In Fluxx, there are two ways to create new user records. The first is for a staff member to manually create a user record provided they have the necessary information to create said user (more on that in the next section).
The second way is for the user who wants the account to register for a WPP-Fluxx account via the links on our Grant Portal Home Page.
Creating a New User Manually (WPP Staff Only)
Creating a new user as a staff member is fairly straightforward and requires that you know only 3 key pieces of information:
- The new user's First Name
- The new user's Last Name
- The new user's Email Address
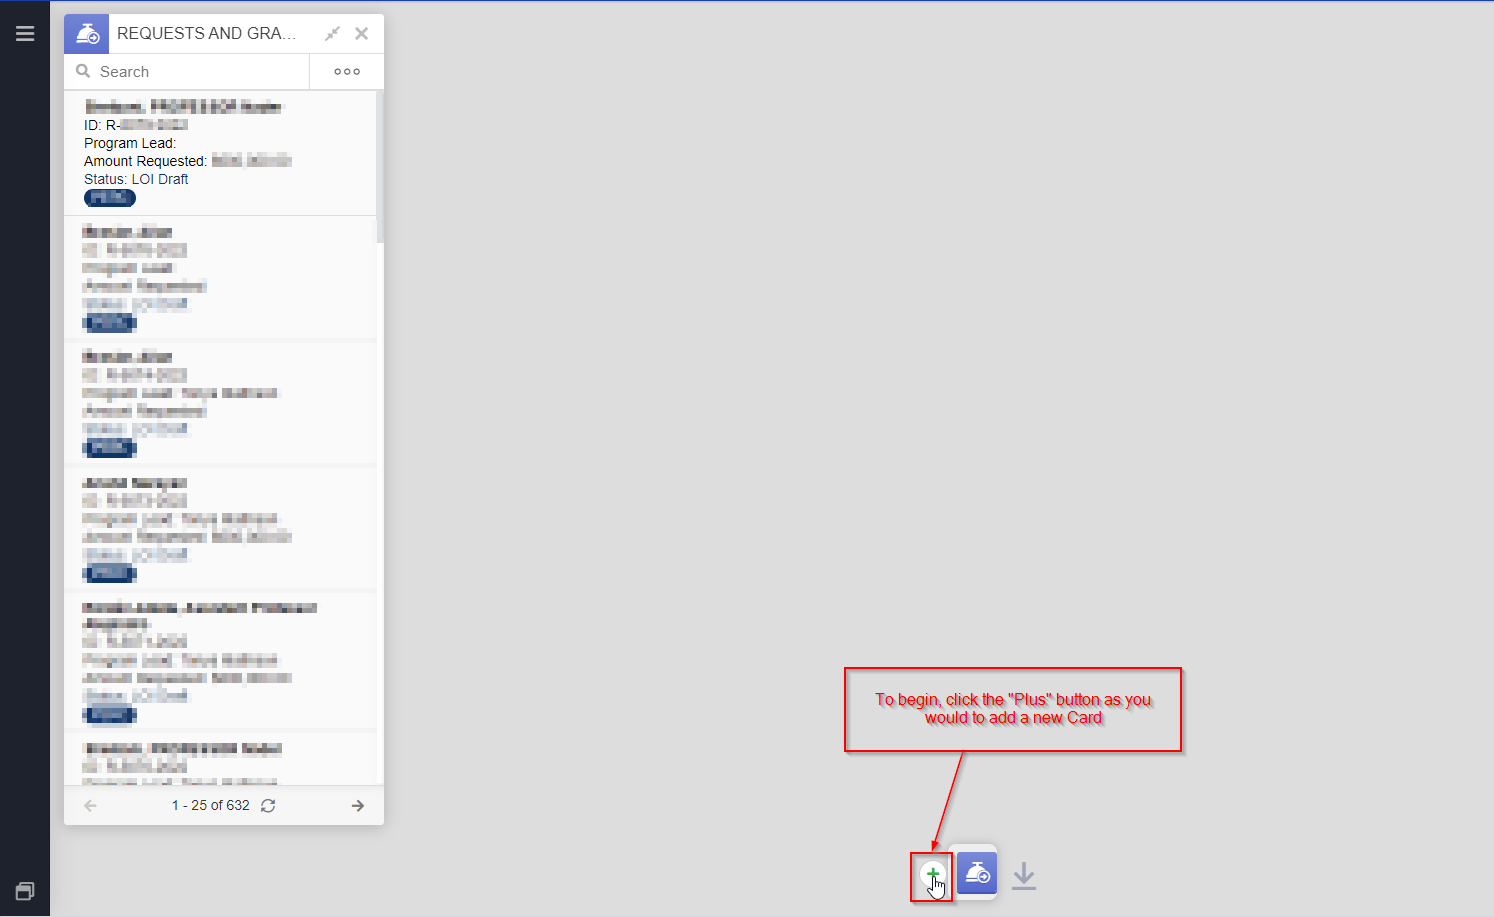
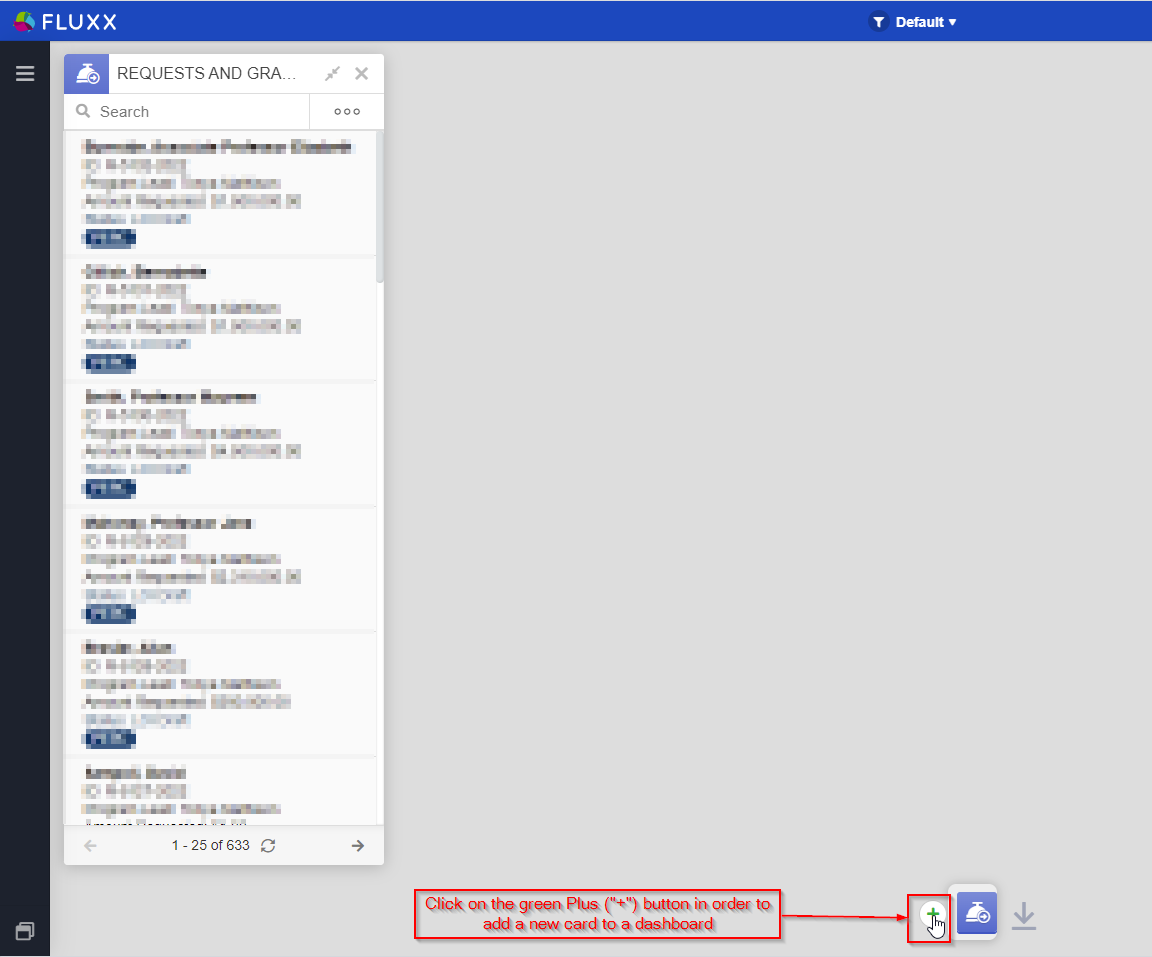
To begin creating the new user, first click the Green Plus button at the bottom of your Fluxx dashboard as you would to add a new card to your dashboard (see screenshot, below).
Once you do so, the normal screen for "Add a Card or Record" will appear. From that window, select the "People" card.
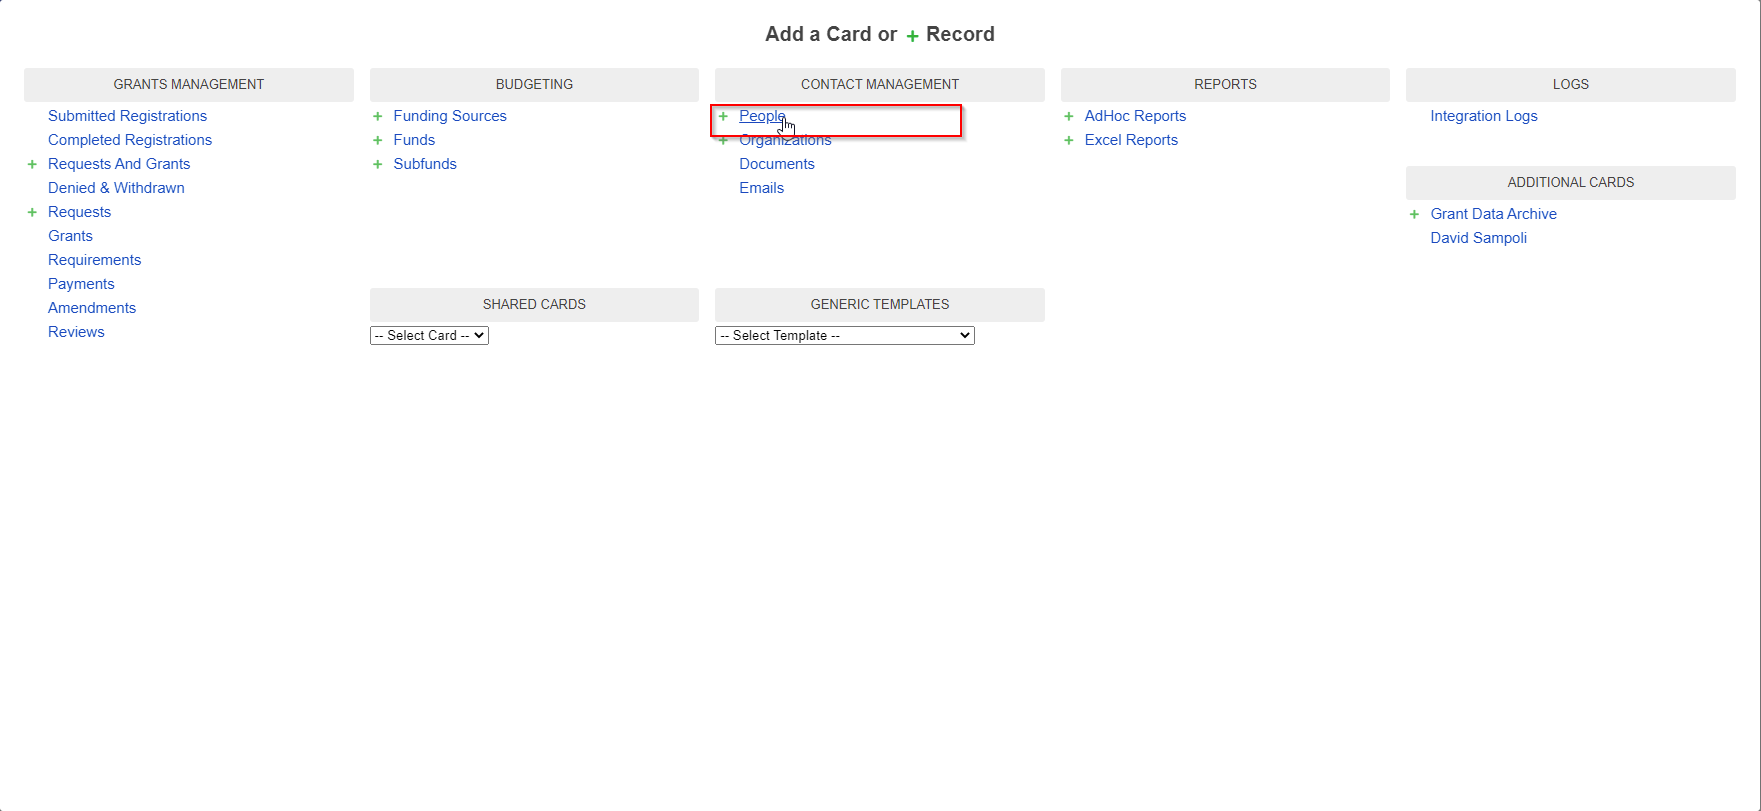
After clicking the "People" card, go ahead and close the "Add a Card or Record" window. You can do so by navigating to the "X" at the bottom of your screen (see also screenshot, below).

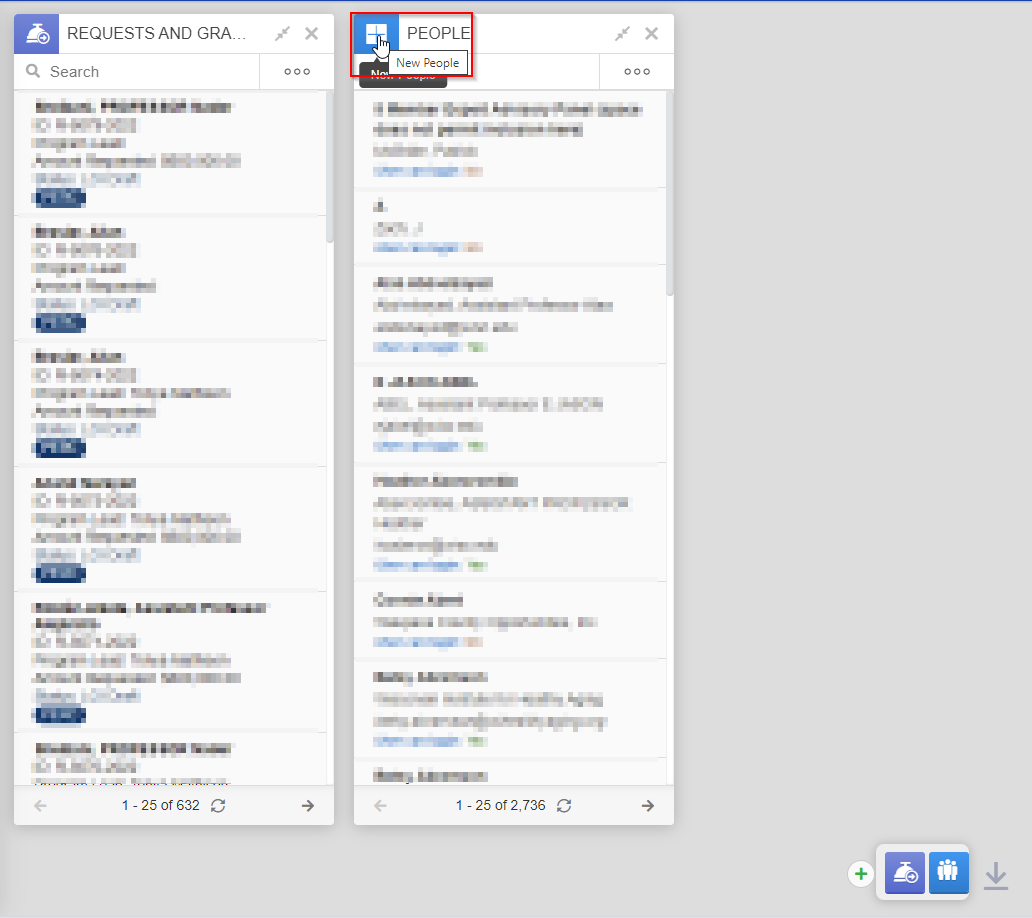
To create the new user, hover over the icon in the top left-hand corner of the "People" card you just added to the dashboard. As your mouse hovers over the icon, the "People" icon will change into a "Plus" sign and a small text box saying "New People" will appear. Click on the plus sign (see also the screenshot, below).
Creating the New User
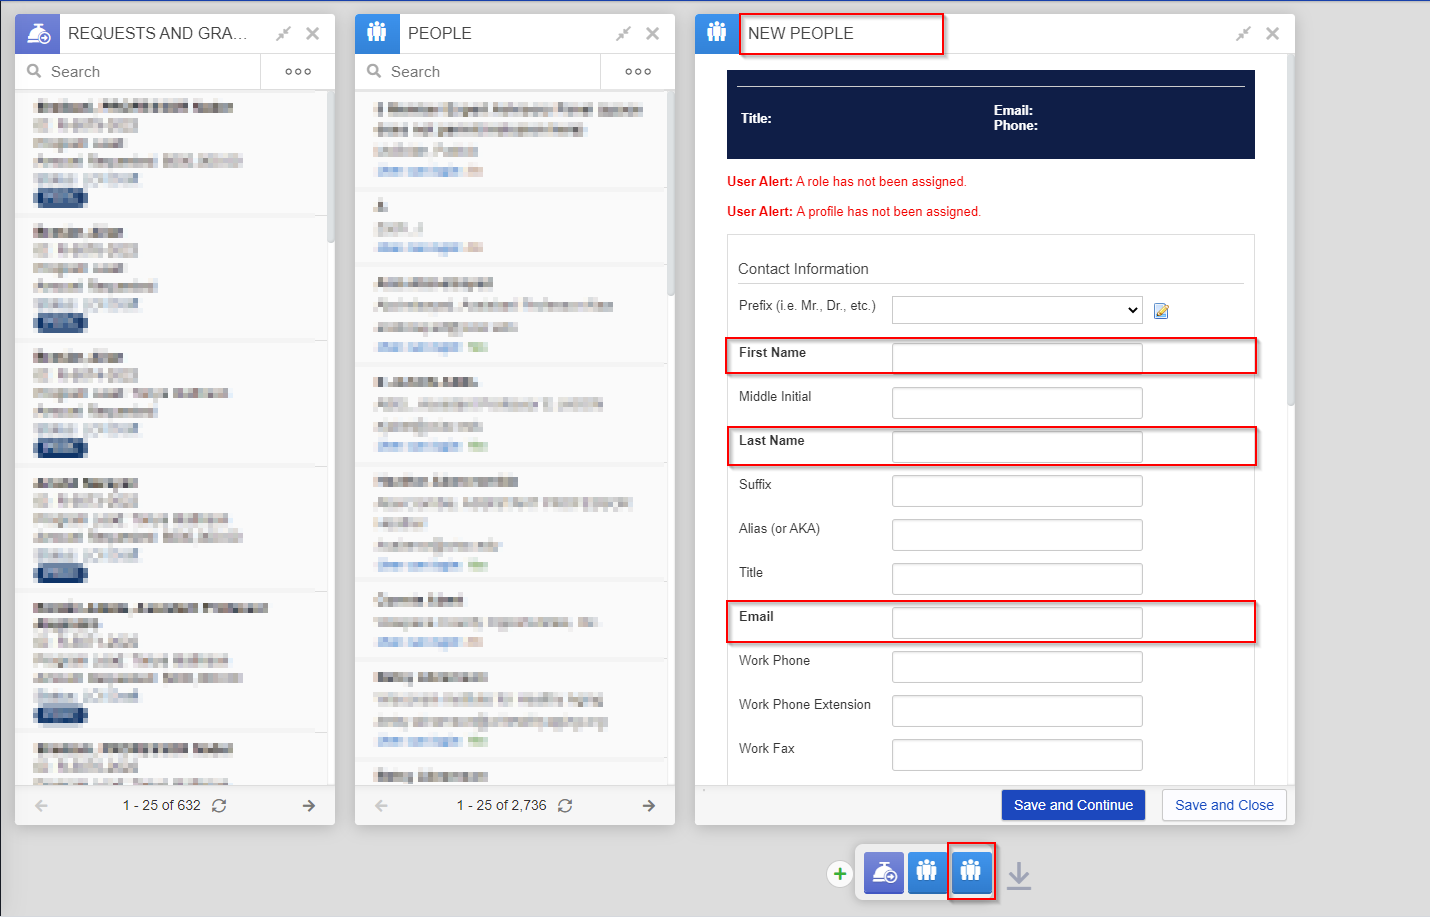
Once you click on the "Plus" icon, a new card will pop onto your dashboard immediately to the right of your first People card and will be called "New People." This is where you will enter the information regarding your new user; all the fields that are bolded (I.e. First Name, Last Name, and Email) are required fields. After you've entered these three fields, keep scrolling down!
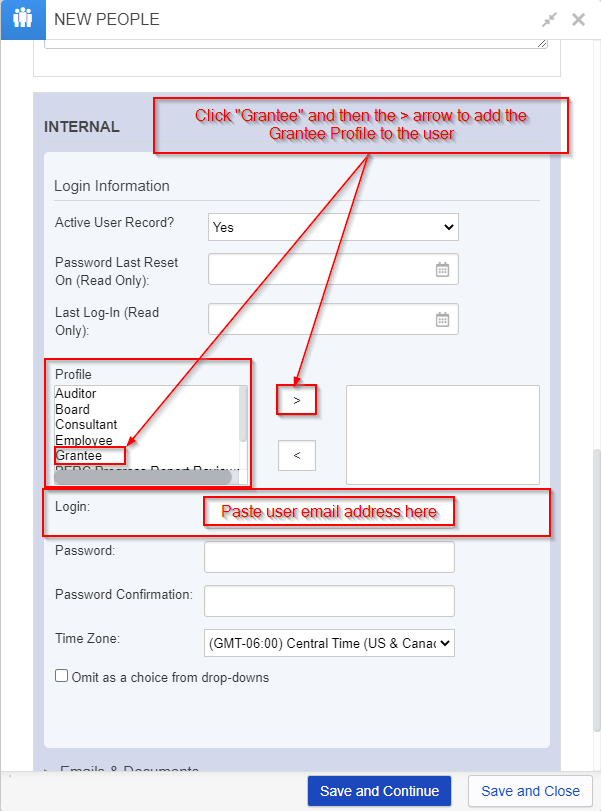
Keep scrolling until you get to the "Internal" section. This is a critical portion of user creation the determines what Portal and what workflows the new user will have access to. The "Profile" section determines what Portal (i.e. Employee, Grantee, Reviewer, PERC Progress Report Reviewer) the user will be able to open. Since the vast majority of our users will just be "Grantees," you'll most likely just have to select the "Grantee" Profile and then select the ">" arrow to move that profile to the right-hand side box (which means it is selected for that user).
Please also review the Roles and Profiles Confluence page for more information on User Profiles. This page also explains what the other Profiles/Portals are used for in case this user does NOT need the grantee portal (or needs the Grantee Portal and another portal).
Additionally, in the "Login" box, paste the user's email address. This will ensure they just need to enter in their email address in order to sign into their account. Once you've done so, click the "Save and Close" button found at the bottom right-hand corner of the card.
There is one final step to manually create a user. After you click "Save and Close," scroll back down to the internal section. The last step to creating this user is to give them a "Program Role." Click Add Role next to "Program Roles" in order to do so (see screenshot, below).

When you click "Add Role," a window will pop up with a "Role" and a "Program" dropdown. Start with the Role. For grantees, role will always be "Grantee." Please see the "Program Roles and User Profiles Definitions" page linked again below for a more complete picture of what each of the "Roles" is used for. Finally, for the "Program" dropdown, always select "All Programs." Never select just "Oversight and Advisory Committee" or "Partnership Education and Research Committee" even if you know that the user will only be working with OAC or PERC.
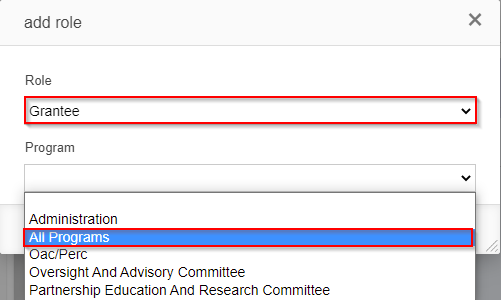
Program Roles and User Profiles Definitions can be found on this page here.
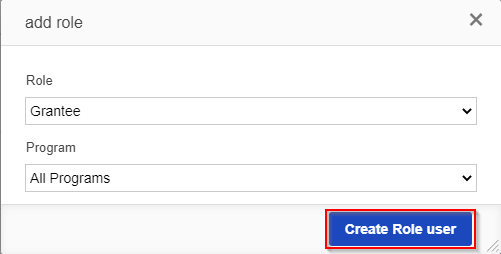
Once you've selected the correct Program Role and the Program "All Programs," click Create Role user. This will add the role to the user in question. That completes the steps for manually creating a new user; now this user will just have to set their password as described in the Grantee Reference Guide in order to activate their account and be able to log in.
Creating a New Organization Manually (WPP Staff Only)
The steps for creating a new organization manually are similar to those for creating a new user manually. Follow the steps laid out here below to see how to do so.
To create a new organization record, only one field is required: Organization Name. That said, we like to have the following fields filled out (when applicable) for all organizations:
- Organization Name
- Street Address
- Street Address 2 (if applicable)
- City
- Country (always pre-populated with "United States")
- State/Province (almost always "Wisconsin")
- County (almost always one of the counties in Wisconsin)
- Postal/ZIP Code
- Organization Phone Number (can be principal investigator's phone number)
- Organization Fax Number (can be principal investigator's fax number if applicable; a lot of folks are removing their fax machines these days so this one is very optional)
- Organization Email (can be principal investigator's email address)
- Website (for OAC organizations that have a dedicated website, ignored for PERC)
- Tax ID (critical for OAC organizations, but no PERC organizations will have a tax ID)
- Primary Contact
Before you begin creating the new organization, make sure you have all of the pieces of information relevant for your type of organization (i.e. Tax ID for an OAC organization, UW office address for a PERC organization, etc.)
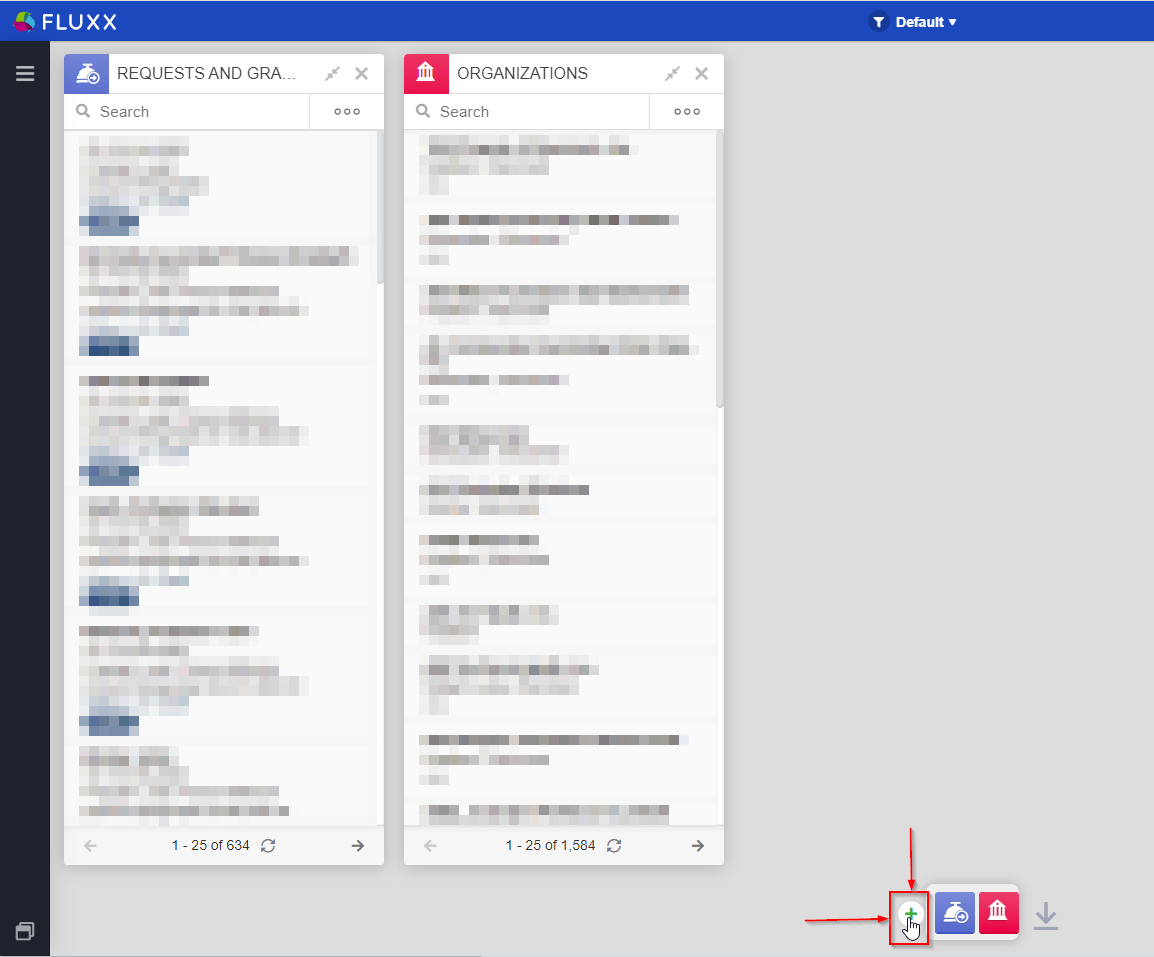
To begin, first click the Green Plus ("+") button at the bottom of your Fluxx dashboard as you would to add a new card to your dashboard (see screenshot, below).
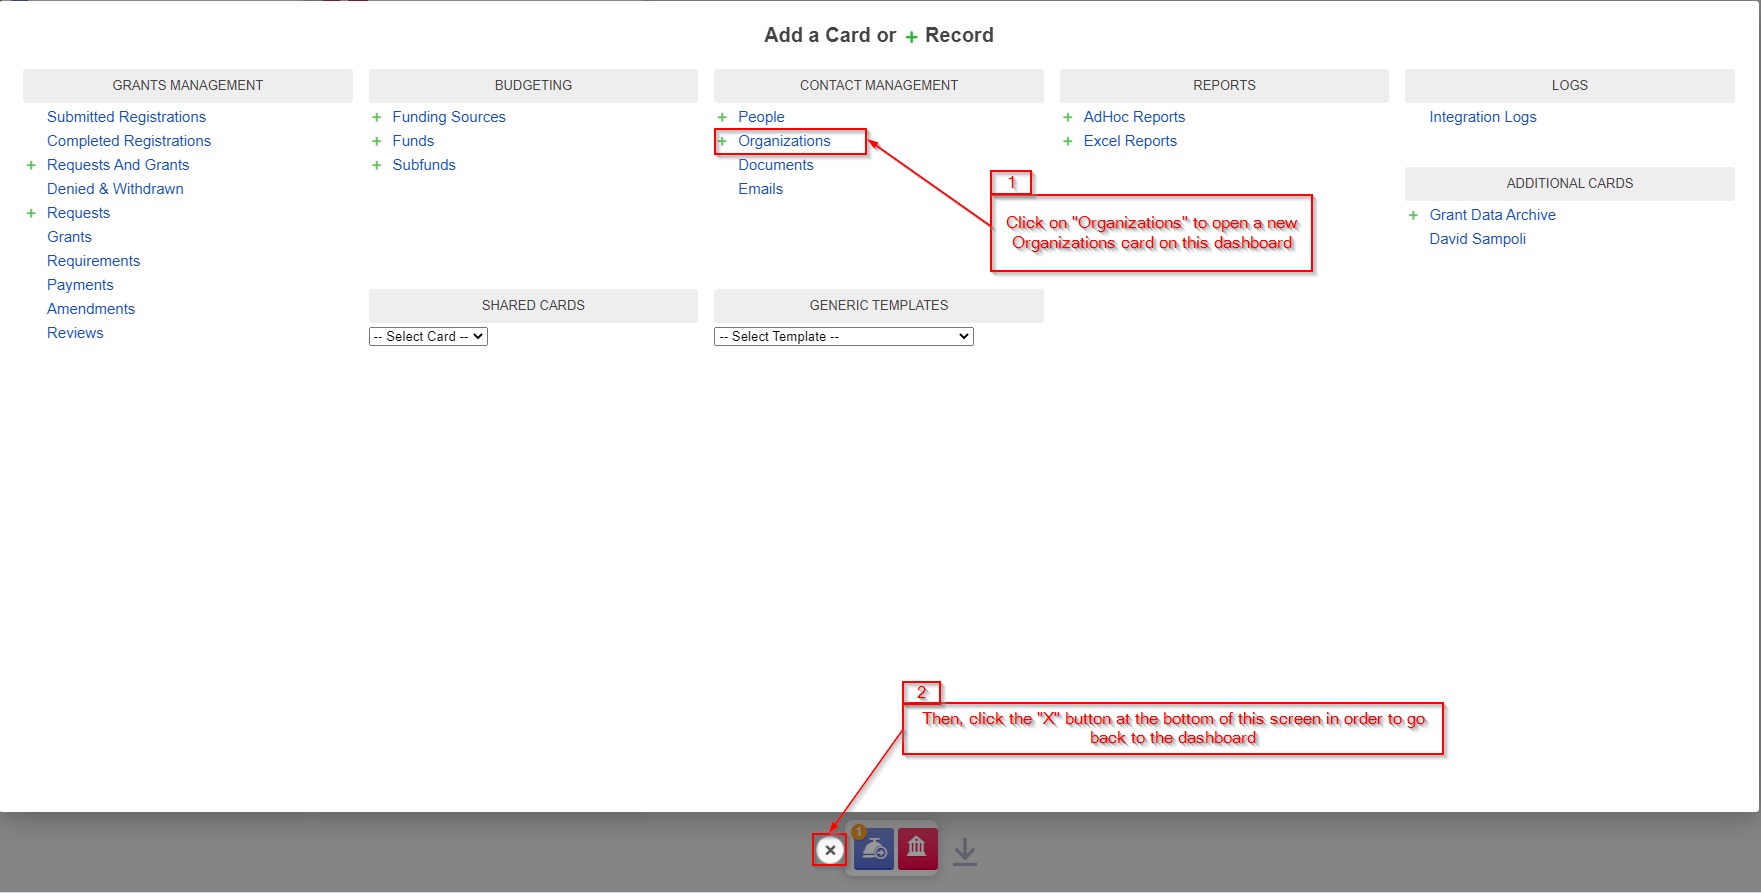
Once you do so, the normal screen for "Add a Card or Record" will appear. From that window, first select the "Organizations" card. Then, to close the window and go back to the dashboard, click the "X" button at the bottom of the screen (see also the screenshot below).
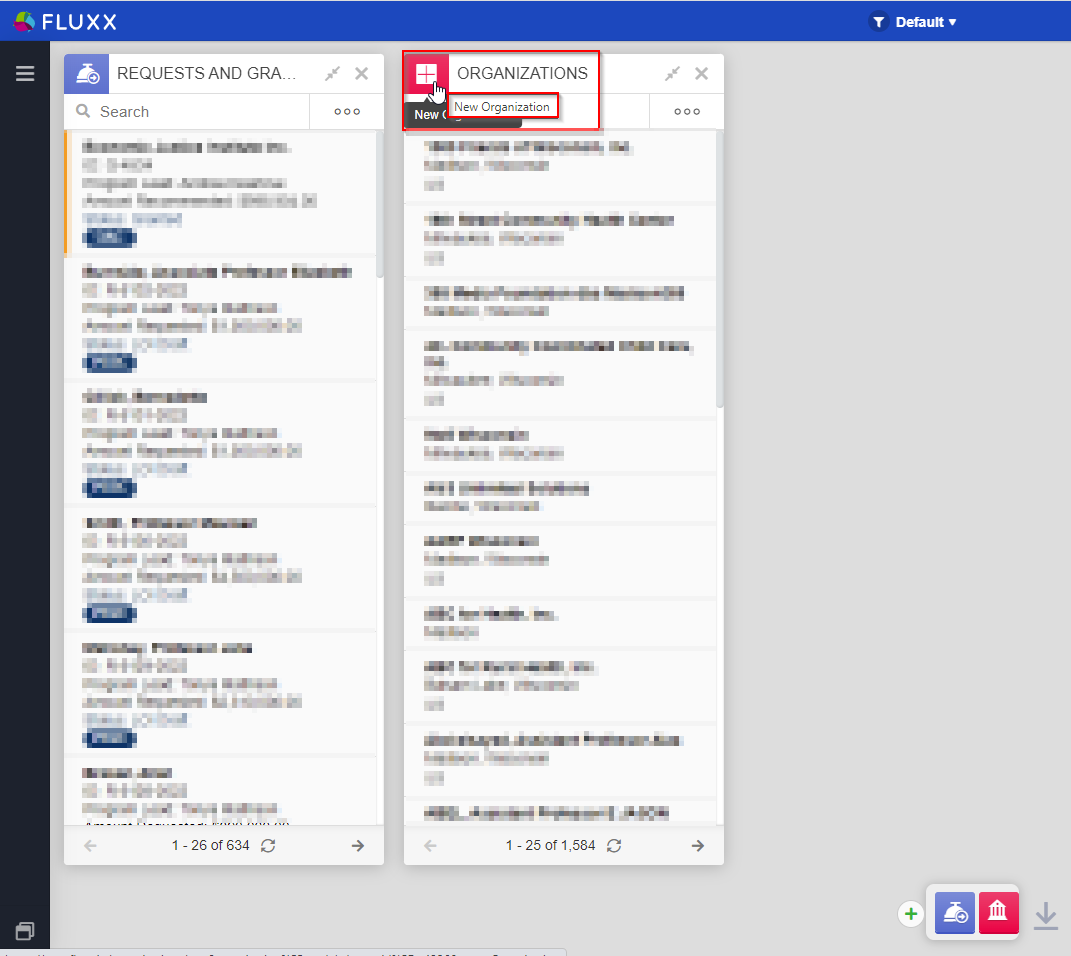
Once you click on the "X," you'll be taken back to the dashboard. To create the new organization, hover over the icon in the top left-hand corner of the "Organizations" card you just added to the dashboard. As your mouse hovers over the icon, the "Organizations" icon will change into a Plus ("+") sign and a small text box saying "New Organization" will appear. Click on the plus sign (see also the screenshot, below) in order to begin creating the new record.
Creating the New Organization
Clicking the Plus ("+") will pull up a new card to the right of "Organizations" called "New Organization." This is where you'll enter in the information of the organization you wish to create. The field "Organization" is the Organization's name; this is the only field that is technically required, though it's worth noting that the we like to have most of (if not all of) these fields filled out for data integrity's sake.
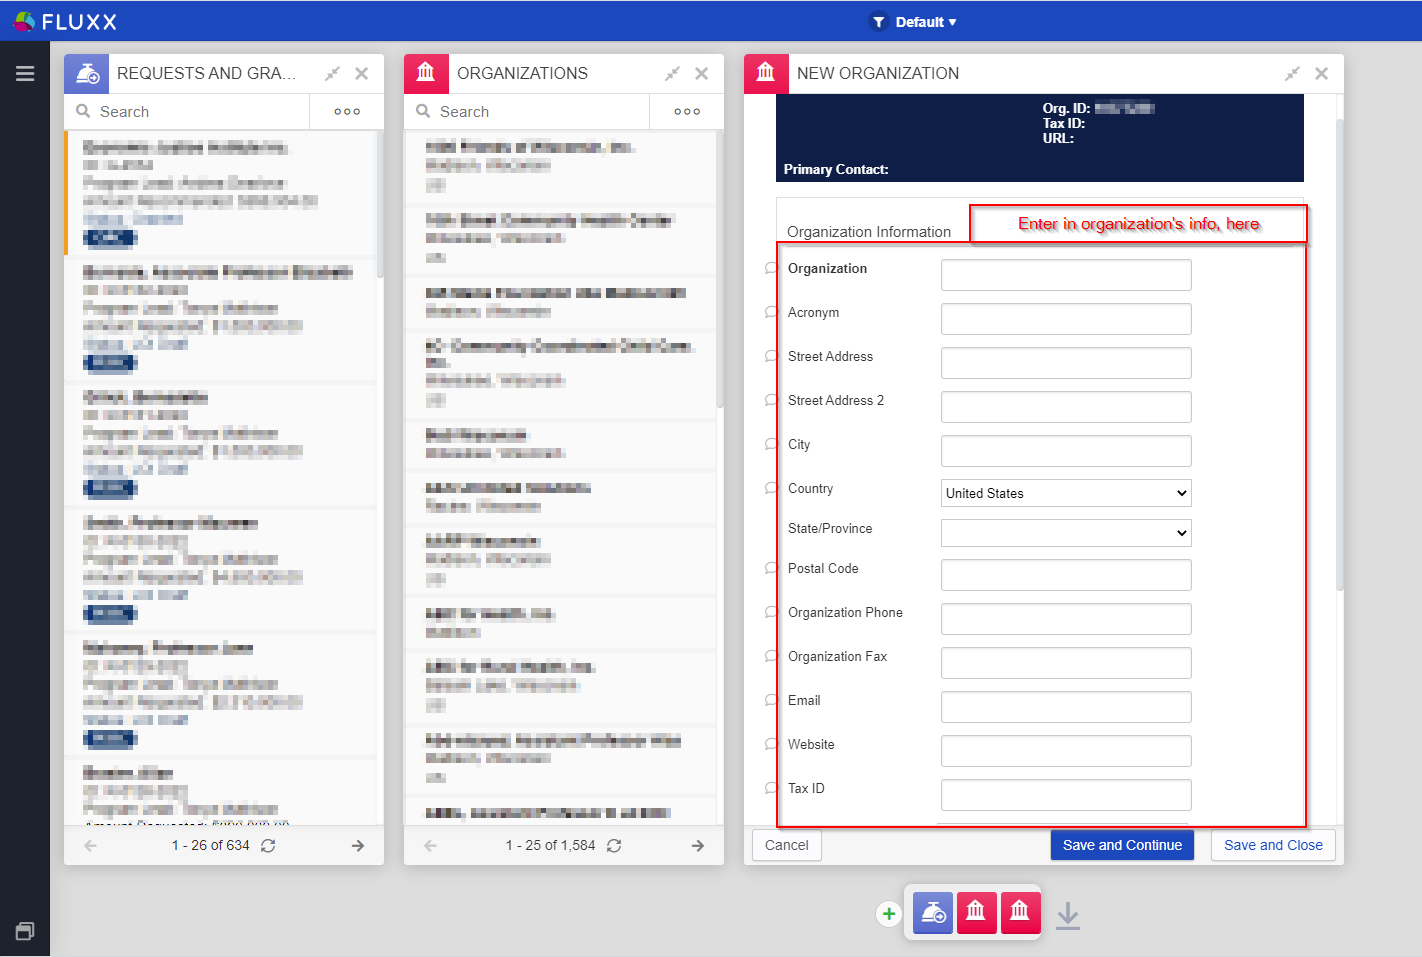
Once you've filled out all relevant fields on the form, click the "Save and Close" button in order to create the new organization record.
Linking Your New Organization to a User
Now that you've created the new organization record, you'll need to link it to a user in order for that organization to be able to come through on an application. To link your new organization to a user, you'll first have to pull up a user record.
Add a user card to your dashboard. As you did previously to add a card to your dashboard, navigate your mouse down to the Green Plus ("+") button at the bottom of the screen and click on it.
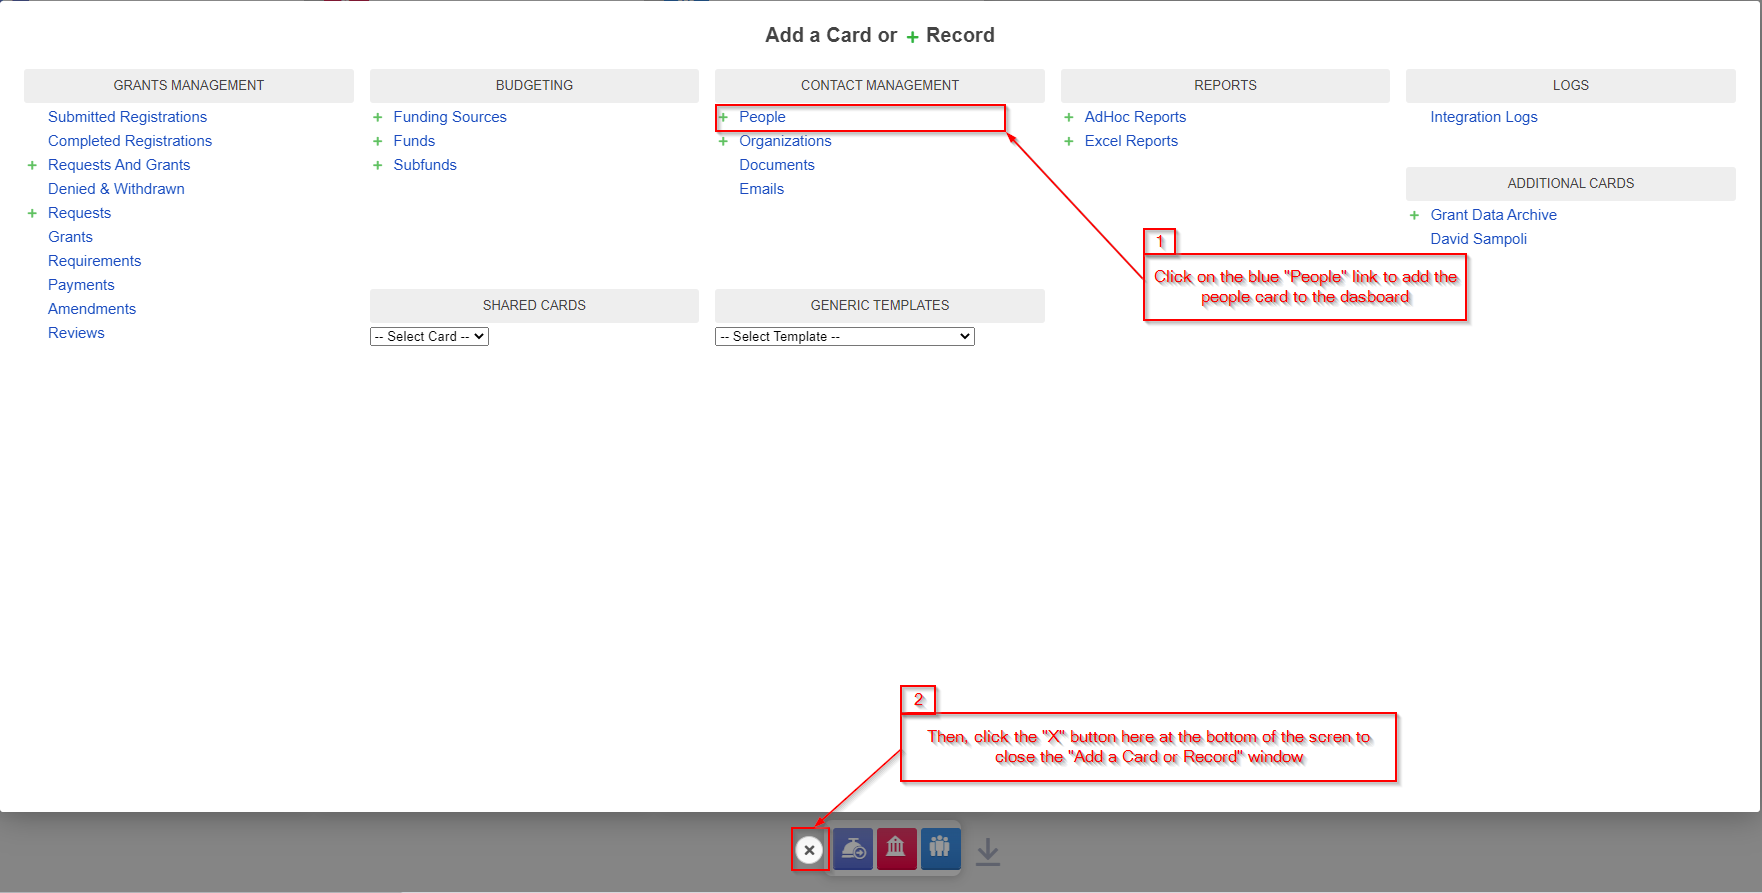
After you click the Plus button, the normal screen for "Add a Card or Record" will pop up. To add the people card to your dashboard, click on the blue "People" link from that screen and then navigate down to the "X" at the bottom of the screen and click it to close the window. See also the screenshot, below.
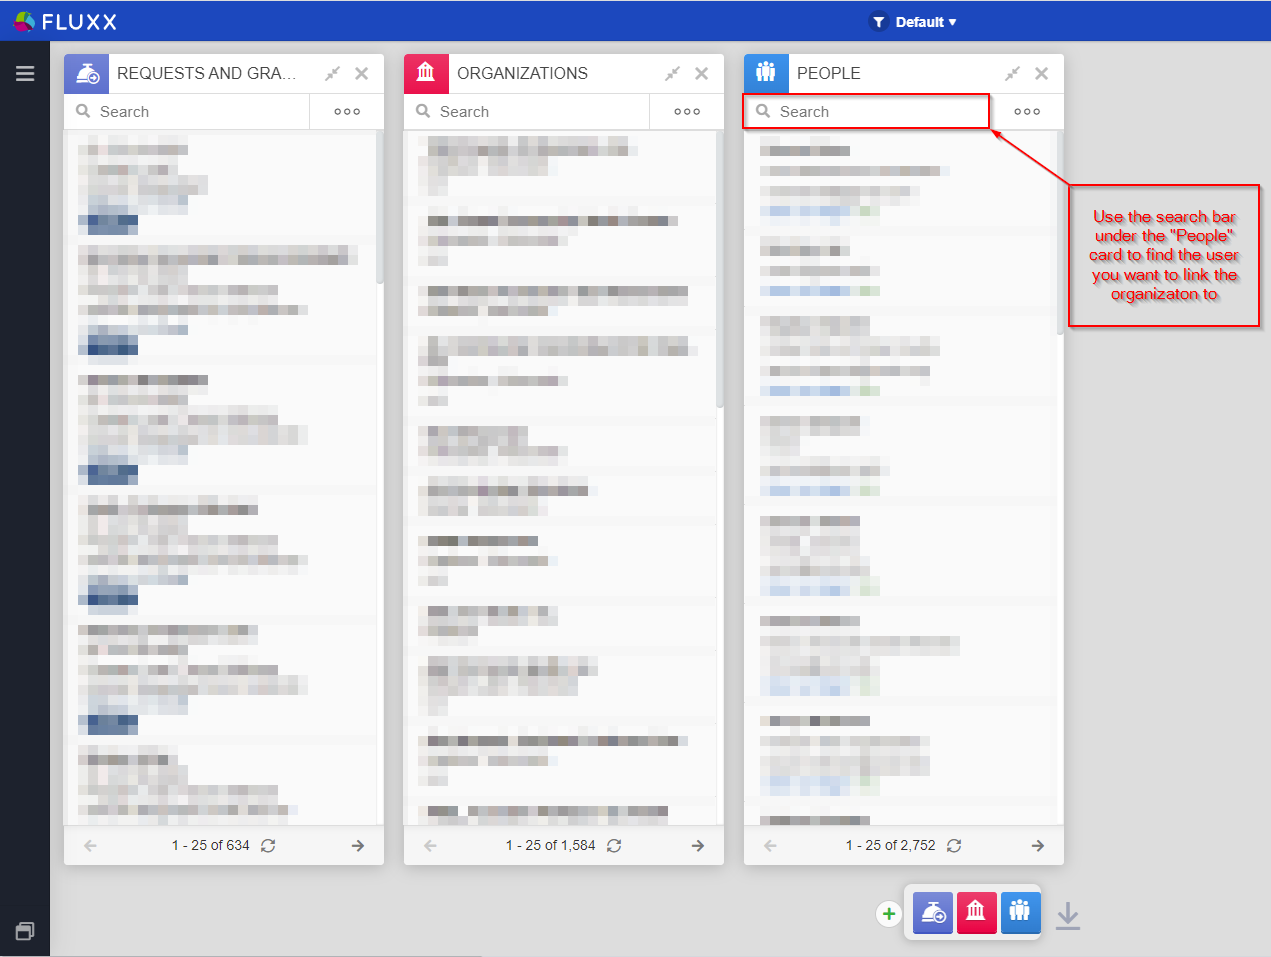
When you close the "Add a Card or Record" window, you'll be brought back to your dashboard which will now contain the "People" Card you just added. To link your new organization record to the desired user, first find the user using the search bar under the People card (see also the screenshot below). You can search based on First Name, Last Name, First + Last Name, email address, etc.
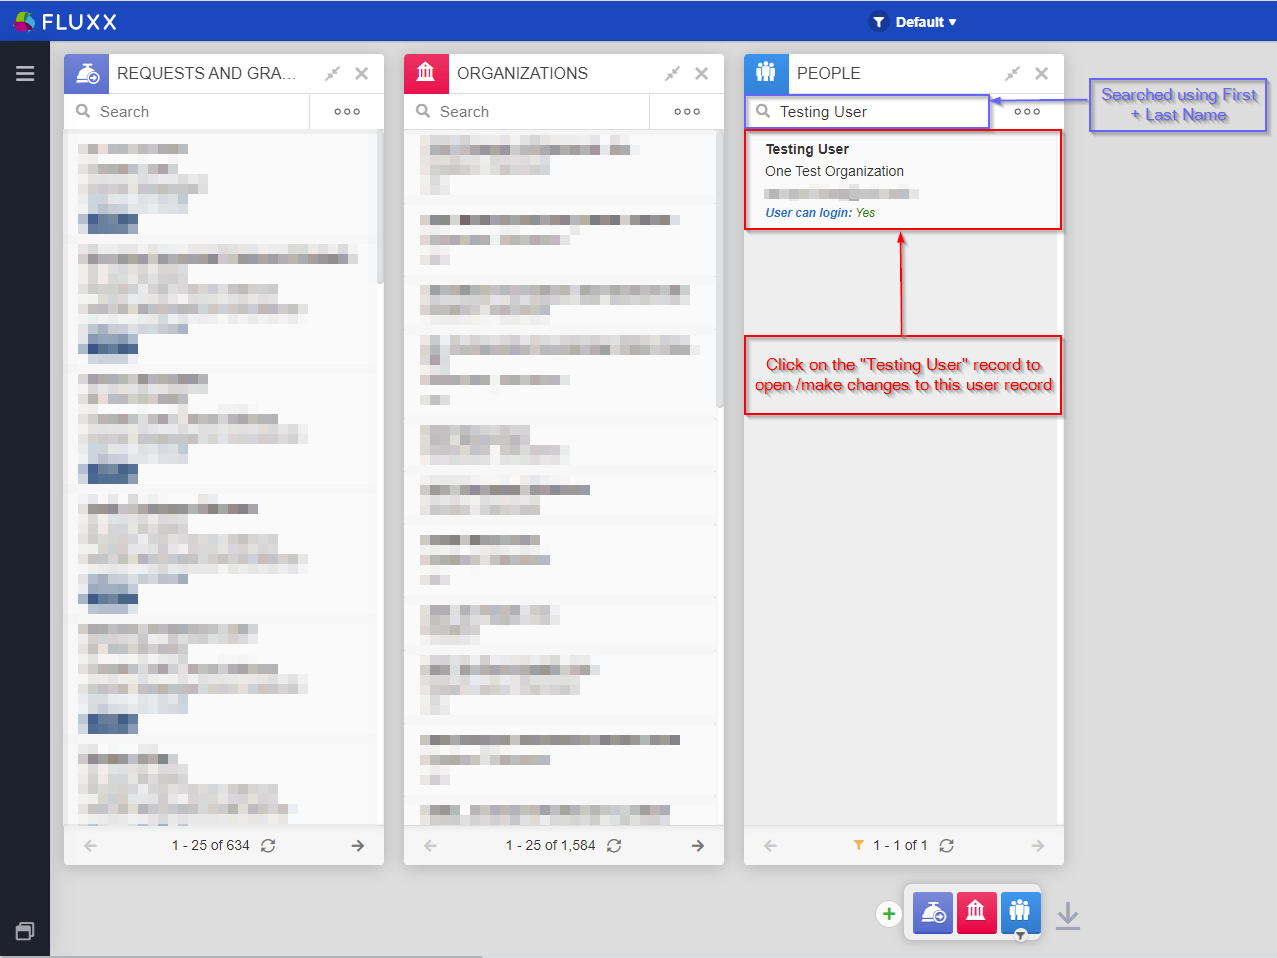
For this example, I searched using First + Last Name for a certain "Testing User." As in the screenshot, below, click on area boxed in red (the record for "Testing User" to begin linking the user with your newly created organization.
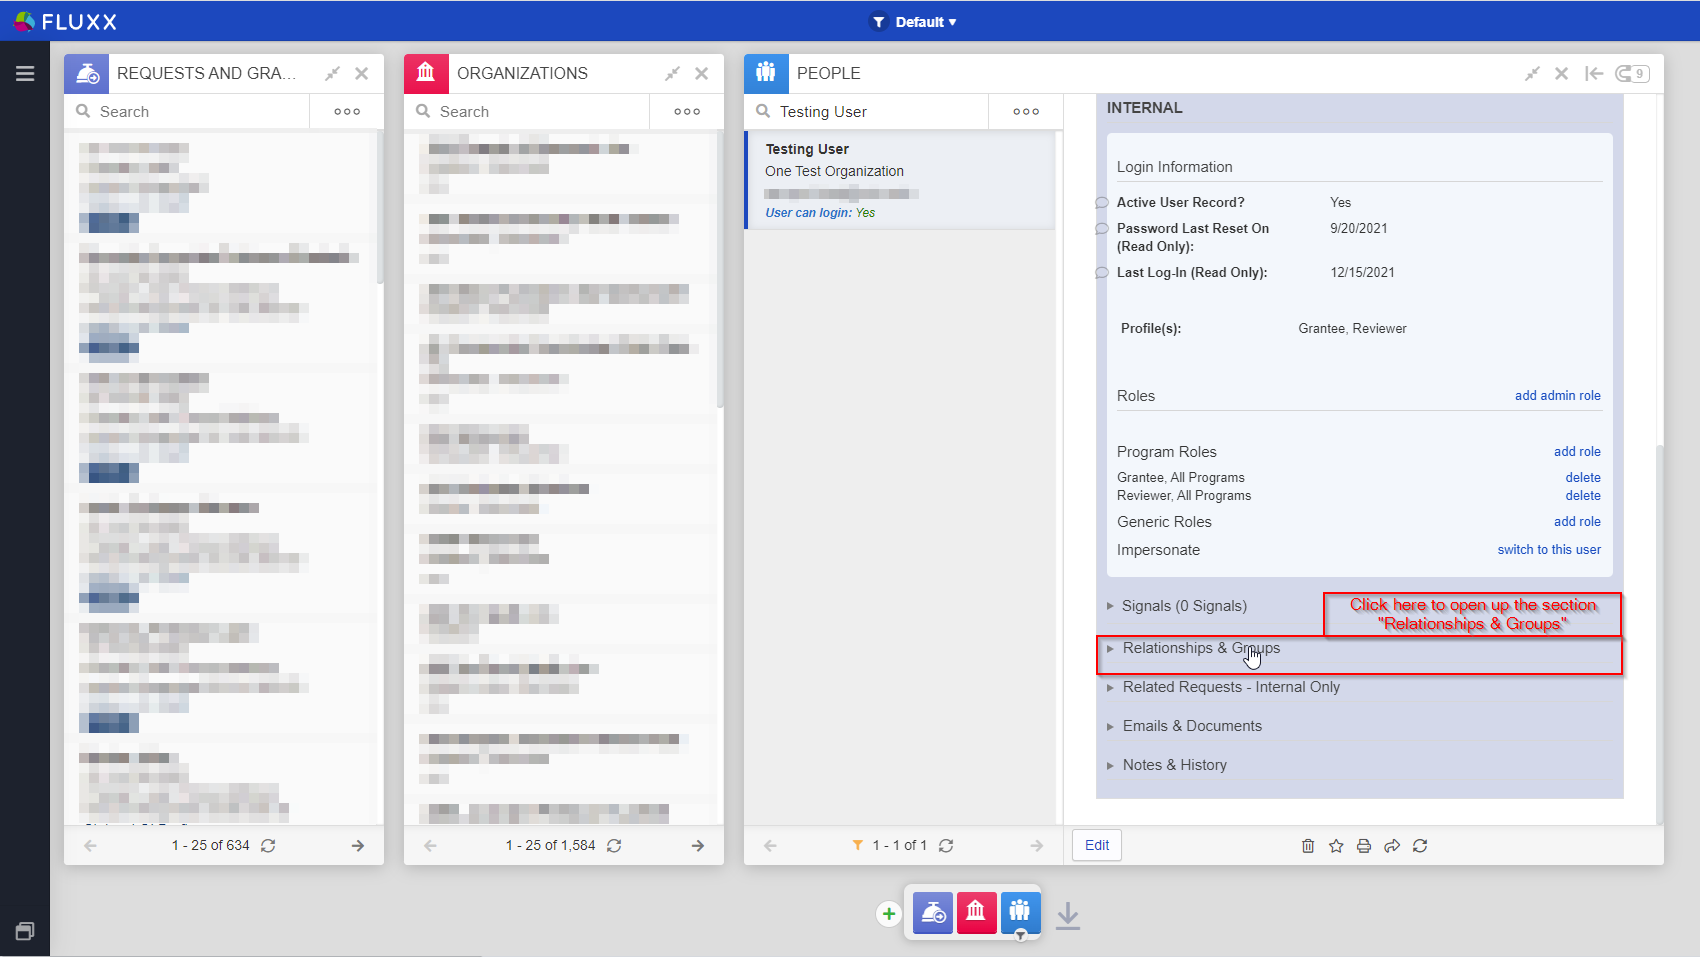
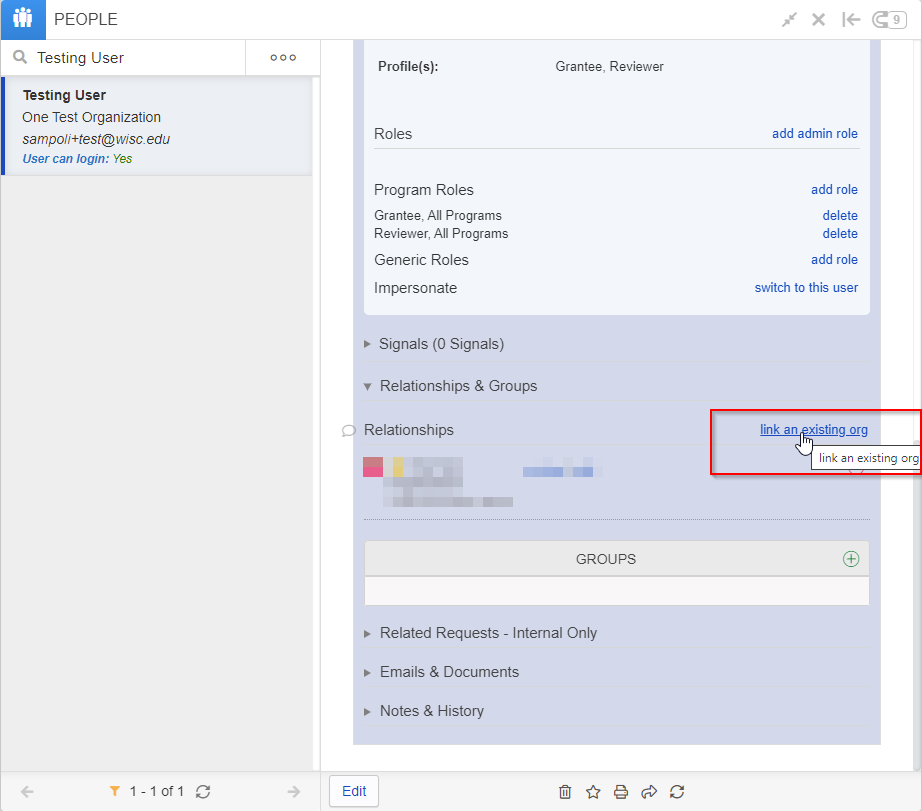
Once you've gotten towards the bottom of the screen, you'll see a collapsed section called "Relationships & Groups." Click on the title of the section ("Relationships & Groups") as in the screenshot below in order to open/uncollapse the section.
Now for the final steps. When the "Relationships & Groups" sections opens, navigate over to the "link an existing org" blue hyperlink as in the screenshot below. Click on that link.
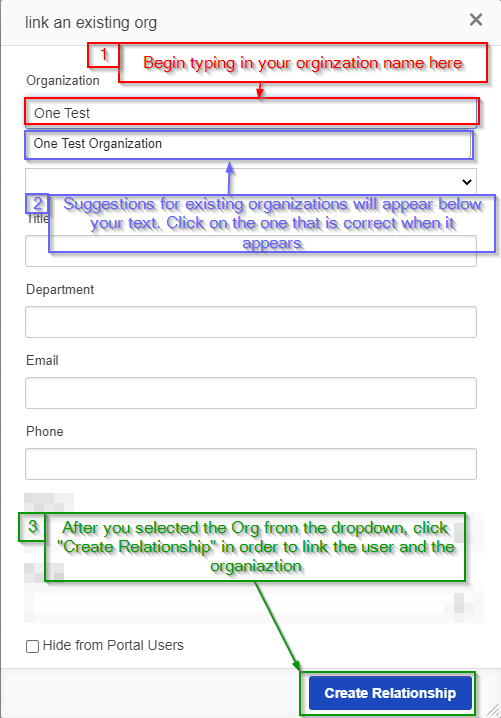
After clicking the link, a window titled "link an existing org" will come up. Under "Organization," begin typing in the name of your newly creating organization. As you type, suggested extant organizations will display below the text box; when you see your organization in the list of suggestions, click on it. Finally, navigate to the bottom of the window and click "Create Relationship." This will link the user in question with the organization record you selected.
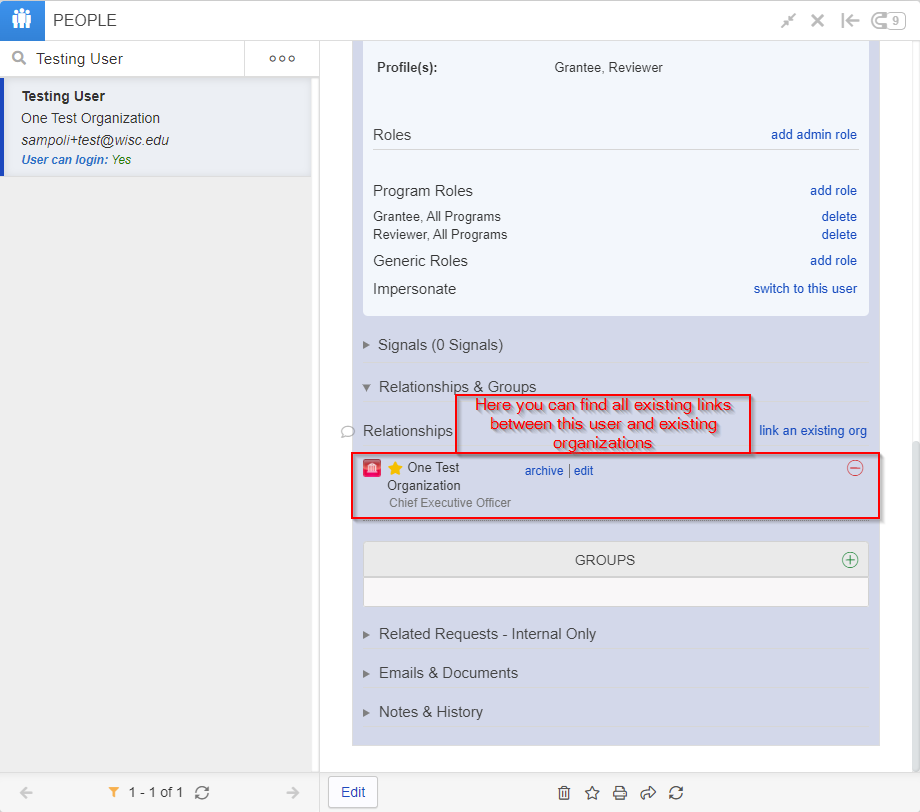
To validate that the user was correctly linked to the organization, you can re-open the "Relationships & Groups" section and look underneath the "Relationships" header; below it, you'll find the list of Organizations currently linked to this user. See also the screenshot, below.
Setting a User as the "Primary Contact" for an Organization
Now that the user is linked to the organization, we can set the user as the "Primary Contact" on the organization record. Note: If NO users are linked to an organization, you won't be able to set a primary contact; at least 1 user must be linked to an organization for that organization to have a primary contact.
Before we begin, what is a "Primary Contact" for an organization?
- From a technical standpoint, the "Primary Contact" does not change any functionality. For example, even if a user isn't the "Primary Contact," they can still start a Grant Application for that organization and can be listed as the "Primary Contact" (Principal Investigator) for that specific application.
- Instead, the "Primary Contact" is more for our staff's usage; the listed "Primary Contact" in general should be the person with whom staff members will interact most frequently regarding that organization and its applications/grants.
- It is worth noting that Fluxx is flexible enough to track several contacts for one application or grant, so that the system can email everyone associated with a proposal and NOT just the primary contact.
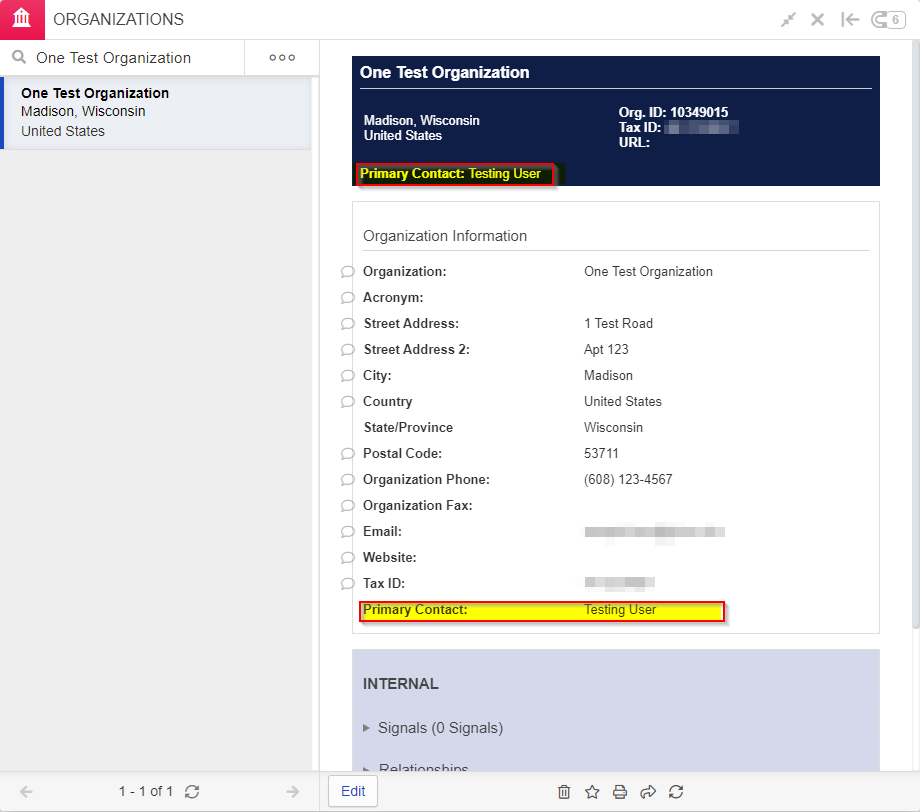
To set the primary contact, navigate back to the organization record you created. From the header, you can quickly see whether or not the Organization already has a primary contact (in the screenshot below, the organization does not). In order to add a primary contact or change the existing one, navigate to the "Edit" button at the bottom of the Organizations Card (see also the screenshot below).

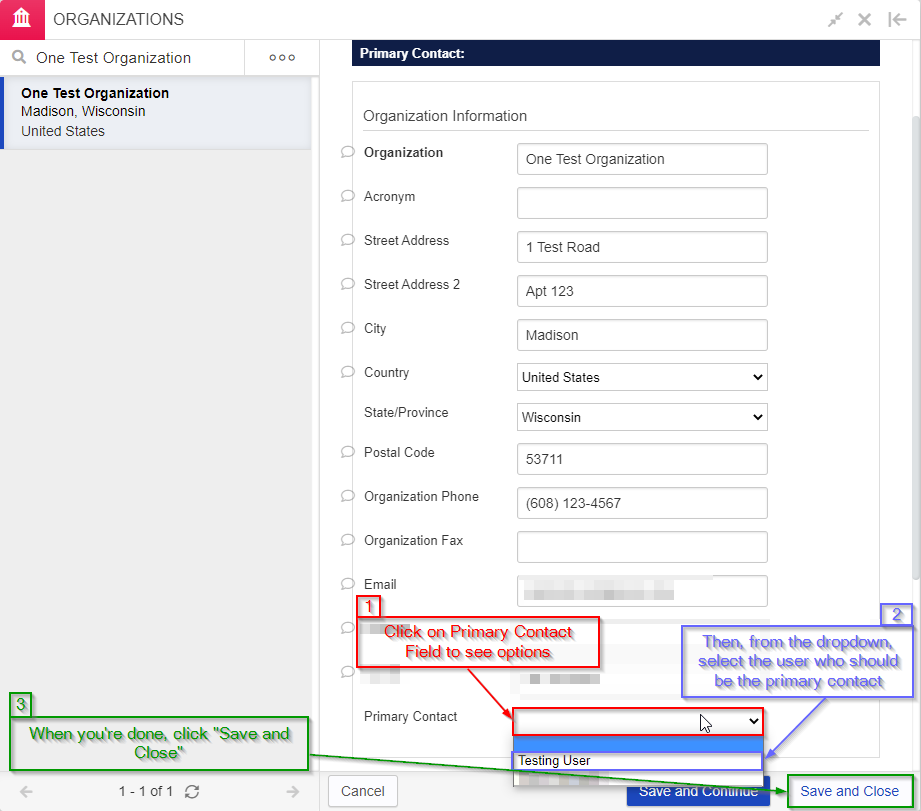
When you click the edit button, all the fields will open up for editing. Scroll down on the form until you see the "Primary Contact" field (the last field before the Internal section). In order to change/add a primary contact, click on the field (# 1 in the screenshot below) – this will cause a dropdown menu to display with all of the users that are linked to this organization. From the dropdown menu, click on the user who you want to be the Primary Contact (#2 in the screenshot below). After you've done so, you can click "Save and Close" button to save the change and exit from editing mode (# 3 in the screenshot below).
After you click "Save and Close," you'll be able to validate that the new primary contact saved to the record correctly. As in the screenshot below, the Primary Contact should now display in the Organization Header and as the last field on the form.
Registering as a New User
If a potential grantee would like to apply for a grant, they can simply go ahead and register for an account within our system. This will get them most of the way to having their own account in Fluxx with limited WPP staff intervention.
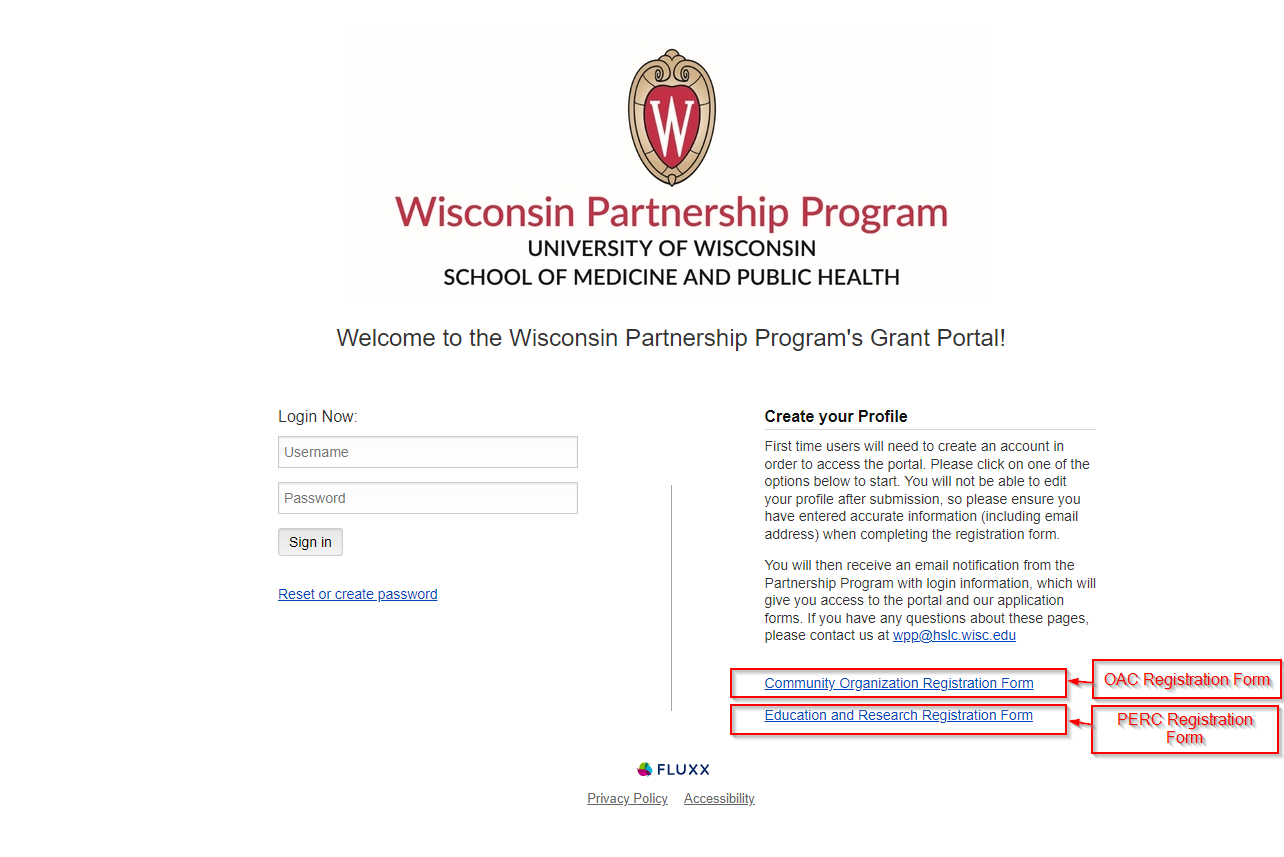
The begin the process of registration, the potential grantee would first navigate to the WPP Grantee Portal home page and click on one of the links on the right-hand side of the page (see also the screenshot below). The first link leads to the OAC Registration Form and the second link leads to the PERC Registration Form.
These forms differ in what questions they ask. Let's look at each of them in order.
OAC Registration Form
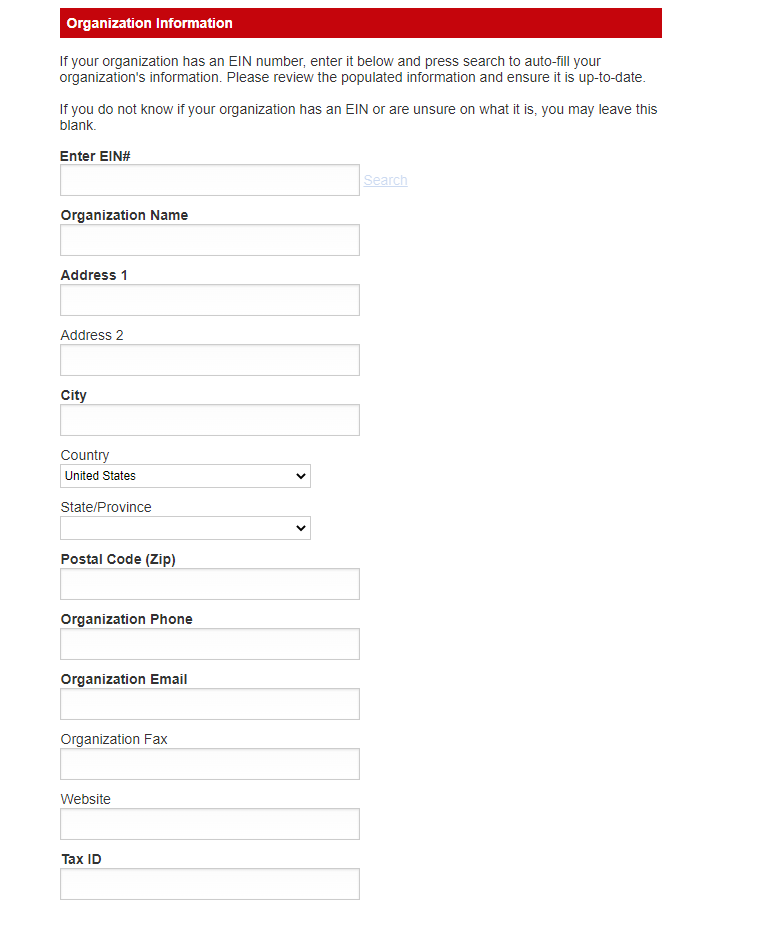
The OAC Registration Form is split into two sections. The first is the "Organization Information" section, which asks various questions about the community organization that is requesting funding, such as the organization's name, street address, city, postal code, and tax ID.
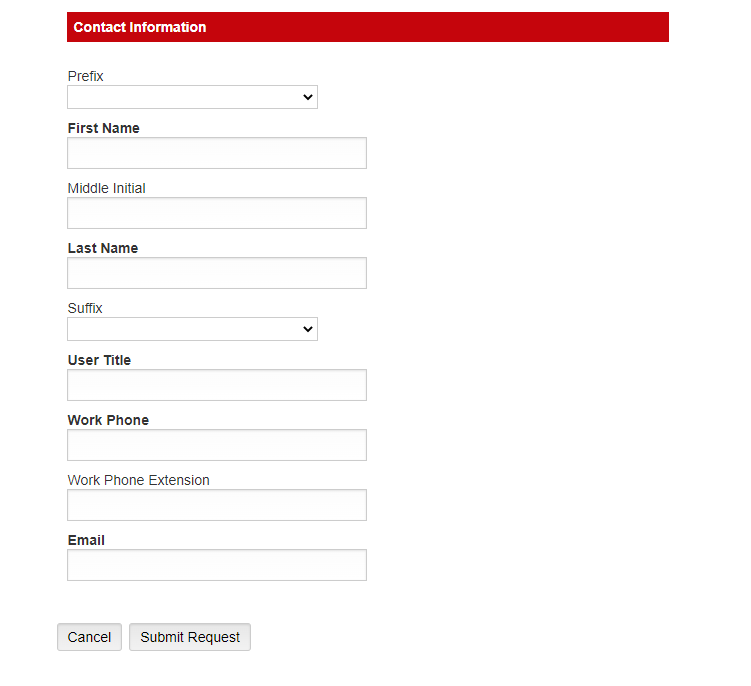
The second is the "Contact Information" section which asks various questions about the specific person who is registering in the system, such as their first and last names, their work phone number, and their email address. Once they have filled out the required information, potential grantees will click the "Submit Request" button. This will send an email to several WPP Staff members letting them know that a user registration has been submitted.
PERC Registration Form
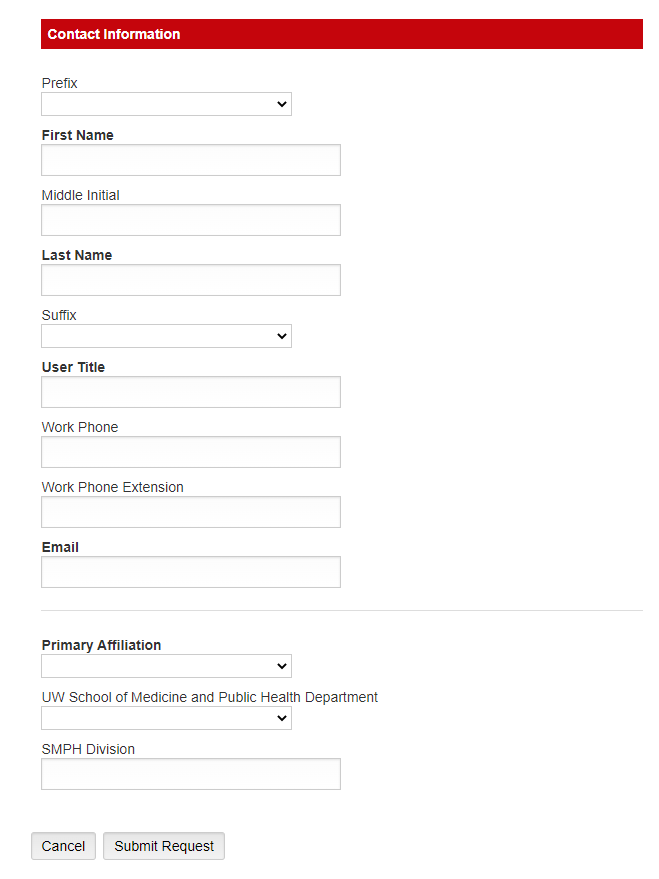
Unlike the OAC Registration Form, the PERC registration form consists of just one section, "Contact Information" which asks questions about the specific person who is registering in the system, such as their first and last names, their work phone number, and their email address. Since in our system, PERC PIs are linked to their own unique "organizations," we do not ask any questions about the organization they are requesting funds for. Once the potential grantee has filled out the required information, they will click the "Submit Request" button. This will send an email to several WPP Staff members letting them know that a user registration has been submitted, just as with the OAC Registration Form.
Completing a Registration Once It's Been Submitted (WPP Staff Only)
If as a WPP Staff member you received an email letting you know that a user has submitted a registration, you can Complete that registration and help the user to get their new account activated by taking the following steps.
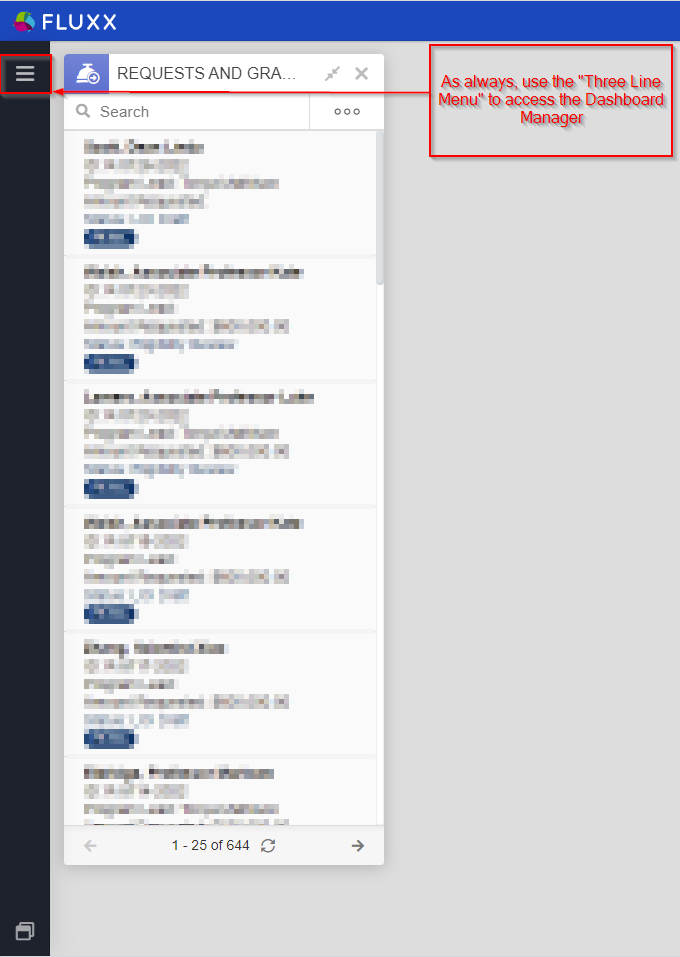
First, head over to the dashboard "1. Registration Dashboard." You can do so by first clicking on the "Three Lines Menu" in order to access the Dashboard Manager (see also the screenshot below):
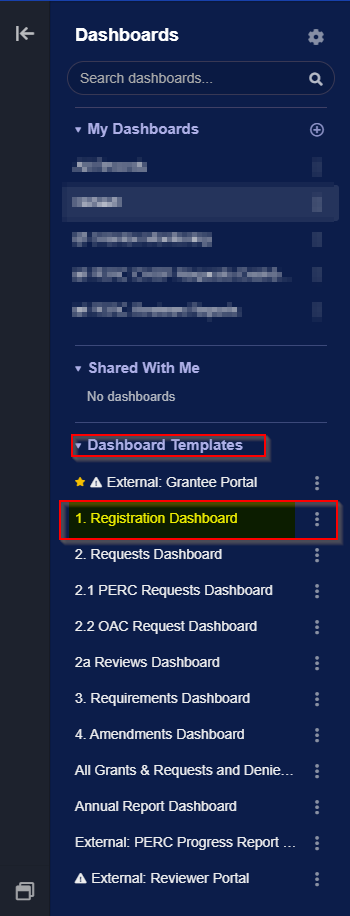
Clicking on the three lines menu will cause the screen found below to appear on the left-hand side of your screen. From the "Dashboards" menu, navigate down to the "Dashboard Templates" and select the template "1. Registration Dashboard" (see also the screenshot below).
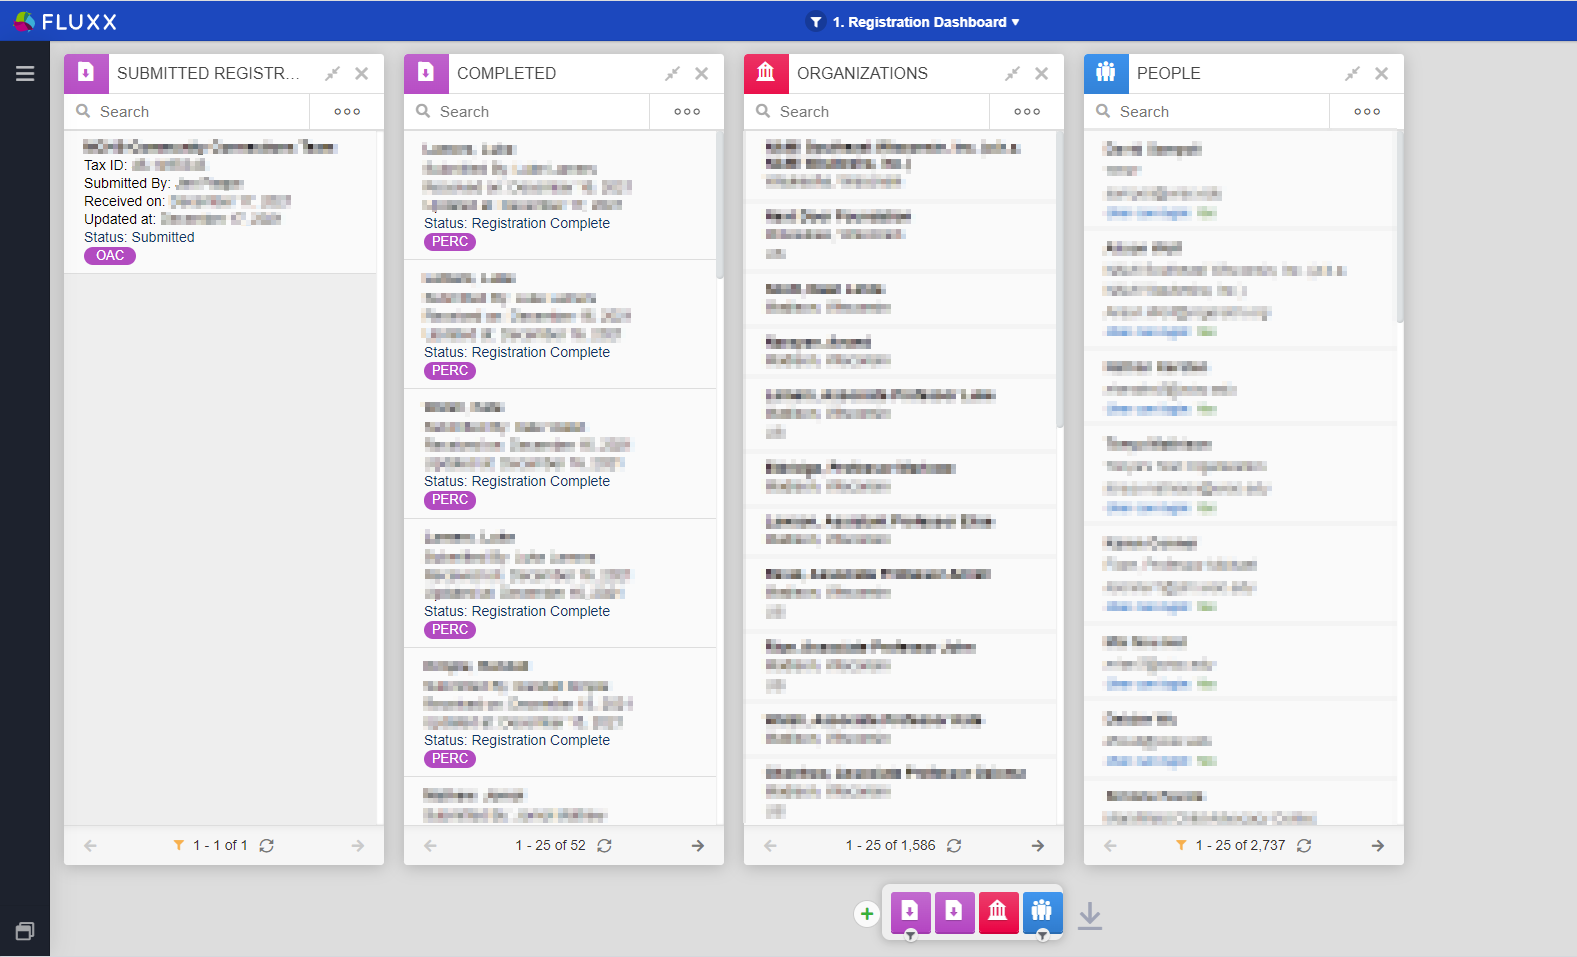
Once you click on the Dashboards name, the system will load the Dashboard itself. The dashboard should appear as in the screenshot, below, with four cards: Submitted Registrations, Completed Registrations, Organizations, and People. See also the screenshot, below.
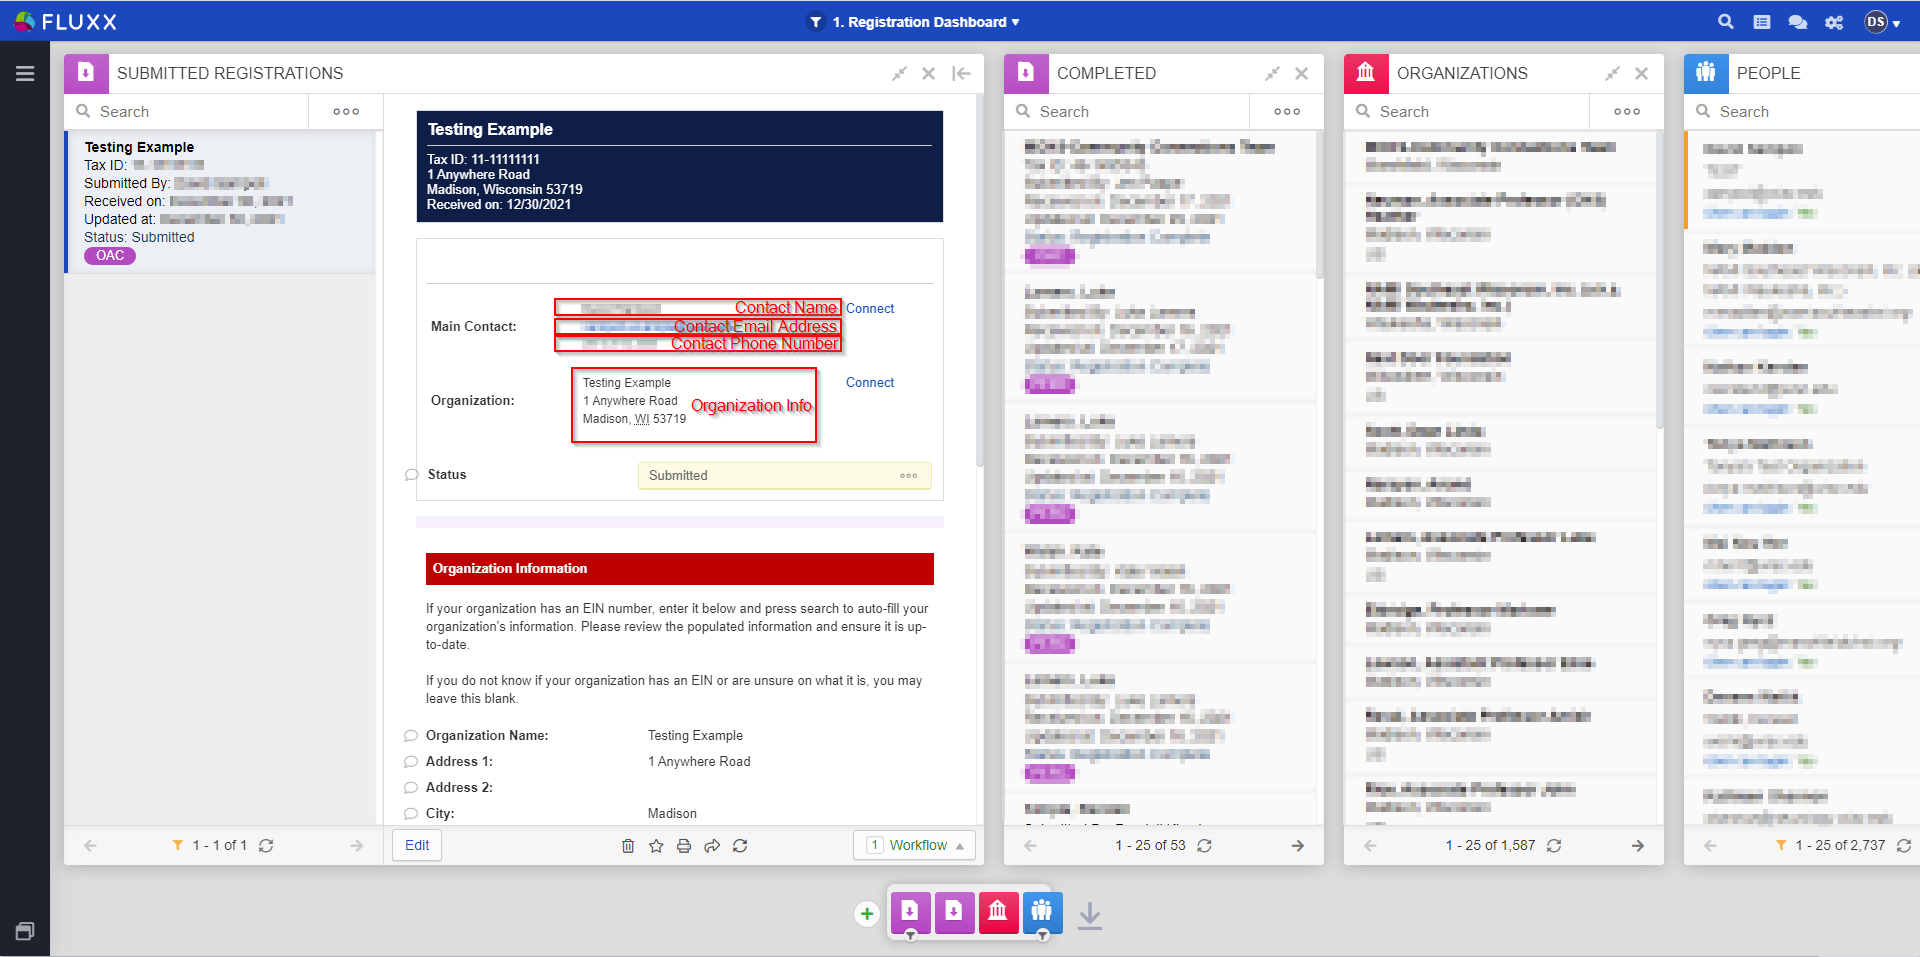
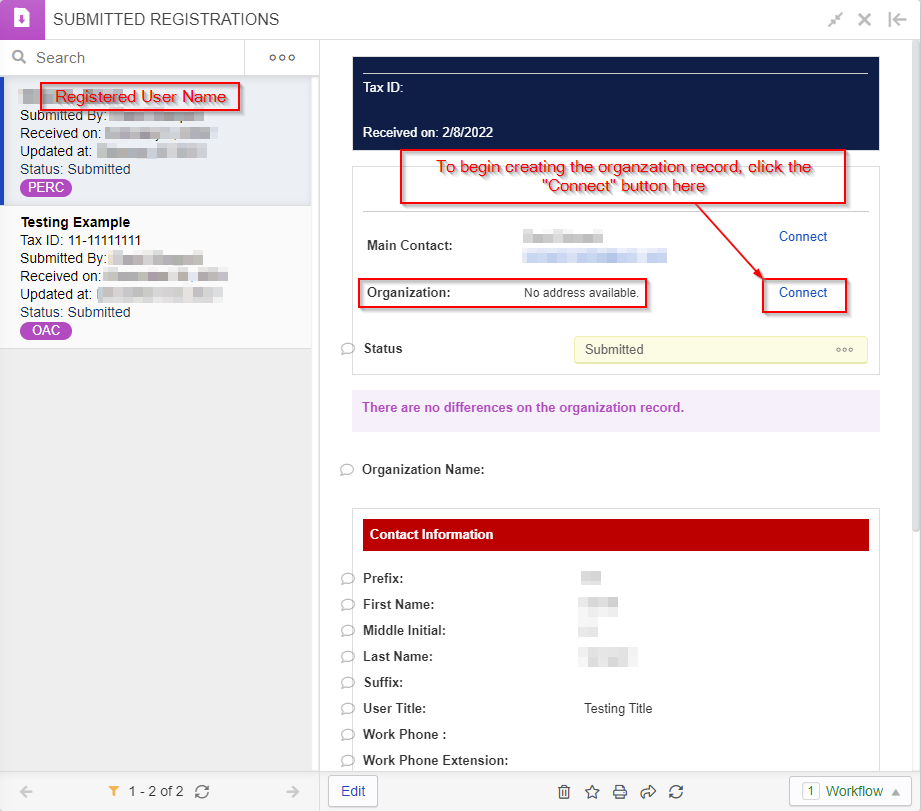
If you received an email about a submitted user registration, you'll want to start by going to the "Submitted Registrations" card and clicking on the entry (or entries) found thereunder. To begin processing this registration, first take a look at the Contact and Organizational Information provided by the user who filled out the registration. You can find high-level information about both in the top section of the registration in the sections "Main Contact" and "Organization." See also the screenshot, below.
The first step to processing a registration is to check to see if the user/organization in question already exists in the system or if they need to be created. This is where the other cards on the dashboard come in handy.
The order here in which you do so is insignificant, but in this guide we'll start by checking the "People" Card to see if the user in question already exists.
Checking Whether a User Record Already Exists for a Registration (OAC or PERC)
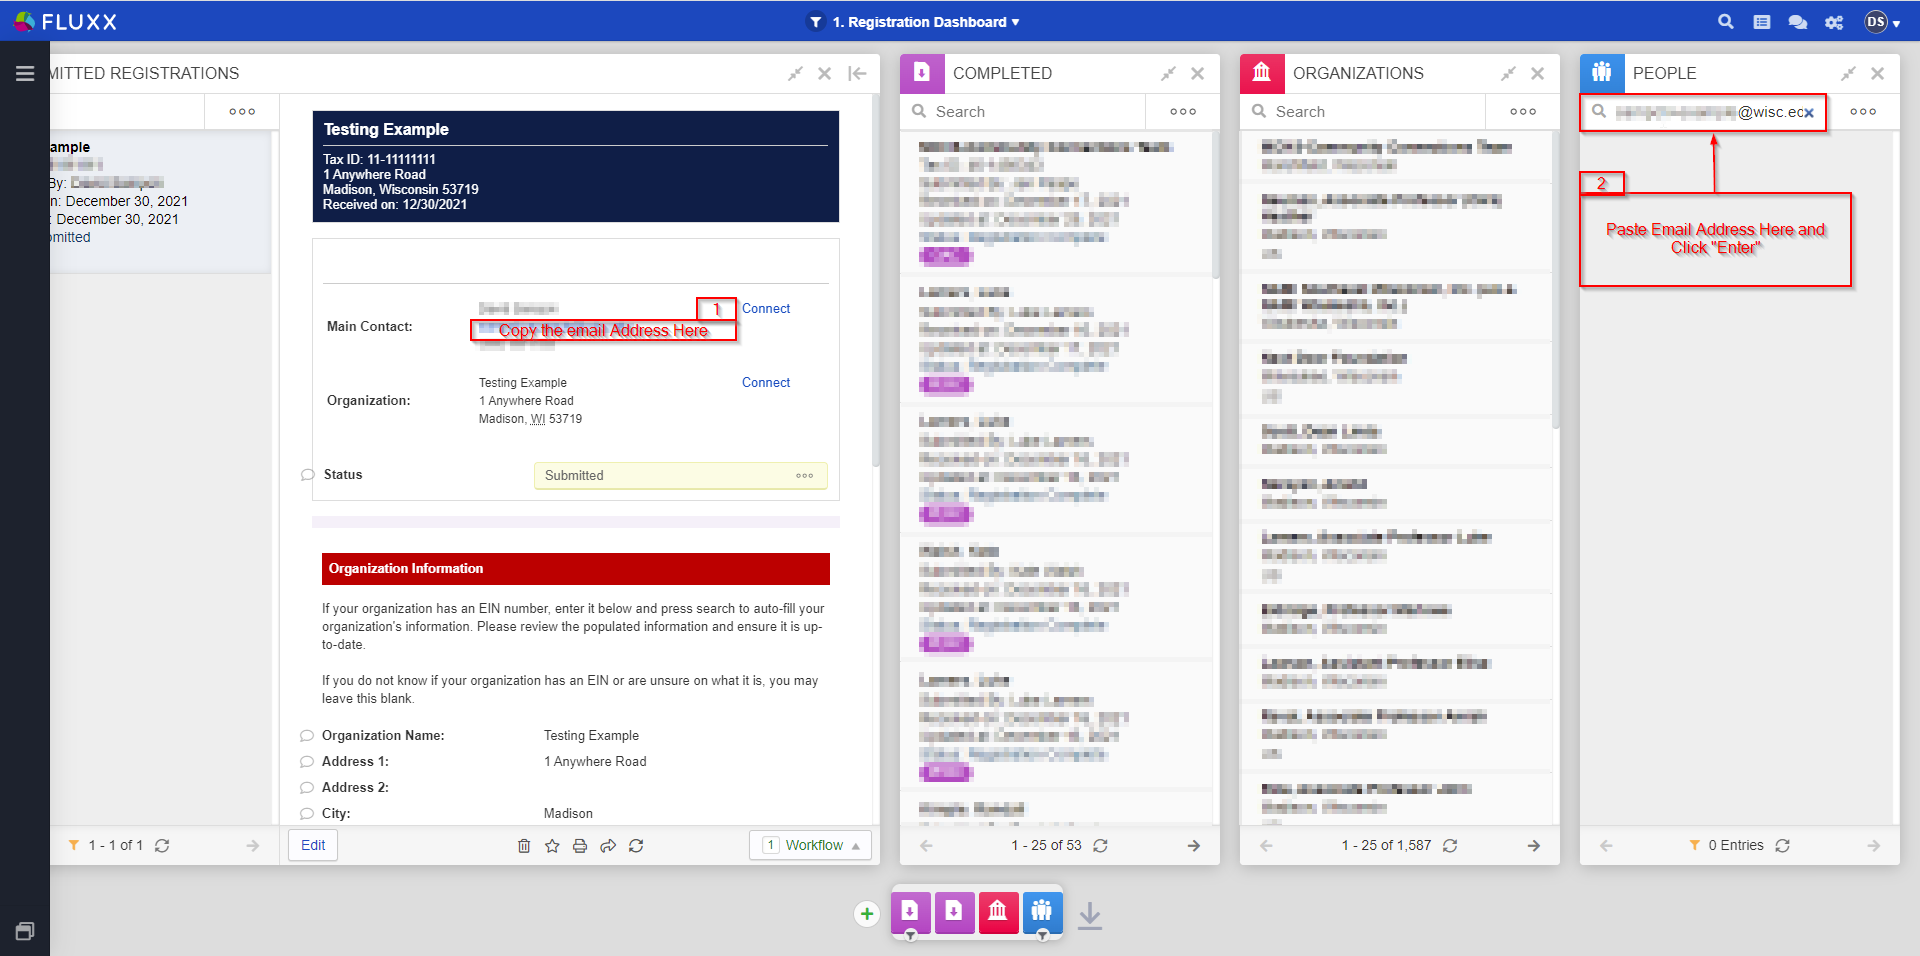
The first thing to do this is to copy the email address of the user and paste it into the search box on the people card. This will search over all the users in the system to see if any have that email address. This is a good start to checking if the user already exists, but isn't always perfect (e.g., some users might have multiple email addresses and may have registered using a different email address than the one that we had on file previously). After checking for that email address in the people card, repeat the same steps for the Potential Grantee's Full Name (First Name + Last Name) and then just their Last Name.
If you return no results after each one of these searches (i.e. the People card is as it appears in the screenshot, above), or the results returned do not match the Person in question, then you've confirmed the User does not currently exist in the system. If this is the case, you'll eventually want to follow the steps laid out in the "Registering a New User" sections (one for OAC-based registration forms and one for PERC-based registration forms) below. However, before doing so you still should check whether or not the registered organization exists in the system yet or not.
If you DID find a user via one of those searches that DOES match the user in question, then you'll eventually want to follow the steps laid out in the "Linking a Registered User to an Existing User" sections (one for OAC and one for PERC) below. Again, you still want to check on the organization record before doing so.
Checking Whether an Organization Already Exists for an OAC Registration
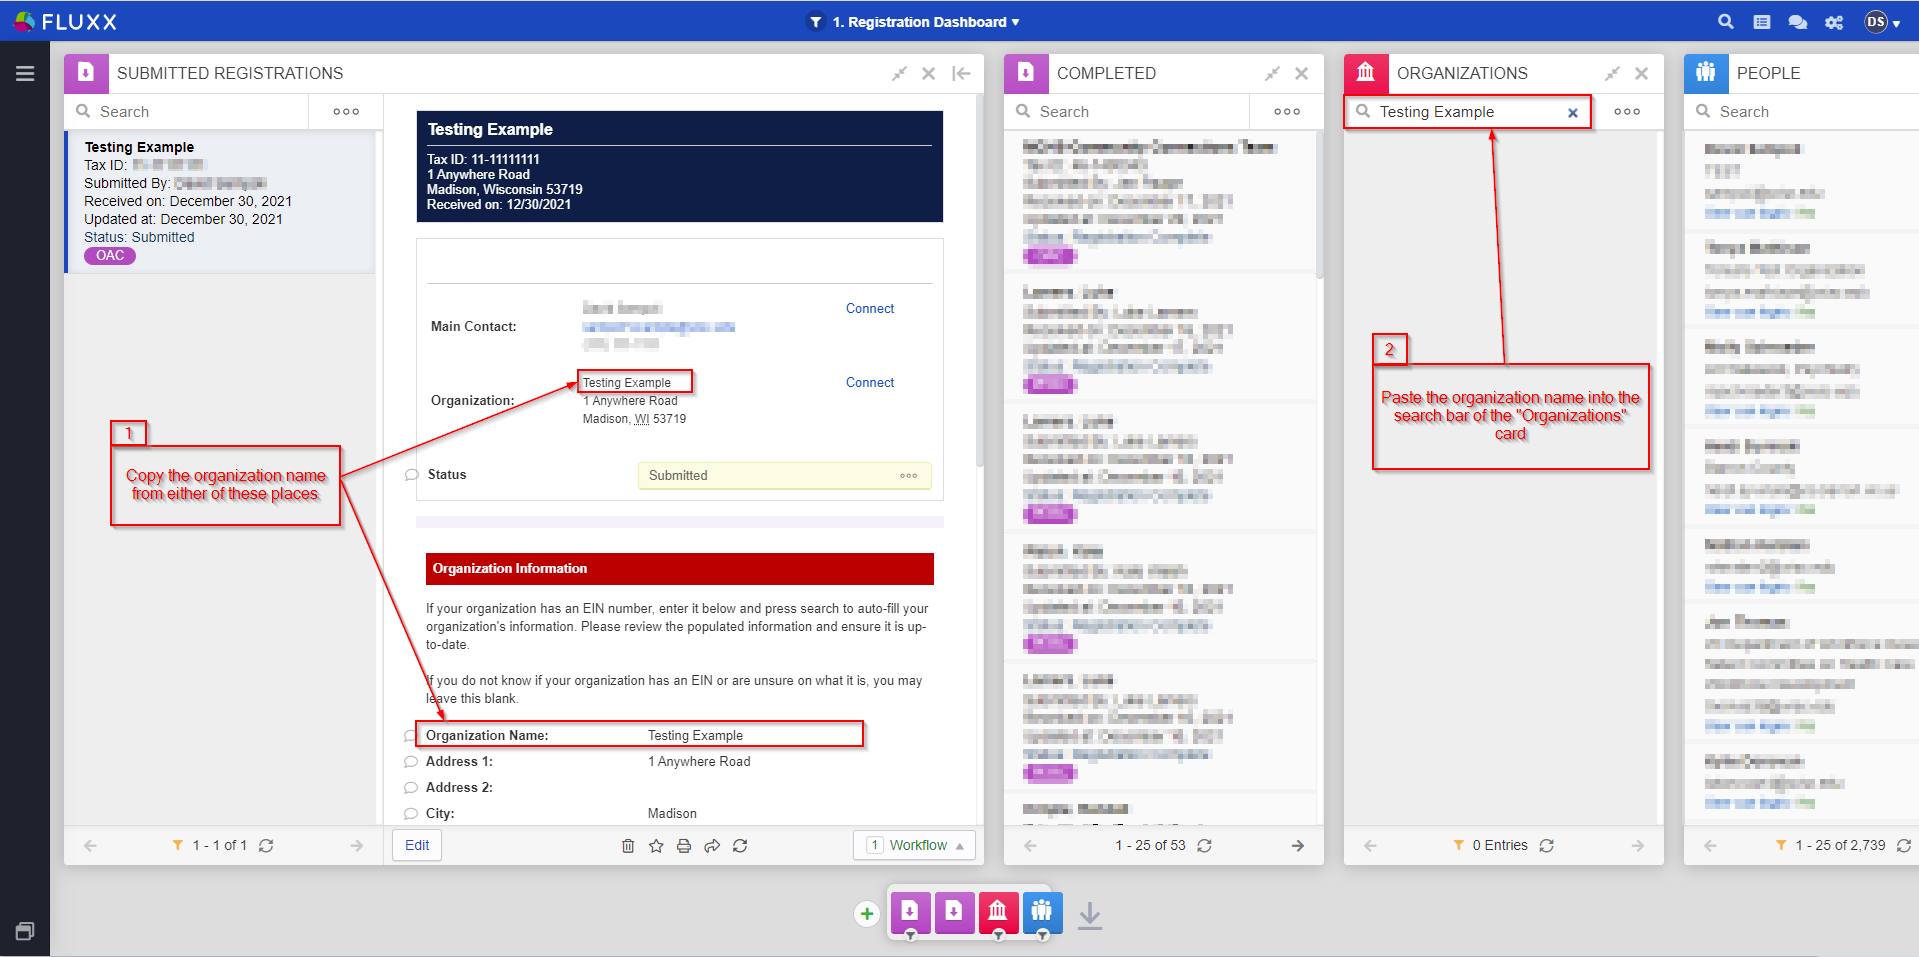
To check to see if an (OAC) organization already exists in the system, the steps are largely similar to those laid out above for checking if a User Record already exists. First, copy the Organization name from the Registration form as shown in the screenshot, below (Note: Since PERC Registration Forms do NOT contain organizational info, this exact step is not applicable to PERC, hence why OAC is referred to separately here). Then, paste the Organization name into the search box in the "Organizations" card. If (as in the screenshot below) no results are returned when searching for the organization name, you should still check one other data point before concluding that no such organization already exists.
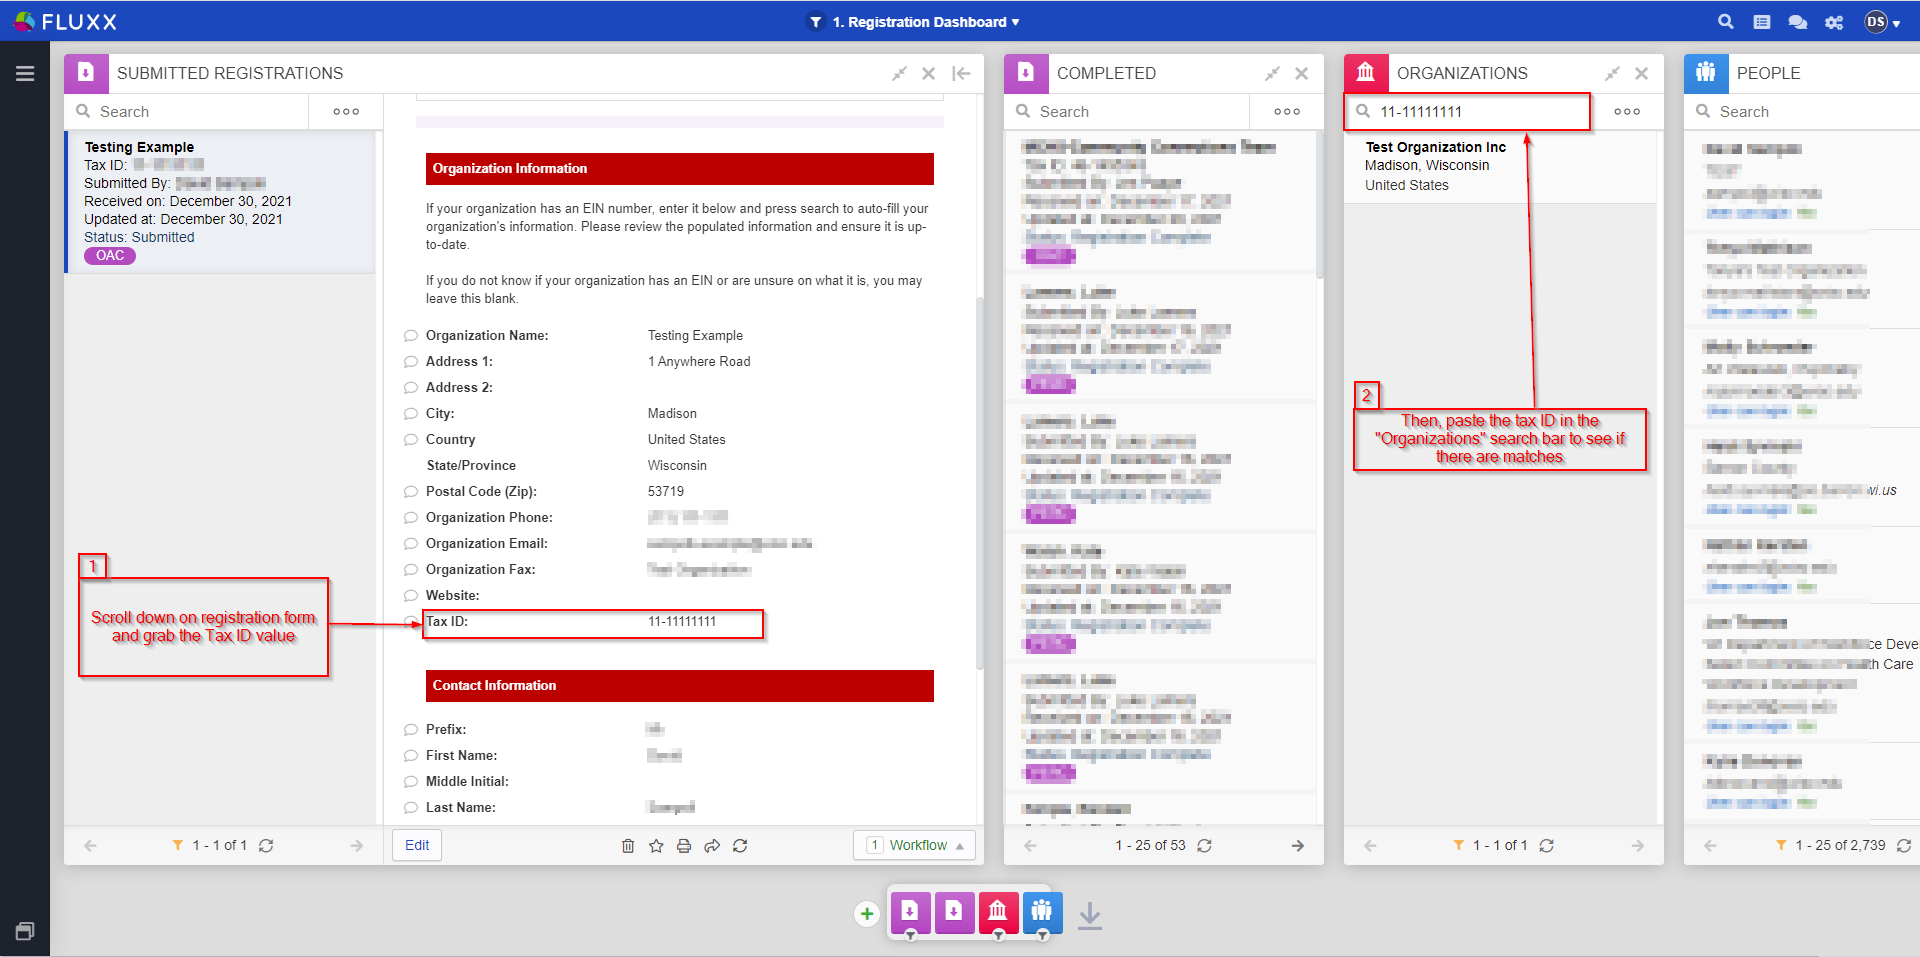
The data point to look at is the organization Tax ID. If you scroll down on the Submitted Registration form, under the "Organization Information" section you can find the "Tax ID" field. Grab the value entered on the registration and paste that value into the search bar in the "Organizations" card as you have done with the organization name (see also the screenshot, below). This will ensure that an organization with the same Tax ID does NOT already exist under a different Organization Name. If you still return no results, then it's safe to head to the Registering a New User (and Organization) section and create the organization; if instead you DID find an organization (as shown in the screenshot, below) then you should Link the Registered Organization to an Existing Organization. See the dedicated OAC sections for these two topic below for OAC-specific tips on doing so.
Checking Whether an Organization Already Exists for a PERC Registration
PERC's process for checking whether an organization record already exists or not is similar to OAC's, with the exception that within the PERC realm "Organizations" are named after their Principal Investigators. PERC organizations are in the format Last Name, (Optional User Title if applicable) First Name. For example, a PERC applicant with the name "Test Name" with a title if "Associate Professor" would have an organization record called "Name, Associate Professor Test." Similar to the steps in the section above for OAC organizations, you can copy the PERC registered user's name and paste it into the search bar in the "Organizations" card (even if you paste the user's full name as First Name Last Name in the search bar, the system is smart enough to find a matching record even if the associated Organization record is called Last Name, Associate Professor First Name e.g.). If you DO find a matching organization to the registered PI, then you can proceed to the section entitled "Linking a Registered Organization to an Existing Organization for PERC."
Registering a New User (and Organization) for OAC
As discussed in the "OAC Registration Form" section, above, the OAC registration forms contains a section for both the person (user) trying to register and a section for the Organization with which the person is affiliated. This section will cover how to create both a new user and a new organization.
Note: It is possible to get a new registration where you only need to create either the User or the Organization record, e.g. the User existed in the system previously, but now works with a new organization that we don't have in the database. In that scenario, you would create a new Organization record for the registered organization, but link the Registered User to the Existing User rather than creating a new user record). As stated previously in this guide, you only want to create new records when the a corresponding record does not already exist (otherwise you'll be creating duplicate records).
If you notice that there are duplicative records in the system, follow these instructions in order to merge those records.
Creating a new organization record
Once you've confirmed that the registered Organization does NOT already have a matching record in the system, you can create a new record for the registered organization by going into the registration and clicking on the "Connect" button next to the registered Organization (see also the screenshot below).
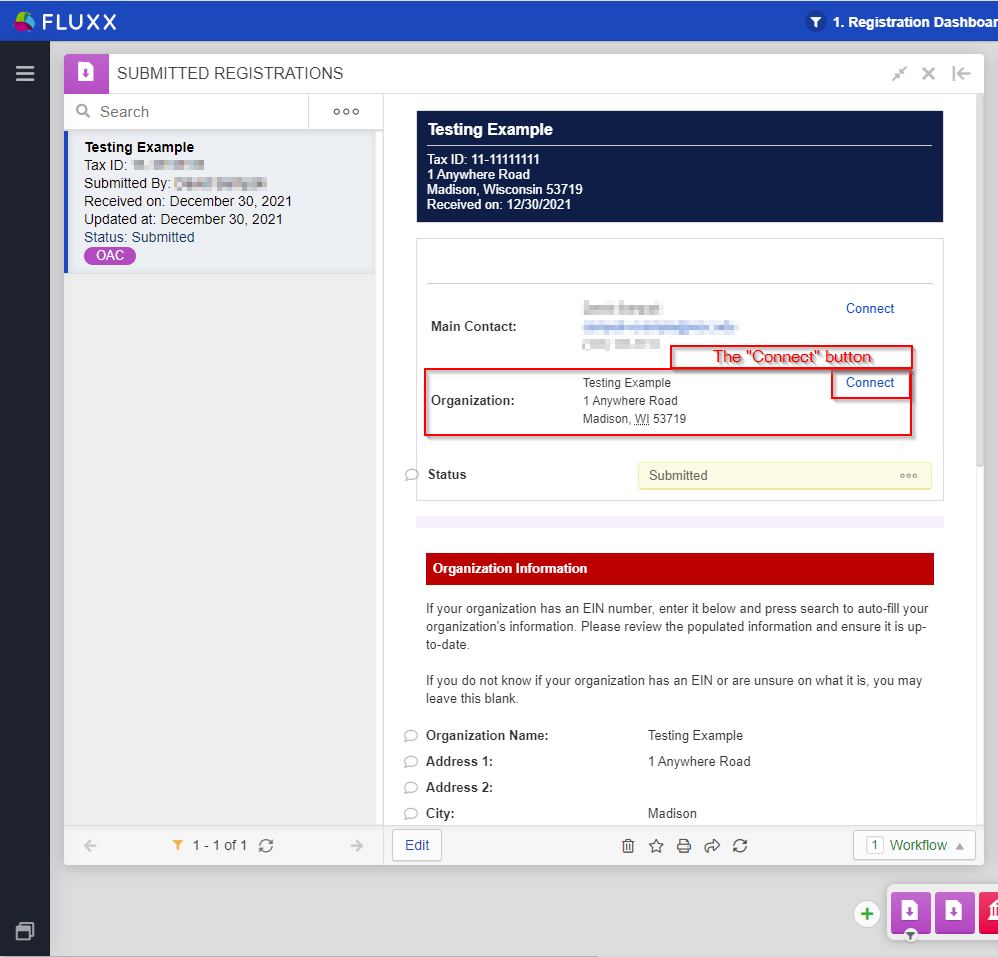
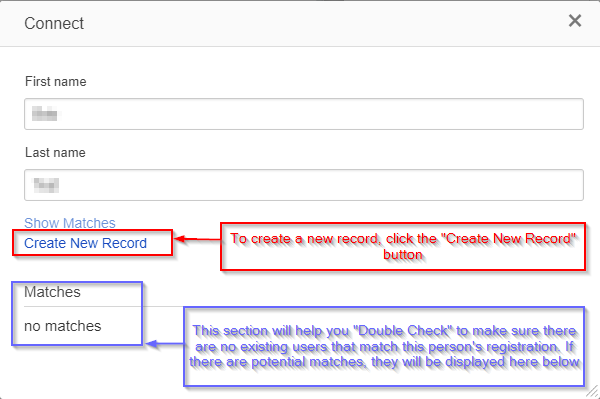
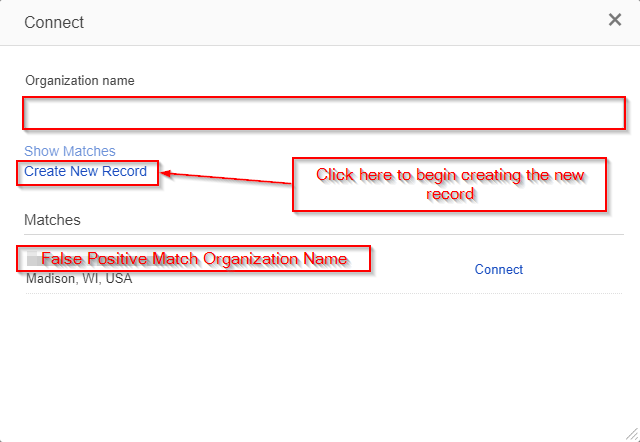
Once you click the "Connect" button, a screen will pop up with the Registered Organization's name shown along with a list of any potential matches to existing Organization records in the system (see also the screenshot below). The "Matches" section can help you to double check to ensure you didn't miss any potential matching existing organizations – just be weary that some false positive matches might also appear in that section, so keep a critical eye when comparing "Matches" to the registered organization's name and Tax ID (as well as any other data points they may have provided). If you don't see any matches (or the matches are false positives), you can create a new record for this organization by clicking the blue "Create New Record" button in the middle of the screen.

Clicking the "Create New Record" button will open another screen allowing you to edit/add information for the Organization before you create the record. From here, follow the instructions in the section "Manually Create an Organization Record" from above in this article in order to create the New Organization Record.
Creating a new user record
Once you've confirmed that the registered user does NOT already have an existing user record in the system, you can create a new record for them by going into the registration and clicking the "Connect" button next to the registration's Main Contact (see also the screenshot below).

Once you click the "Connect" button, a screen will pop up with the Registered User's First and Last Names shown along with a list of any potential matches to existing user records in the system (see also the screenshot below), very similar to the screen shown when you clicked "Connect" to create a new organization record in the previous section. The "Matches" section can help you to double check to ensure you didn't miss any potential matching existing users – just be weary that some false positive matches might also appear in that section, so keep a critical eye when comparing "Matches" to the registered user's first name, last name, and email address (as well as any other data points they may have provided). If you don't see any matches (or the matches are false positives), you can create a new user record for this person by clicking the blue "Create New Record" button in the middle of the screen.
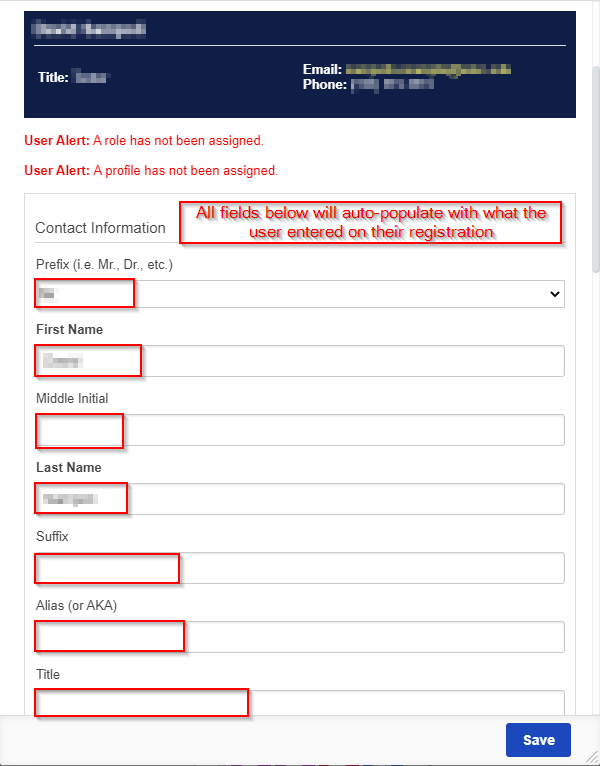
Clicking "Create New Record" will pull up the same screen seen when you Create a New User Manually – the only difference is that the fields on the form will be pre-populated with the values that the Registree entered when filling out the registration form. Make sure to follow the same steps laid out in that section and then click the "Save" button to create the new user based on their registration.
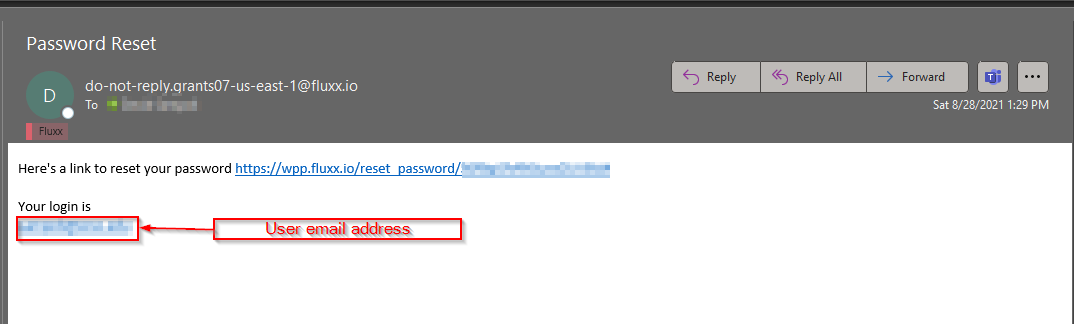
NOTE: As soon as you hit the "Save" button and create the new user, an email will be sent out to the email address listed under that user giving them a link to reset their password and letting them know what their login is (see screenshot below for a sample of what this email looks like). This email will not go to the email queue and will NOT be visible underneath the user record, but does get sent anyway.
Registering a New User (and Organization) for PERC
As discussed in the "PERC Registration Form" section, above, the PERC registration forms contain just one section for both the person (user) trying to register and for the Organization with which the person is affiliated – the Organization record for PERC is simply a stand-in record for the Principle Investigator (PI). This section will cover how to create both a new user and a new (PERC) organization.
Note: It is possible to get a new registration where you only need to create either the User or the Organization record, e.g. the User existed in the system previously, but now works with a new PI that we don't have in the database. In that scenario, you would create a new Organization record for the new PI of the project, but link the Registered User to the Existing User rather than creating a new user record). As stated previously in this guide, you only want to create new records when the a corresponding record does not already exist (otherwise you'll be creating duplicate records).
If you notice that there are duplicative records in the system, follow these instructions in order to merge those records.
Creating a New Organization Record
When first looking at a PERC Registration, you'll notice that no Organization information is present on a PERC form (as previously stated in this guide). Again, PERC Organizations are shell records for the Principle Investigator (PI). First, you'll want to follow the text from this section of the guide to check whether or not an organization record already exists for this PERC Registration. If you've confirmed that a matching record does NOT already exist for this PI, then you begin the process of creating a PERC organization record.
To begin the process, click on the "Connect" button to the right of the "Organization" section in the registration. See also the screenshot below.
Clicking the "Connect" button will pull up a window similar to the one found in the screenshot below. Again, because the PERC Registrations does NOT include any section for Organization name, the "Organization Name" field will be blank. You may very well see one or several false positive "Matches" in the bottom section of this window; ignore these unless one of the matches has the same name as the PI who attempted to register. To begin creating the new organization record in earnest, click on the "Create New Record" button found in the middle of the window (see also the screenshot).
Linking a Registered User to an Existing User for OAC
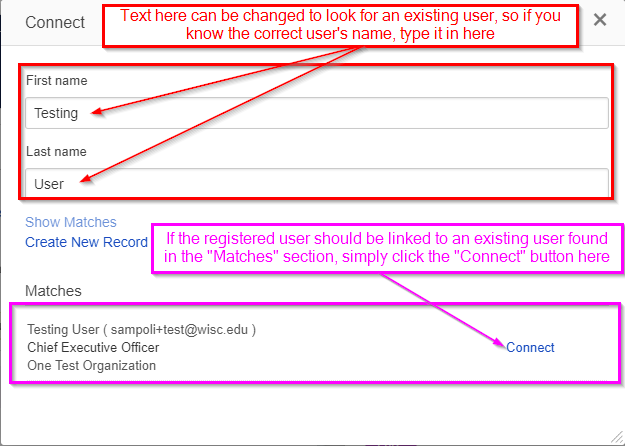
Linking a registered User to an existing user is very easy. When you click on the "Connect" button with the registration, the window for creating a new record/linking to an existing record will pop up. At the top of the window, there are two text boxes: First Name and Last Name. Both of these text boxes are free text. You can edit both the First Name and the Last Name to look for matches, so for example if you know the registered user's name is spelled incorrectly, you can correct the name and then find the correct match in the "Matches" section now that you're using the corrected name. Once you find a correct match for an existing user in the the "Matches" section, simply click on the "Connect" button next to the existing user's name and the registered user will be linked to the existing User.
Linking a Registered User to an Existing User for PERC
The steps for connect a PERC-registered user to an existing user are exactly the same as for OAC; please see the section and screenshot immediately above this for the steps on how to do so.
Linking a Registered Organization to an Existing Organization for OAC
Connecting a Registered Organization to an existing organization is also very easy. When you click on the "Connect" button within the registration, the window for creating a new record/linking to an existing record will pop up. At the top of that window, the "Organization Name" text box is free-text, so if you know for example that the organization name was misspelled, etc. you can type in the correct name in that box. Any matching, existing organization records will appear under the "Matches" section; if you would like to link the Registered Organization to an existing organization found in the "Matches" section, simply click on the "Connect" button next to the organization name (see also the screenshot below).

Linking a Registered Organization to an Existing Organization for PERC
The process for connecting PERC registered organizations to existing organizations is exactly the same as for OAC; see the section and screenshot immediately above this for the steps on how to do so.