
The Card Documents Menu of the Admin Panel contains options to control several things within the system including system letters, system emails, the documents available per each Record Type, and API Alerts.
Letters
Letters are documents that can contain dynamic information pulls (i.e. pulling in the Grantee Principal Investigator's name and email address, etc.) and can be generated either manually or automatically based off of the record moving to a certain status.
Fluxx has a good article about letters that can be found here: https://fluxxdev.atlassian.net/servicedesk/customer/portal/1/article/1796081221?src=-976765691
The screenshot below highlights some important items from the Letters screen. See beneath the screenshot for descriptions of those highlighted items.
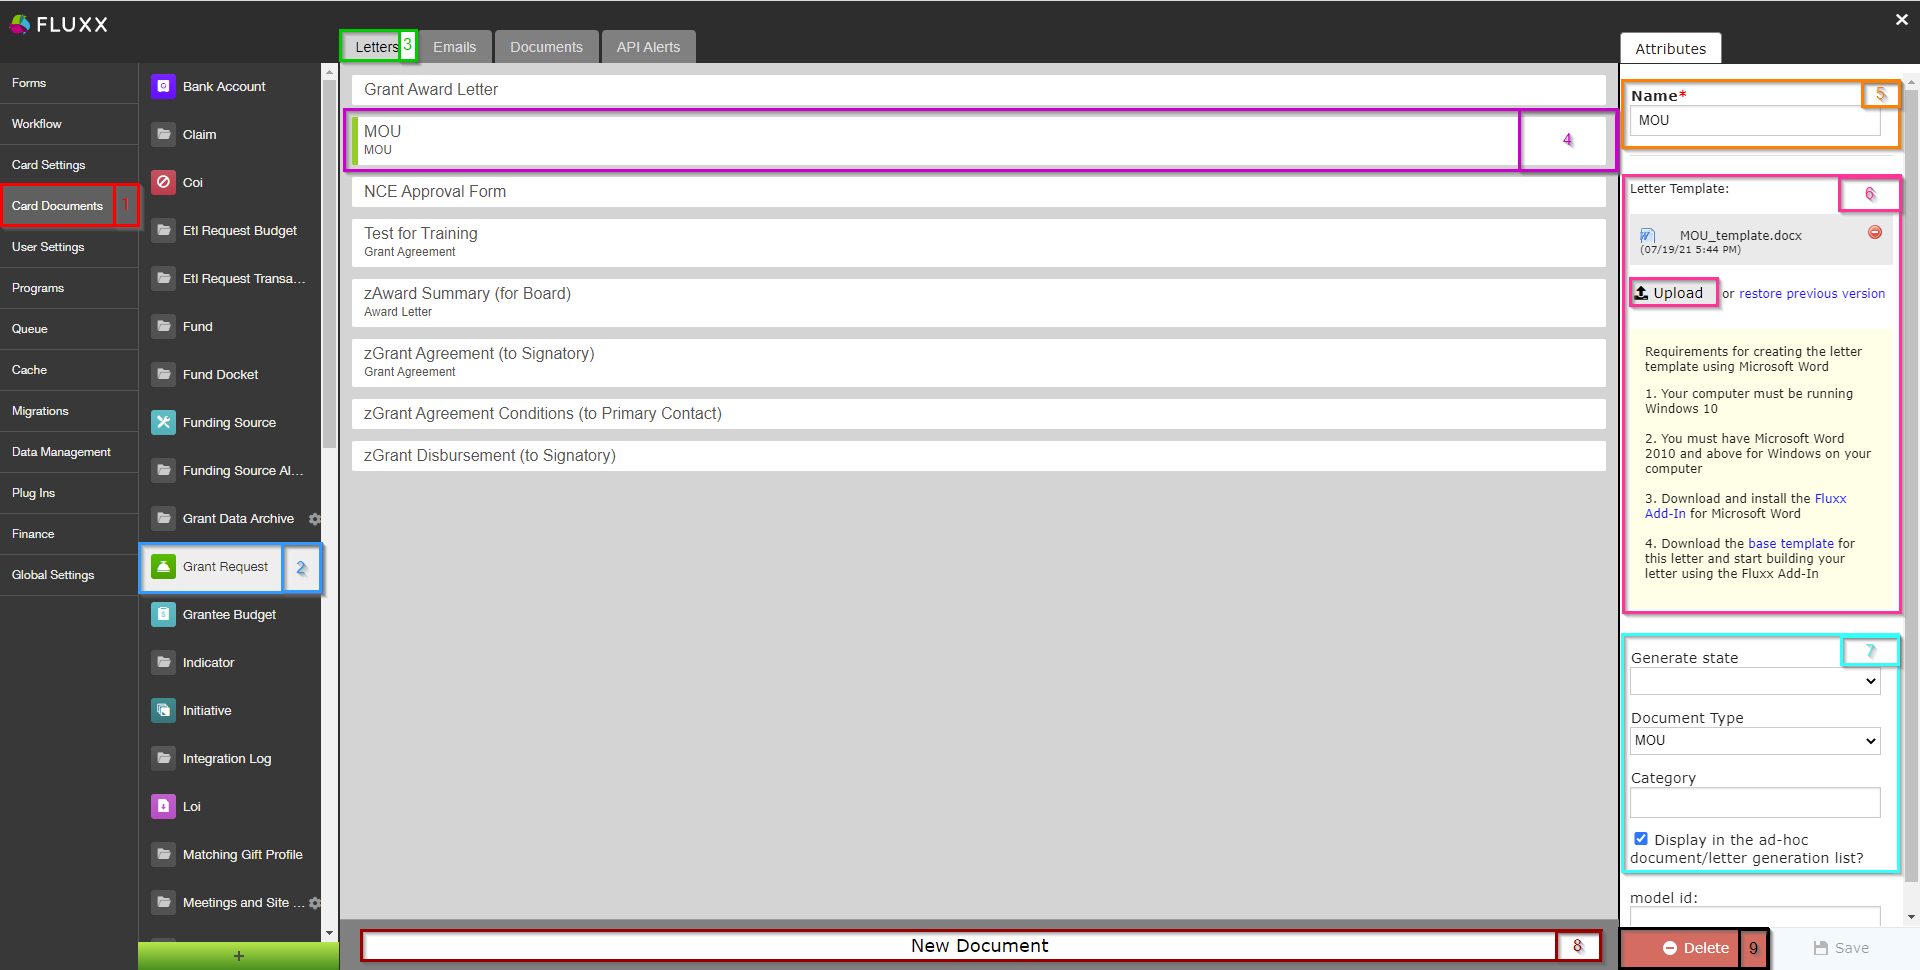
- Box # 1: Shows the Card Documents menu selected from the main Admin Panel Menu.
- Box # 2: Shows the Record Type currently selected; in this screenshot, we're looking at the Grant Request Record Type.
- Box # 3: Shows the Letters tab currently selected.
- Box # 4: Shows the Letter that you currently have selected. You can tell which Letter is currently selected NOT ONLY based off of the name (match name of Letter with "Name" from box # 5), BUT ALSO from the slim green line that appears to the LEFT of the Letter name.
- Box # 5: Shows the name of the Letter currently selected. This can be edited here without causing system issues.
- Box # 6: Shows the Letter Template currently applied to this letter; this section also allows you to restore a previous version or upload a new version of this Letter Template.
- Box # 7: Shows four different settings related to the letter:
- Generate State: If you want your letter to generate automatically at a specific status, select that status here.
- Document Type: To ensure proper visibility of your letter template, you must specify a document type you have previously configured.
- Category: Corresponds to the document category. This allows you to determine which 'document storage' box to use (i.e. a grantee-visible one or an employee-only one).
- Display in the ad-hoc document/letter generation list?: Check this box if you want this letter to appear as an option in the generated letters of the document component of your card.
- Box # 8: Shows where you can generate a New Letter if so desired.
- Box # 9: Shows where you can delete the currently selected Letter.
Emails
The emails tab of the Card Documents menu allows you to configure/edit/delete automatic system emails. It is therefore the most important tab used by the WPP of the Card Documents Admin Panel menu.
Before You Go On...
Fluxx has a great article discussing all of this that can be found here: https://fluxxdev.atlassian.net/servicedesk/customer/portal/1/article/1795951428?src=-1634618103
To send an email from the Fluxx system, six things are required:
- The "Alert Enabled?" checkbox must be checked (otherwise the email will not generate)
- An internal name for the email must be supplied (needed just to save the email alert)
- A subject line for the email must be entered (otherwise email will have 'No Subject'; emails that lack subjects sometimes gets automatically moved to the Spam folder, so this is not desired)
- Text for the body of the email must be entered (otherwise what is the point of this email alert)
- At least one recipient must be specified (otherwise no one will receive the email)
- A trigger mechanism has to be supplied (otherwise the email will never be sent)
Emails Tab Overview – First Settings
See the screenshot below to see the highlighted items from the Emails tab and beneath the screenshot for descriptions of those highlighted items. These settings fulfill the first 4 requirements from above, but do not completely cover the recipients or the trigger mechanism (continue to the next subsection for the settings that deal more completely with those requirements).
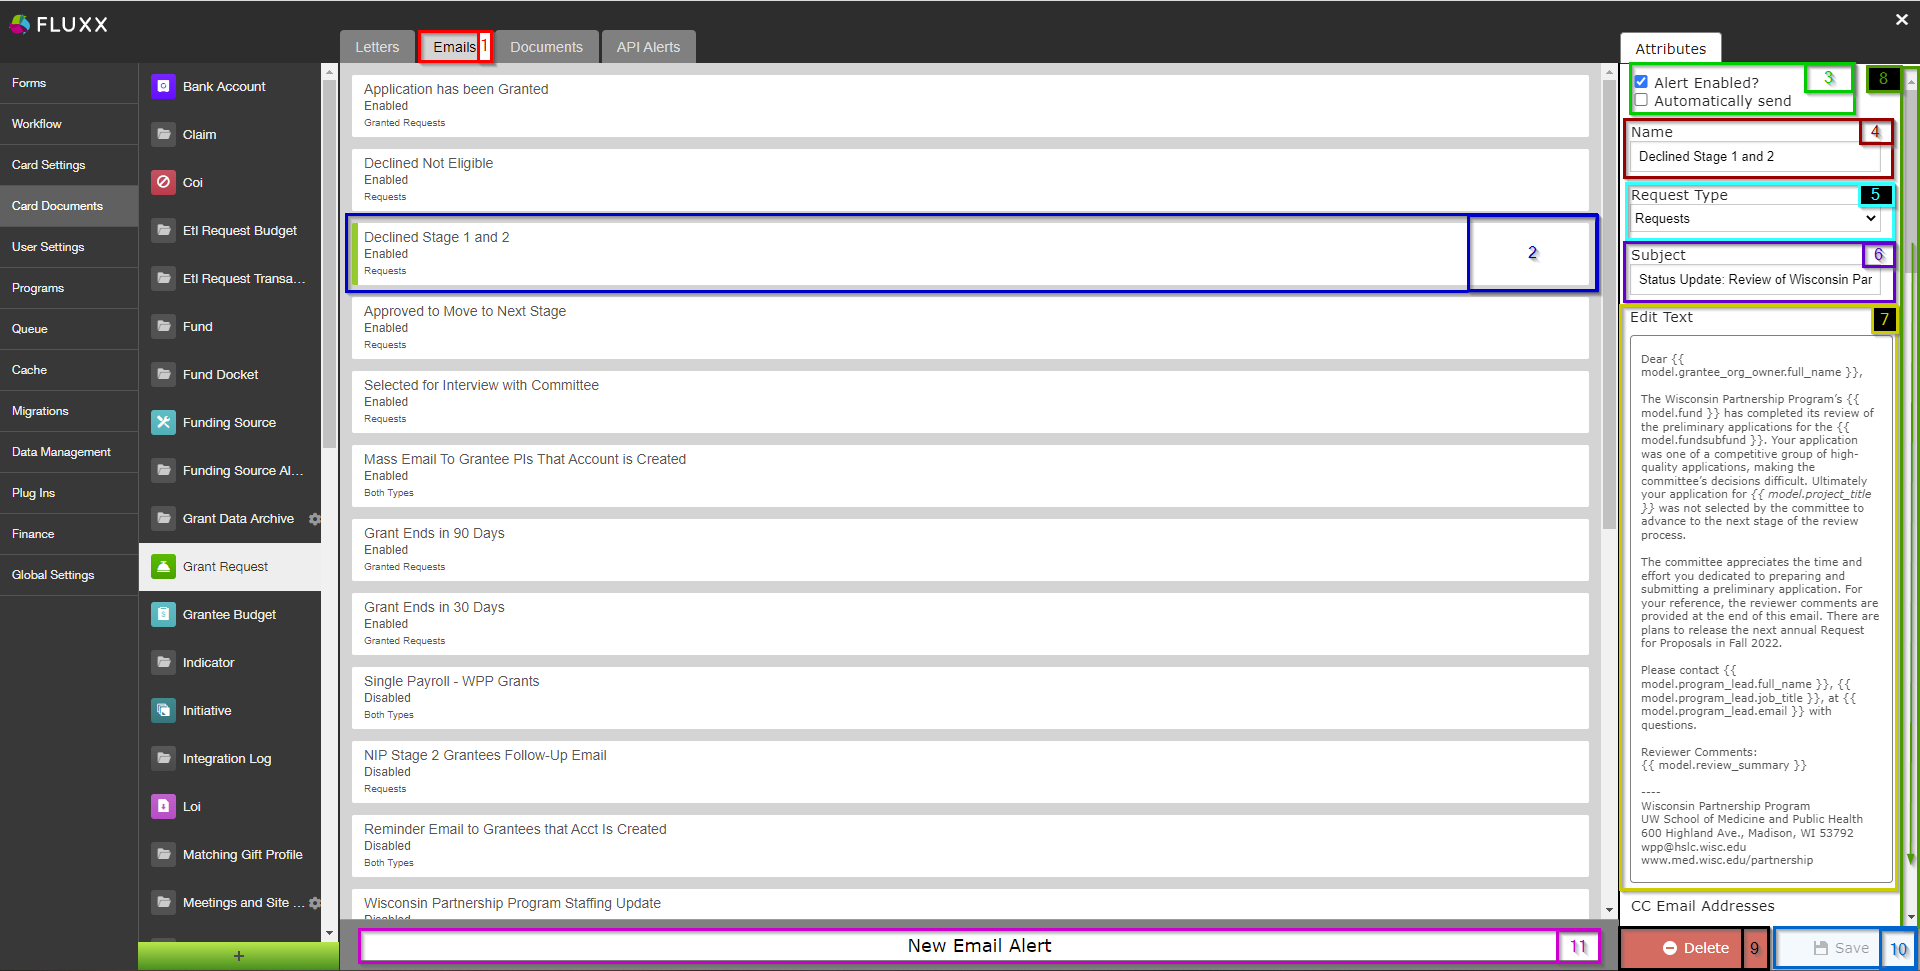
- Box # 1: Shows the Emails tab selected.
- Box # 2: Shows the Email that you currently have selected. You can tell which Email is currently selected NOT ONLY based off of the name (match name of Email with "Name" from box # 4), BUT ALSO from the slim green line that appears to the LEFT of the Email name.
- Box # 3: Shows two very important checkboxes that control whether or not (1) the email is active and (2) the email will send automatically and bypass the email queue.
- Alert Enabled Checkbox: Determines whether or not the Email alert is Enabled. If checked, the email is considered Enabled and can be sent. If NOT checked, then the email will not send even if the criteria are met.
- Automatically Send Checkbox: Determines whether or not the Email will go to the Email Queue when it 'triggers' (see the section below for email triggering). If NOT checked, when the email is triggered it will go to the Email Queue and will need to be manually pushed out of the queue by a user. If the checkbox IS checked, then, when triggered, the email will completely skip the email queue and be sent directly to the selected recipients.
- Box # 4: Shows the internal Name of the email alert. This can be changed at any time without breaking/impacting anything in the system (except for the name of this email alert as it appears in the list of email alerts for the selected Record Type).
- Box # 5: Shows the Request Type. This is only an option on the Grant Requests Record Type; it allows you to choose from Requests (Applications), Granted Requests (Awarded Grants), or Both (Applications and Fully Awarded Grants).
- Box # 6: Shows where you can edit the Subject Line of the email message. Note: This is the ONLY part of the email message where you CANNOT pull in dynamic information (i.e. Project Title from a Grant Application). Therefore, subject lines should be as generic as possible.
- Box # 7: Shows where the text for the Body of the Email is configured. To edit the text here, click on the button "Edit Text." Editing Email body text is the same as editing text in Forms. See "Editing Text" for more information.
- Box # 8: Shows the Scroll Bar that you can and should use to view more email settings. One needs to scroll down in order to see the additional settings.
- Box # 9: Shows where you can delete this email alert.
- Box # 10: Shows where you can save your work on the email alert. Note: You need to Save this record after making any changes in order for those changes to be applied; if you close this page/switch to another after making changes without previously clicking on the Save button, all unsaved changes will be discarded.
- Box # 11: Shows where you can create a New Email Alert for this given Record Type (in this screenshot, Grant Requests).
Additional Settings
The settings described above allow you to Enable/Disable the email, send it automatically (skipping the queue), send it for only specific records (i.e. Grants, Applications, or Both), and change the subject line and body of the email. Other settings are available to determine to whom should be sent and when it should be sent.
The screenshot below is taken after scrolling down on the "Attributes" tab using the scroll bar called out in box # 8 from the screenshot above. See the screenshot for highlighted items and beneath the screenshot for descriptions of said items. These items begin to deal with the Recipients requirement, but are not the only settings that determine who will receive the alert.

- Box # 1: Shows where you can configure hard-coded CC and BCC email addresses. These have to be typed in manually, and if multiple emails addresses are desired in one box (i.e. two email addresses in the CC Email Addresses) then the email addresses must be comma-separated.
- Box # 2: Shows the "Recipients" box that displays a list of all users in the system marked as "Employees" to allow you to send emails to specific employees if so desired. If it desired to select multiple employees to send the email alert to, then CTRL + Clicking will allow you to select multiple users from the list. Alternatively, Shift + Clicking will perform an inclusive selection (i.e. selecting every user between two records including the starting and ending record).
- Box # 3: Shows the "User Relationship Fields" allowing you to send this email alert dynamically to users based off of their relationship to the record. For example, you can send email to the last person who Updated the record (though this particular relationship is not recommended for use in email alerts).
Continuing to scroll down, more settings appear for the email recipients and for the trigger mechanism of the alert. See the screenshot below for more highlighted items and beneath it for descriptions of those items.

- Box # 1: Shows more user relationship fields that can be used to determine to whom the email alert should be sent. At the WPP, we generally use these checkboxes to determine who the email should go to. The User relationship fields here relate back to the Grant Request record, even if the email is NOT in the Grant Request record type. For example, if I'm creating an email in the Request Report (AKA Requirements) record type, selecting the "Primary Contact" and "Primary Signatory" to send the email to will make the system link back from the Requirement to the related Grant record and pull in the email address's from the Grant's Primary Contact and Primary Signatory.
- Additionally, other users linked to the Grant that AREN'T grantees can be selected as well; you can see from the list that "Program Lead" (as well as Program Lead CC and Program Lead BCC) are all options in the list in case you always want to include the Program Officer in any email alert to the Grantees.
- This is the main section used to complete the recipients requirement
- Box # 2: Shows the first part of the email alert page where you can configure how the email alert is triggered. The main way that the WPP triggers email alerts is based off of status changes.
- This is how to configure the Trigger Mechanism email alert requirement.
- The Alert Trigger Type has four different options for selection:
- Filter: email alerts with this option selected will send anytime a record meets the filter criteria and has a value change on the record. This alert will trigger over and over every time the condition is met. For this reason, One Time Filter is generally recommended over the simple Filter option.
- One Time Filter: email alerts with this option selected will trigger the same as filtered alerts with one important distinction: this email will only trigger once and will NOT send again. For this reason, it's generally preferred to use One Time Filter rather than Filter.
- Field: Any change in any of the fields that are selected will trigger the email alert to be sent. You can select multiple fields to be the triggered, and one email will trigger for changes to ALL the fields selected.
- Once Field is selected, a list of all available fields for that model will appear. Select the field(s) you want to trigger the alert to be based on from the list.
- State: triggers an email alert when a record enters (i.e. first moves to) the workflow status (AKA state) configured for the specific email alert. This is the most used Alert Trigger Type by the WPP.
- Once this option is selected, a workflow state or states will need to be selected in the box that appears.
Continuing to scroll down on the attributes screen, several more options appear. See the screenshot below for highlighted items and beneath the screenshot for descriptions of said items.

- Box # 1: Show the Test Alert box. This allows you to enter in an internal ID for a record of the same Record Type as the email alert.
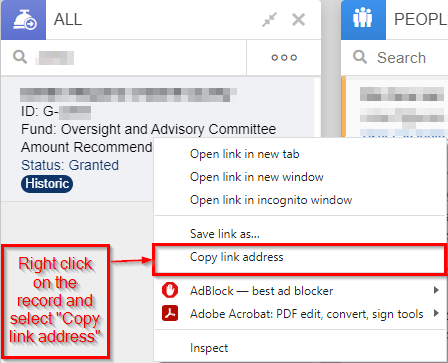
- To obtain an ID for testing, right-click on a record in the system that has the same Record Type as the email alert (in this example, we're looking at Grant Request emails so the record here is a Grant Request – in this specific case a full Grant). When you right-click a record, a small menu comes up with options such as "Open link in new tab." Select the option "Copy link address:"
- Once you've done so, open up a Notepad page (or a Notepad++ page if you use that application). In your Notepad page, paste the link that you just copied:
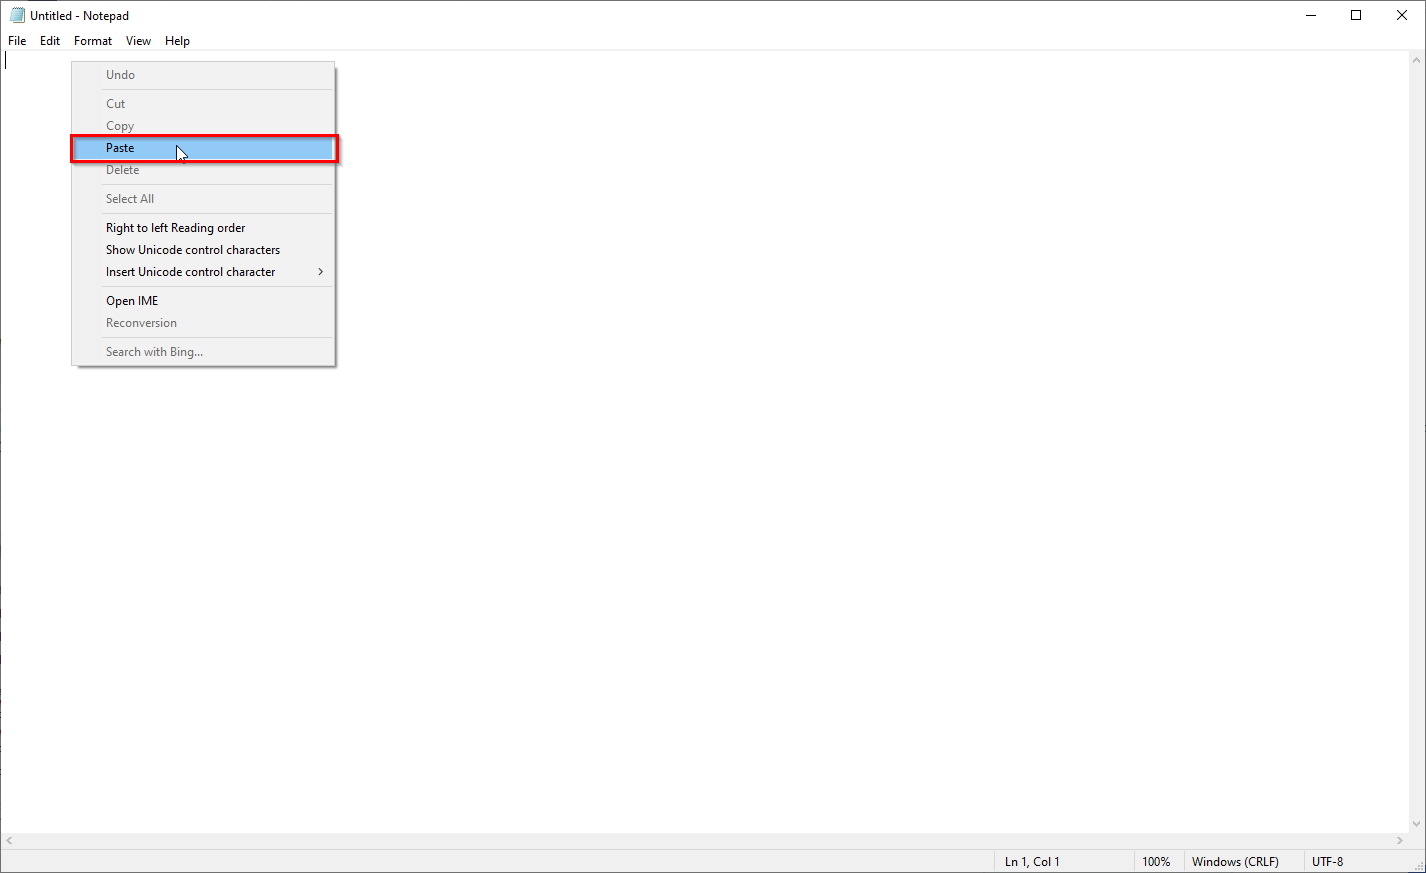
- The link should look something like the screenshot found below. The number after the last forward slash ("/") (also highlighted in the screenshot below) represent the Internal ID that you can post into this window to test the alert. Copy the numbers after the last forward slash.
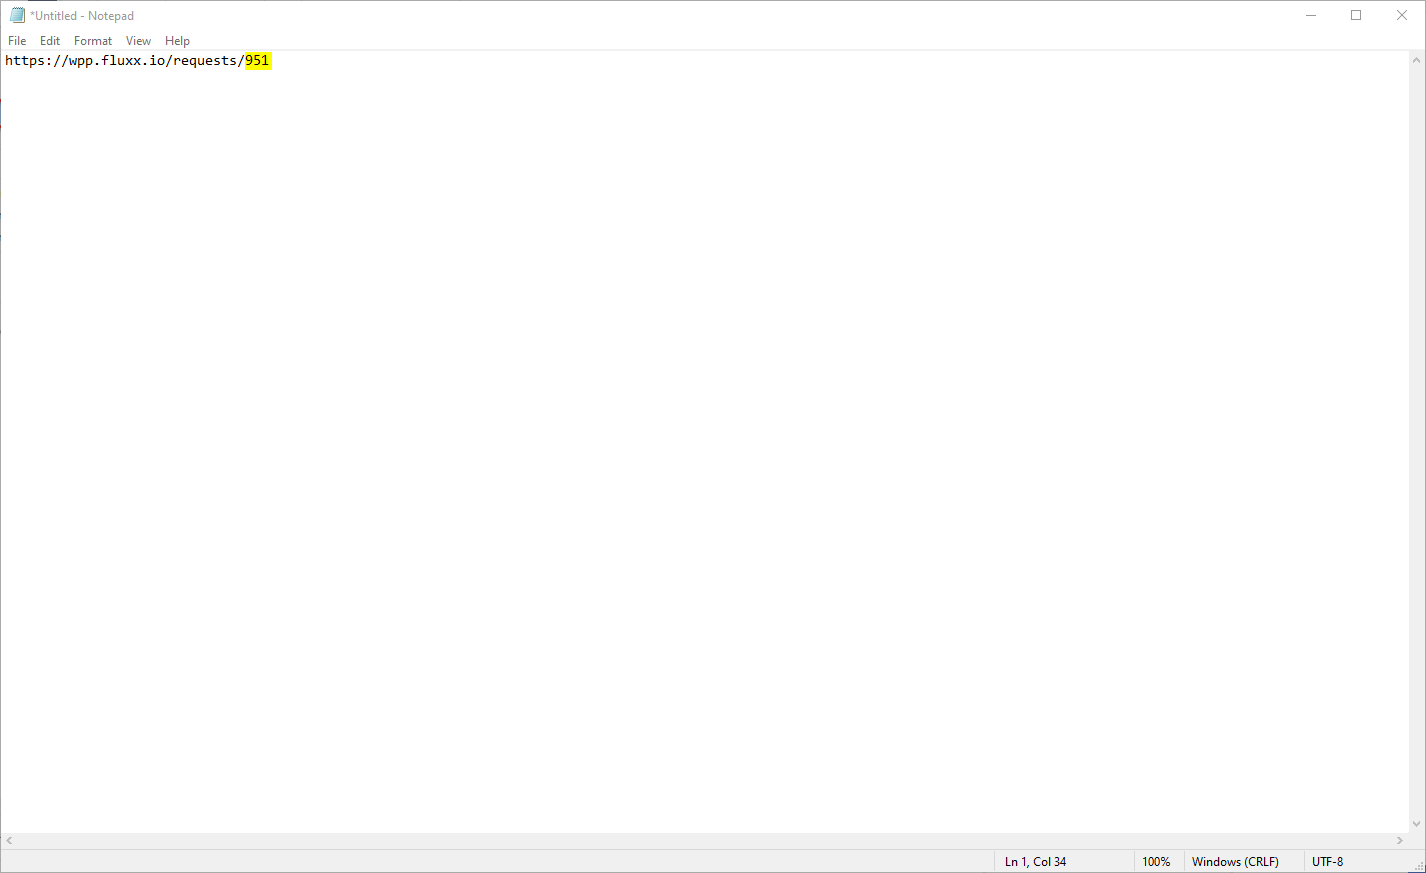
- Now to generate the test alert. Paste the numbers obtained from the last step in the "model id:" field, then click on the button that says "Generate Test Alert."

- Clicking "Generate Test Alert" will result in a new tab opening up on your internet browser with the text of the email as it would be configured for the record supplied in "model id:" – see the screenshot below to see what that test alert looks like:

- Box # 2: Shows the "Switch to Advanced Filters" toggle option. Like with Cards, emails can be set up with Filters. These Filters work in conjunction with the Trigger settings to determine if the record in question merits the Email Alert. Basically, in order for a record to qualify for the email alert, it has to qualify for both the trigger settings AS WELL AS the filters. Switching to Advanced filters allows for the "Advanced Search" window to appear and then allows you to use Advanced Filters criteria and logic (i.e. using nested groupings, switching between "AND"/"OR" logic, and toggling "NOT" clauses).
- Box # 3: Shows the Basic Filters that are available for selection. These filters will still appear when advanced filters are being used, but both should NOT be used in conjunction. Use EITHER the basic filters OR the advanced filters, not both.
Documents
The Documents screen lets you control what documents exist for/can be uploaded to given Record Types. See the screenshot below for highlighted items and beneath the screenshot for descriptions of said items.
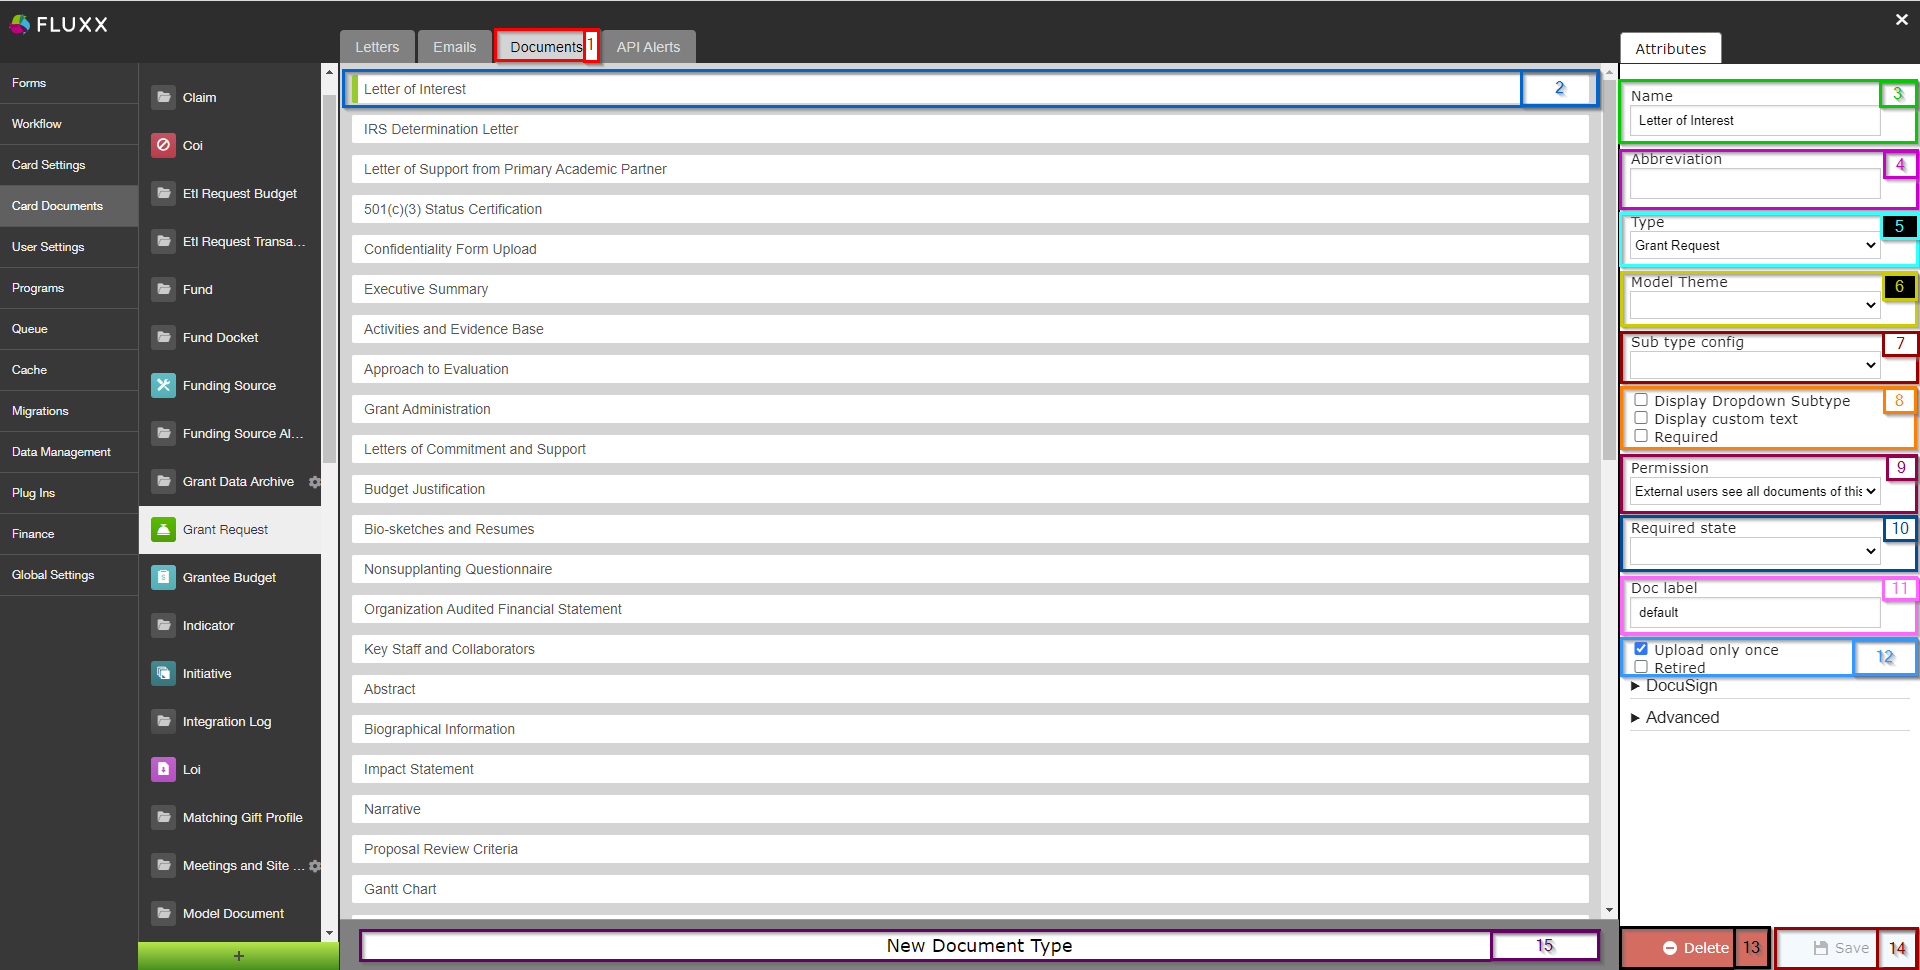
- Box # 1: Shows the Documents tab currently selected.
- Box # 2: Shows the Document that you currently have selected. You can tell which Document is currently selected NOT ONLY based off of the name (match name of Document with "Name" from box # 3), BUT ALSO from the slim green line that appears to the LEFT of the Document name.
- Box # 3: Shows the internal Name of the document. This can be changed at any time without breaking/impacting anything in the system (except for the name of this document as it appears to both internal and external users).
- Box # 4: Shows the Abbreviation. This is used in a very small number of screens, and is generally left blank by the WPP.
- Box # 5: Shows the Type of Record that the document type is linked to. This allows you to move a Document Type from one Record Type to another if needed/desired. However, it is generally recommended against moving a document this was between Record Types as it can cause confusion for admins who attempt to edit the document in the old Record Type but don't see the document there anymore (because it moved to a different record type). If not moved correctly, it can also cause issues with any previous uploads to that same document type. In general, it's preferable to simply "Retire" the old document and to create the newly desired document type under the correct Record Type (this is safer).
- Box # 6: Shows the Model Theme (AKA Form Type) that the document can be applied to. If left blank, the Document Type can be used for every form under this record type. Otherwise, it will only be accessible on the form selected in this field.
- Box # 7: Shows the Sub type config, which allows you to force a user uploading a document to add in a type of date field when uploading the document selected. The two options are:
- Date: Forces the user to enter in a full date when uploading the document, i.e. 1/1/2022.
- Year: Forces the user to enter in a calendar year when uploading the document, i.e. 2022.
- Box # 8: Shows three checkboxes that have an impact on document upload functionality. They are:
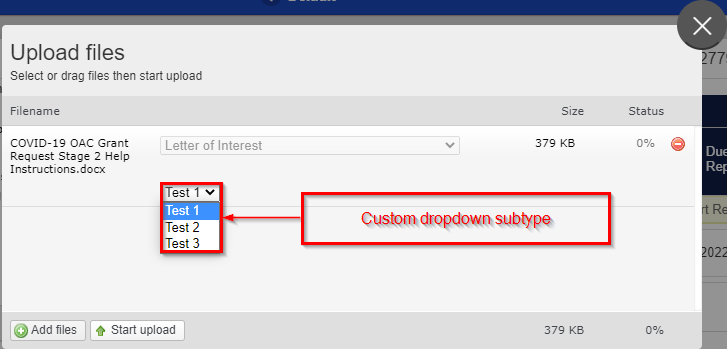
- Display Dropdown Subtype: Allows the user to enter in a custom list of dropdown values for the user uploading the document to select from. Similar to the the Sub type config, but the values are custom and NOT solely year or date-based.
- Example of what a custom Dropdown Subtype looks like in the system:
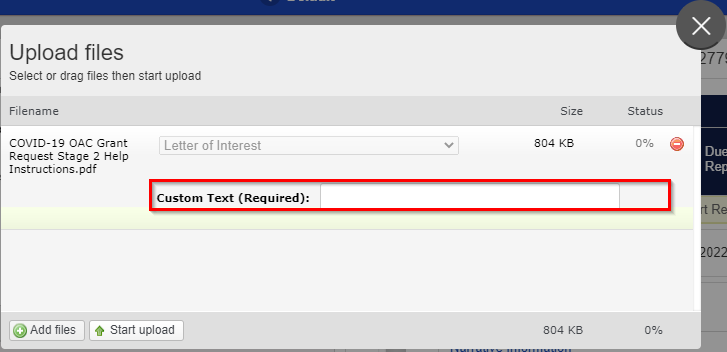
- Display custom text: When checked, forces the user uploading the selected document to enter in Custom Text with their uploaded document. No other configuration is available with this settings.
- Example of what "Display custom text" looks like in the system:
- Required: Checking this box will always make this document required on any form it is added to. It is generally recommended against checking this box as documents can be made mandatory on the particular form it is added to as well. Generally, we prefer to make the document required on the Form so that, if needed, we can always have the document be an optional upload on a different form (again, if it is required on the Document level then it will be Required regardless of the Form that it is on, so you'll never have the possibility of making it optional).
- Box # 9: Displays the Permissions dropdown menu for this particular document type. See below for the options for the Permissions menu.
- Screenshot of the options available in this dropdown menu:
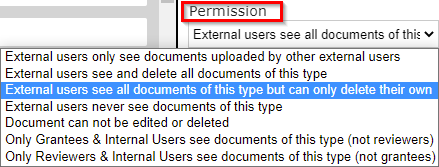
- Description of those Permissions:
- External users only see documents uploaded by other external users: As the name implies, external users (non-employees) only see this document when it is uploaded by other external users; non-employees will NOT see the document if it is uploaded by an employee.
- External users see and delete all documents of this type: External users are able to see all documents of this type (regardless of how it was uploaded) and can delete all documents of this type.
- External users see all documents of this type but can only delete their own: External users are able to see all documents of this type (regardless of how it was uploaded) and can delete the document of this type ONLY if they themselves uploaded it. This is the recommended permissions type for all documents.
- External users never see documents of this type: As the name implies, external users will never be able to see a document with these permissions.
- Document can not be edited or deleted: Self-explanatory.
- Only Grantees & Internal Users see documents of this type (not reviewers): Employees and Grantees can see this document type; reviewers cannot.
- Only Reviewers & Internal Users see documents of this type (not grantees): Employees and Reviewers can see this document type; grantees cannot.
- Box # 10: Shows the Required State dropdown menu which contains a list of all of the available statuses for the Record Type that this document is currently in. This will make it so that this document is always required at that specific status. As with the Required checkbox above, it is generally recommended to make documents required on the specific Form that they're on and to leave this field blank.
- Box # 11: Shows the form's default Doc label. The Doc Label pairs with the Doc label on the Documents component as added to a form. Essentially, a Document will, once uploaded, display in the Document Uploads component with the same Doc label as the document itself. The Doc label for a document can be changed on the Form level as well, so it's generally recommended against changing the label here and instead recommended to change the label on the Form level.
- Box # 12: Shows two checkboxes that store important functionality for this document:
- Upload Only Once: Forces the user uploading the document to only upload one version of this document (i.e. not able to select 4 different files to count as my 1 'document upload'). Additionally, it prevents the usage of the use of the "Add New Version of Document" button.
- Example of the 'Upload New Version of Document' button:

- Retired: Checking this box will make the system consider this document to be Retired, i.e. no longer in use, but still existing in the system. This allows for old documents uploaded with this type to stay around in the system, but prevents users from adding this document to new Forms in the future.
- Box # 13: Shows where you can Delete the document in question. It's recommended against doing this unless the Document Type was created in error and no documents have been uploaded with that type. In general, it's preferable to Retire an old Document Type than it is to delete it.
- Box # 14: Shows where you can save your work on the Document Type. Note: You need to Save this record after making any changes in order for those changes to be applied; if you close this page/switch to another after making changes without previously clicking on the Save button, all unsaved changes will be discarded.
- Box # 15: Shows where you can Create a New Document Type within this Record Type.
API Alerts
The WPP does not currently use API Alerts; however, Fluxx has a good article regarding API Alerts and the API Queue that is linked out below.
Link to Fluxx article: https://fluxxdev.atlassian.net/servicedesk/customer/portal/1/article/1795884009?src=1177191611


