
Before you go on...
Much of this article assumes an understanding of the workings of and the differences between Profiles, Roles, and Programs in Fluxx.
For background materials to understand these differences, please see our Roles, Program, and Profiles (or Portals) Definitions Page.
Additionally, Fluxx has two great articles discussing many of the things found in this article. This article deals with explaining Profiles, Roles, and Permissions explicitly.
A second article discusses Editing Profile Permissions, which should be a key takeaway from this page.
Profiles
The Profiles tab contains the several different Profiles available for selection from within our system, allowing you to Edit/Create/Delete Profiles. When you select a Profile from this screen, there are four different subtabs that allow you to edit specific pieces of functionality for each given profile.
The four subtabs are:
- The Attributes Tab – Controls high-level attributes, such as the Profile name and the exact Portal that will be presented to users who sign in with this Profile.
- The Rights Tab – Controls what Rights users with this Profile have within the system, i.e. being able to view or edit or create records of a specific type.
- The Delegate Rights Tab – Not currently used by the WPP; allows extended functionality by allowing the embedding of a dynamic card in the Grantee Portal with permissions based off of the parent record this embedded child card is related to.
- The Permissions+ Tab – Extended Profile settings with a series of checkboxes that control other user Permissions not covered in the Rights tab.
Attributes Tab
The Attributed Tab allows you to edit high-level information about the Profiles available for users. See the screenshot below for highlighted items from the Attributes Tab and see beneath the screenshot for descriptions of said items.
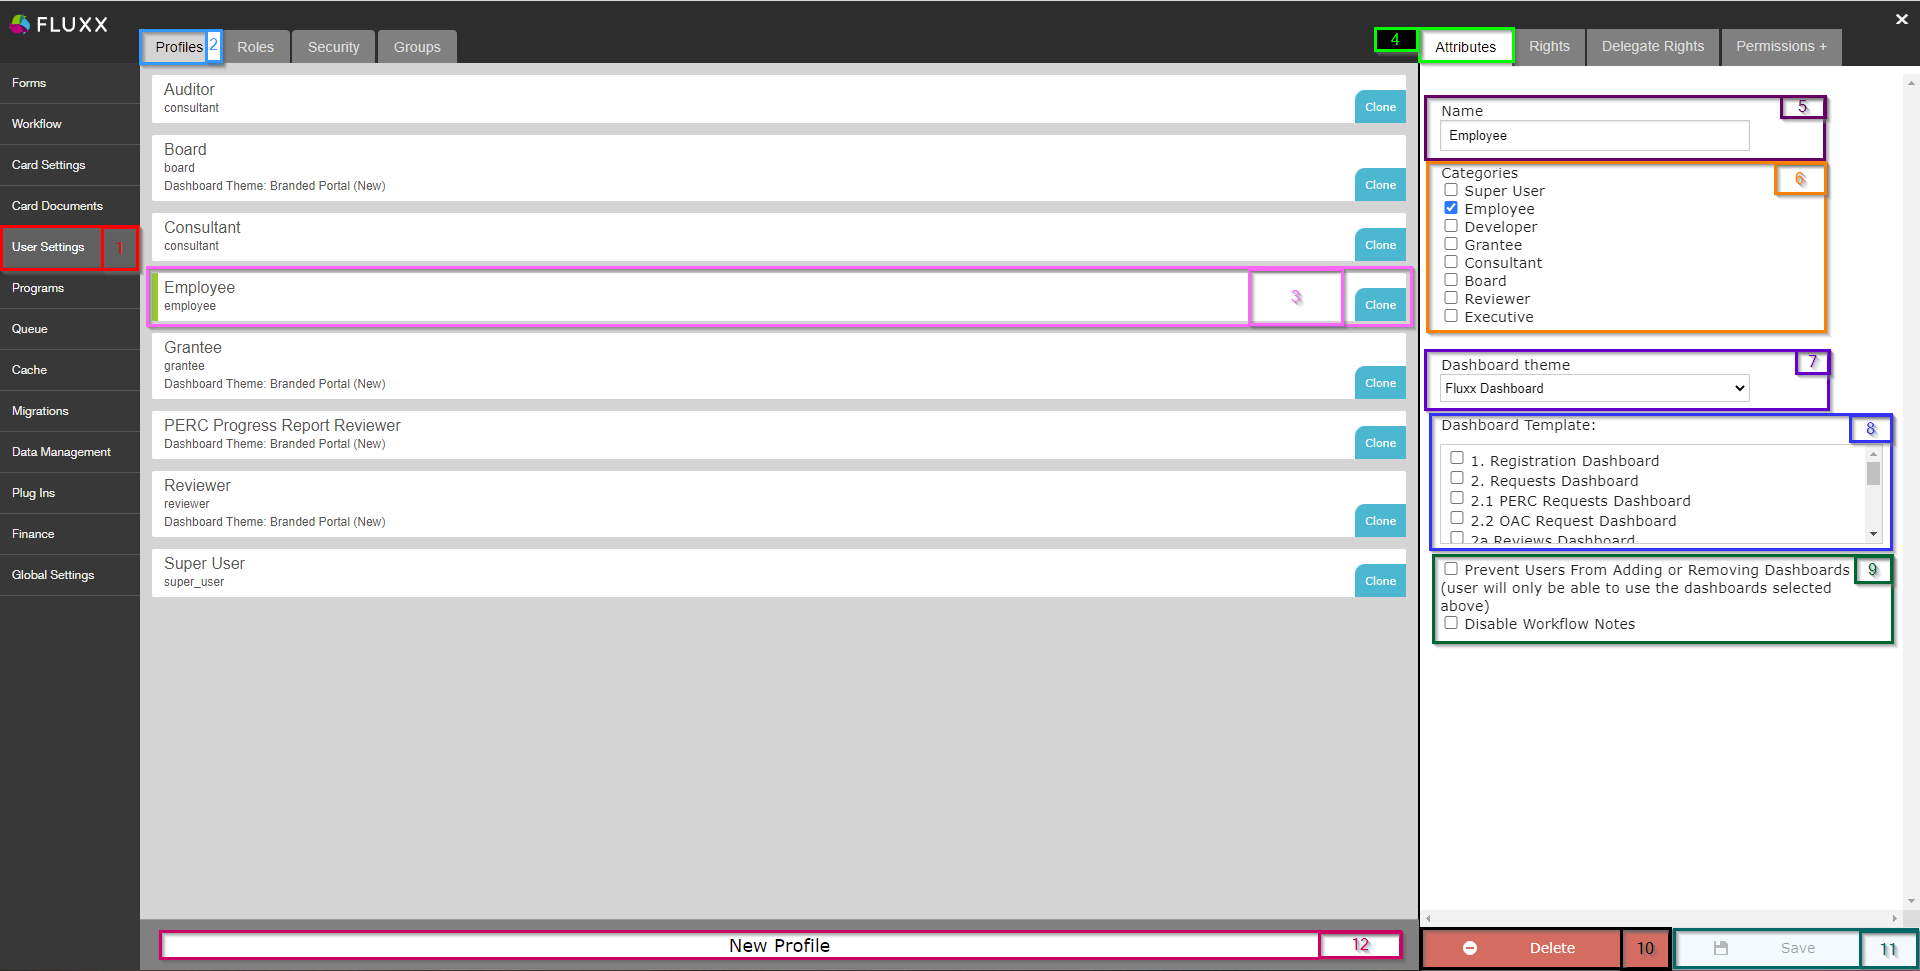
- Box # 1: Shows the User Settings Admin Panel menu currently selected.
- Box # 2: Shows the Profiles tab currently selected.
- Box # 3: Shows the Profile that you currently have selected. You can tell which Profile is currently selected NOT ONLY based off of the name (match name of Profile with "Description" from box # 5), BUT ALSO from the slim green line that appears to the LEFT of the Profile name.
- Box # 4: Shows the multiple tabs of user settings available from within the single Profile selected. Currently selected is the Attributes tab. This lets you change high-level information about the profile selected, such as the profile name and the profile category. Other tabs allow for other changes to be made (see below for explanations of the other tabs).
- Box # 5: Shows the name of the Profile selected. This can be edited and will not break the system; however, please avoid doing so unless absolutely necessary as we've training staff on the current Profile names.
- Box # 6: Shows the Category that the profile falls into. This partially dictates functionality; selecting the Employee category will force the profile to behave like an Employee-type profile, whereas selecting the Reviewer category will force the profile to behave like a Reviewer-type profile. For newly created, non-default profiles (such as our PERC Progress Report Reviewer), a category is not necessarily needed (as they need their own special functionality).
- Box # 7: Shows the Dashboard theme selector.
- There are three options for selection here:

- Fluxx Dashboard: The default option, Fluxx dashboard is essentially the Employee view of the system (where the user has a Default dashboard, plus shared dashboards and the Organization-specific Dashboard Templates).
- External Portal (Old): No longer used; used to be used for external portals (i.e. Grantee and Reviewer Portals).
- Branded Portal (New): The new version of the External Portal; this will force the user to have 1 portal view based on the Dashboard Template selected for Box # 8. This prevents the user from creating their own dashboard/adding new cards that they shouldn't have access to (as is desired for external users like Grantees, Reviewers, and PERC Progress Report Reviewers).
- Box # 8: Shows where you can select the Dashboard Template. You only need to select a Dashboard Template IF you selected "Branded Portal (New)" as the Dashboard theme selector from Box # 7. Otherwise, if you selected "Fluxx Dashboard" this field can be left unaltered.
- Box # 9: Shows two checkboxes that determine some functionality for this Profile.
- Prevent Users from Adding or Removing Dashboards (users will only be able to use the dashboards selected above): If checked, will prevent the user from being able to add or remove Dashboards; they will be restricted to only having the Dashboards checked in Box # 8. This is mainly used when the Dashboard Theme selector is set to Fluxx Dashboard, as those with the Branded Portal (new) are always prevented from being able to add/remove dashboards. Still, you can check this box for new portals built for external users (non-employees) to make absolutely sure they are prevented from adding new dashboards.
- Disable Workflow Notes: When clicked, users will be unable to add Workflow Notes, i.e. notes directly on the record that can be left as you're completing your workflow.
- Example of what being able to leave a workflow note looks like in the system. If this checkbox is checked, then the Add Note button found below will be completely removed and users will not be able to see/leave these notes.

- Box # 10: Shows where you can Delete this User Profile. This is highly dangerous! Please only delete profiles that were created in error and are not attached to any user accounts; deleting any User Profiles that are in use will result in users immediately losing the Portal Access and permissions that they need to complete their work.
- Box # 11: Shows where you can Save your changes to this profile. If you've made any changes, you must hit the save button in order for your changes to be effectuated. Otherwise, your changes will be discarded.
- Box # 12: Shows where you can create a New Profile. This is useful if you need to create a new Portal, as the WPP needed to do when we created the Progress Report Reviewer Profile.
Rights Tab
See the screenshot below for highlighted, important items from the Rights Tab can be found in the screenshot below. See beneath the screenshot for descriptions of said items.

- Box # 1: Shows the Profile that's currently selected. You can tell which Profile is currently selected from the slim green line that appears to the LEFT of the Profile name.
- Box # 2: Shows the Rights tab that's currently selected.
- Box # 3: Shows a single Rights line; each line represents a set of permissions that are either Allowed or Not-Allowed.
- The Word on the left-hand side of Box # 3 under the column "Model" represents the Record Type that the permissions are applied for (e.g. Grant Requests, Reviews, Requirements, Documents, etc.).
- The word in the middle under the column "Permission" describes what type of permission is granted for this record type. In this example, the permission given is Create, which means that this profile can Create records in the Record Type specified under the Model column.
- The Symbol under the "Allowed" column specifies whether the action described for the given Record Type is Allowed (represented by the
 checkmark) or Not-Allowed (represented by the
  symbol that looks like the number 0).
 - Any permissions line can be deleted by clicking on the
 symbol on right-hand side of Box # 3.
- Box # 4: Shows where the Scroll Bar lives on this screen. You'll need to make use of the scroll bar here, as there are often more permissions lines than can fit in one screen, so users will typically have to scroll down this screen to see all of the permission lines.
- Box # 5: Shows the Delete button where you can delete the Profile you currently have selected. This is highly dangerous! Please only delete profiles that were created in error and are not attached to any user accounts; deleting any User Profiles that are in use will result in users immediately losing the Portal Access and permissions that they need to complete their work.
- Box # 6: Shows where you can Save your changes to this profile. If you've made any changes, you must hit the save button in order for your changes to be effectuated. Otherwise, your changes will be discarded.
Delegate Rights Tab
Not currently used by the WPP. See this Fluxx article if you need information on the Delegate Rights tab: https://fluxxdev.atlassian.net/servicedesk/customer/portal/1/article/1692303561?src=14367399
Permissions+
Before you read this section, please see this Fluxx article that discusses the Permissions+ tab and lays out what each of these options truly entails: https://fluxxdev.atlassian.net/servicedesk/customer/portal/1/article/1796049373
Under the Permissions+ tab, a series of checkboxes which act as toggles for specific user functionalities can be found. See the screenshot below for highlighted items from the Permissions+ tab and beneath the screenshot for descriptions of said items.

- Box # 1: Shows the Permissions+ tab currently selected.
- Box # 2: Shows the first batch of functionality toggles. Most have names that sufficiently describe what the toggle does. Descriptions:
- Allow Monitoring the Email Queue: Checking this box will allow this profile to approve or delete emails from the queue. Since this is for monitoring the email queue without Admin Permissions, you'll needed to use the Table View to Monitor the Email Queue.
- Allow Monitoring the Job Queue: Checking this box will allow this profile users to take actions on the jobs queue. Again, since this is for monitoring the jobs queue without Admin Privileges, you'll need use the Table View to Monitor the Job Queue.
- Hide Universal Search: Checking this box removes the universal search feature from this profile.
- Allow batch/bulk update: Checking this box shows the individual bulk actions available for this profile.
- Please note checking this box does not give users the ability to perform bulk update actions until individual settings are checked
- To enable all bulk update actions, each individual bulk update setting must be checked
- Sub-options that become available upon clicking this checkbox:
Allow bulk update attributes | Checking this box will allow this profile to bulk update fields of the records |
Allow bulk update status | Checking this box will allow this profile to bulk update the state of the records |
Allow sending bulk email alerts | Checking this box will allow this profile to bulk send an email alert for the records |
Allow generating documents in bulk | Checking this box will allow this profile to generate a letter template for the records |
Allow bridger status check in bulk | Checking this box will allow this profile to run a bridger status check on the records |
Allow scheduling payments in bulk | Checking this box will allow this profile to assign payments for the records |
Allow scheduling reports in bulk | Checking this box will allow this profile to assign reports for the records |
- Allow accessing the dedupe tool: Checking this box will allow this profile to utilize and take action on the dedupe tool (used to merge duplicative records).
- Allow editing payment contingencies: Checking this box will allow this profile to edit the payment contingencies on a granted record.
- Allow editing funding sources: Checking this box will allow this profile to edit existing Funding Source Records and create new Funding Source Records.
- Requires that the User Role assigned has access to that workflow state.
- Allow editing request funding sources on active grants: Checking this box will allow this profile to edit the Request Funding Source on a granted request record.
- Allow editing and deleting Ad-hoc and Excel Reports: Checking this box will allow this profile to edit or delete existing Ad-hoc Report and Excel records.
- Allow editing of select (dropdown) fields: Checking this box will allow this profile to edit select field values from the form.
- Allow Theme Switching: Allows the user to use the Component Theme-Switcher on Grant Request records. This allows the user to switch the Form type after the record has been created.
- Box # 3: Shows the second batch of functionality toggles. These toggles are all related to User credentials and security. Descriptions:
- Allow updating users' login: Checking this box will allow this profile to edit a user’s login.
- Login fields will be available on the user record.
- Login fields will appear in the LOI (Registration) Connect modal.
- This means if a user with this permission connects a user to the system via the Connect component, the New User Email (if enabled) will trigger.
- Allow updating users' password: Checking this box will allow this profile to edit a user’s password.
- Allow updating users' SSO UID: Checking this box will allow this profile to edit the sso_uid core field.
- If SSO is configured for your site, then the SSO UID is treated like a password. Enabling this option will allow the user to access other users SSO UID fields on the user record.
- Allow impersonating grantees: Checking this box will allow this profile to impersonate any profile with the “Grantee” category.
- Box # 4: Shows the Delete button where you can delete the Profile you currently have selected. This is highly dangerous! Please only delete profiles that were created in error and are not attached to any user accounts; deleting any User Profiles that are in use will result in users immediately losing the Portal Access and permissions that they need to complete their work.
- Box # 5: Shows where you can Save your changes to this profile. If you've made any changes, you must hit the save button in order for your changes to be effectuated. Otherwise, your changes will be discarded.
Roles
The Roles tab allows you to create/edit/delete User Roles within the system. See the screenshot below for highlighted important items and beneath the screenshot for descriptions of said items.

- Box # 1: Shows the Roles tab currently selected.
- Box # 2: Shows the Role that's currently selected. You can tell which Role is currently selected from the slim green line that appears to the LEFT of the Profile name and by matching the Role name with the name shown in Box # 4.
- Box # 3: Shows the Roleable Type dropdown selection box. There are four possible options to selected here:

- This field determines which Program (or sublevel below program) is available for selection at the Programs level when selecting a user's User Role. The WPP always leaves this field set at the Program-level (and then we always enter 'All Programs' at the specific program selection menu).
- Box # 4: Shows the configurable name of the Role type. This can be changed at any time without breaking anything in the system. However, please avoid doing so, as we've trained employees on the current names of the Roles we've configured.
- Box # 5: Shows the Delete button where you can delete the Role you currently have selected. This is highly dangerous! Please only delete roles that were created in error and are not attached to any user accounts; deleting any Roles that are in use will result in users immediately losing the permissions that they need to complete their work (i.e. being unable to submit an application).
- Box # 6: Shows the Save button where you can save any changes made to the Role. If you've made any changes, you must hit the save button in order for your changes to be effectuated. Otherwise, your changes will be discarded.
- Box # 7: Shows the New Role button where you can create a new Role if needed.
Security
The Security Tab contains several different settings allowing you to control features like the minimum password length required, the ability to control whether users can use multiple Profiles, multi-factor authentication, etc.
Before you go on...
Fluxx has a great article that discusses the ins and outs of the Security Tab. See the article here: https://fluxxdev.atlassian.net/servicedesk/customer/portal/1/article/1422295246?src=-168973113
The Security Tab
The main settings used from with the Security Tab are found within the Security Settings item, as shown from the screenshot below. Please see the screenshot for highlighted items from this screen and beneath the screenshot for descriptions of said items.

- Box # 1: Shows the Security Tab as currently selected.
- Box # 2: Shows the Settings Menu that's currently selected. You can tell which Settings Menu is currently selected from the slim green line that appears to the LEFT of the Settings name.
- Box # 3: Shows several settings related to User Passwords within Fluxx.
- Minimum Password Length: This feature controls the minimum required password length. Options range from 3-15 Characters, which includes all letters, numbers, and symbols (e.g. ^,*,&, etc.).
- Don't allow passwords to contain/match the login: Unchecking this box allows a password to match the user's sign in user name (i.e. Login name; at WPP this is the user's email address 99% of the time). If this box IS checked, then the password CANNOT contain the user's login within the password.
- Don't allow passwords to contain more than this number of repeated characters in a row: This feature controls the number of characters that can be repeated in a row within the password. Options range from 2-10 Repeated Characters ALLOWED within the password; any number of repeated characters that exceeds the number listed here will result in the password being declared invalid.
- Box # 4: Shows several options relating to user's failing to enter their password correctly and a setting for the maximum duration that a password can be used for.
- Number of failed login attempts before account lockout: This feature controls the number of times a user can incorrectly enter their password before their account is temporarily locked. Options range from 2-20 times.
- Account lockout ban duration: This feature controls the amount of time a user is temporarily locked out of their account for after entering their password incorrectly the required number of times. Options range from 0 minutes - 24 hours.
- Ensure the same password was not used within at least this number of changes: This feature controls how many password changes until a previous password can be used again. Options range from 2-10 Password Changes before an old password can be re-used.
- Maximum Password Age Policy: The number of days a password can be utilized before it expires. Options range from 30 - 120 days (or blank, i.e. no maximum number of days). When a password expires, the user will be required to set a new password.
- Box # 5: Shows three checkboxes that can require certain characters to be used within the password that a user sets. If any of these checkboxes are checked and a user fails to include the character(s) specified in the checked checkbox, then the password will result as an invalid password when they attempt to set it.
- Uppercase letter (A through Z): As the name implies, this requires that the password contain at least 1 uppercase letter.
- Lowercase letter (a through z): As the name implies, this requires that the password contain at least 1 lowercase letter.
- Number (0 through 9): As the name implies, this requires that the password contain at least 1 number value (0 - 9).
- Box # 6: Shows the Cancel button. Clicking on this button will Discard any unsaved changes made to the current settings menu.
- Box # 7: Shows the Save button. If you've made any changes, you must hit the save button in order for your changes to be effectuated. Otherwise, your changes will be discarded.
The other security settings offer other options as well, but nothing particularly relevant to the WPP. See the Fluxx Security Settings article for more information on these.
Groups
Before you go on...
Fluxx has an article that discusses how groups are used and how to manage them. Please read through that article as well, here: https://fluxxdev.atlassian.net/servicedesk/customer/portal/1/article/1795885766?src=964446319
The Groups Tab
The Groups Tab allows you to manage, create, and edit User Groups, which are primarily used when scheduling Reviews. See the screenshot below for highlighted items and beneath the screenshot for descriptions of said items.

- Box # 1: Shows the Groups tab as currently selected.
- Box # 2: Shows the Group that is currently selected. You can tell which Group is currently selected from the slim green line that appears to the LEFT of the Group name and by matching the Group name with the name shown in Box # 3.
- Box # 3: Shows three attributes for each user group:
- Name: This is the Configurable name of this user group. This can be edited at any time without breaking anything, but keep in mind that we train Employees on the names of these user groups so please do not change these without a good reason to do so.
- This group is a Tree/Hierarchy: Essentially, this allows this group to be a "Parent Group" for subgroupings underneath this user group. WPP does not use this functionality at this time.
- Retired: If this box is checked, this group will be considered Retired and will no longer be available for selection from the normal spots where user groups are used.
- Box # 4: Shows the Delete button. This allows you to Delete the user group selected. Be careful about doing this! Deleting user groups that will be used for Reviews can screw up the workflow of the Employees who are creating the reviews, so please only do this if the User Group was created in error.
- Box # 5: Shows the Save button. If you've made any changes, you must hit the save button in order for your changes to be effectuated. Otherwise, your changes will be discarded.
- Box # 6: Shows the New Group button that, when clicked, will create a new User Group. You can then change the name/settings on that user group as desired.