In order to capture leverages data, a tool is created in REDCap.
This project consists of two data collection instruments one of which is a repeatable form. Both are available to be used internally as a form as well as externally as a survey.
The first survey contains the basic necessary information to identify a request. This instrument is meant to be filled by an imported data file (Excel) and is not visible by external users. The file will be loaded by first getting the template and filling it from legacy db, Blackbud search, ICTR giant spreadsheet or any other source. This form can only be edited and visible internally.
The repeatable instrument can be filled several times. The responses can be edited also internally as well as externally even if it is submitted and/or marked as 'Complete'.
From External Recipient's Point of View
When an email is sent to participants through REDCap, they will have a link to their survey queue that takes them to a screen like the following and they need to click the 'view all' link (pointing to with the red arrow in the image below) to see the whole list:

In the list, there is option to edit any of the leverages they entered previously or enter a new one:

The links in the queue (green box 3) are the entries already filled before and the user is able to go to any of them and change them.
They also can add a new leverage by hitting the 'Take this survey again' button.
From Internal Recipient's Point of View
For a user to be able to reach the project internally, they have to have a REDCap account that can be requested be filling out a form through the following link:
https://redcap.ictr.wisc.edu/surveys/?s=MPHF4FWP4D
And then after a couple days, they will receive an email with instructions on how to login. Using their NetID and password, they need to login which will create the account and the user can be added to the project then by a project's admin.
The name of the project is "WPP Leveraging Project".
Entering the project's profile and setup page, the user will see the following screen which I call:

Some of the main functionalities are showing in the project setup image above.
Black box (1) on the top left hand side: This section will take you to the project setup, to the list of the projects and to the REDCap Messenger.
Red arrows (2) throughout the image: either of these links that any of those arrows are pointing to, will take the user to the instruments/surveys for editing the instrument itself. This is NOT for data entry!
Green box (3) on the left hand side panel: This link takes the user to the module where they can enter data or modify existing ones.
Pink box (4) on the left hand side panel: This link will take the user to the survey screen where they can see the link and also the list of the participants. Emails to participants can be sent from that module.
Blue box (5) on the left and side panel: This will take you to the import/export modules where the user can either export the data into spreadsheet, or import data through preferably spreadsheet. We use this mainly for bulk uploads for instance the giant ICTR spreadsheet.
Entering/Modifying Records
Manual Data Entry
Click on "Add / Edit Records" on the left hand side menu (Red box number 1 below):

The screen provides the functionality to either Edit an existing record or add a new one.
Edit an existing record
To edit an existing record, the user can choose the dropdown shown with the blue arrow (2) in image above. This will open a dropdown with ALL the records in database.
Alternatively, one can do a Data search based on certain field and find the record that way.
Add a new record
The user can add a new record manually by clicking the "Add new record" button shown in the image above with the green arrow (3).
After entering/modifying the data, there are a couple options:

Save and exit: Saves the changes and exits the form
Save and Stay: Saves and does not exit the screen
There is an arrow beside the "Save and Stay" button that when clicked, it opens more options:

Data Import
For importing data, the best way is to download the template spreadsheet and fill it out. To see how to fill it out, it is a good idea to go to export module and export one to see how the data is supposed to look like.
After completing the spreadsheet, we import it into the import module which runs a data sanity check and shows the issues to us.
We need to resolve the issues in order to pass and import. That is why downloading the template is so important → it saves time and hassle.
Manage Survey Participant
We can reach this module by clicking the "Manage Survey Participant" link on the left hand side panel shown in the image below in the brown box (1):

There are a couple important functionalities under this module.
Survey link
The first tab on manage survey participants screen shows all the different ways the survey link can be obtained. Image above shows that screen.
Participants List
The second tab will bring the list of participants (shown in the image below with the red arrow number 1):

Each survey has its own list and it can be switched from the dropdown shown in the green box number 2. It is not much important until a correspondence is being sent out.
Compose Survey Invitation
In this case, we have to choose "Leveraged Source" and click the button "Compose Survey Invitation" (purple arrow number 3 from the image above) which opens up the following screen:
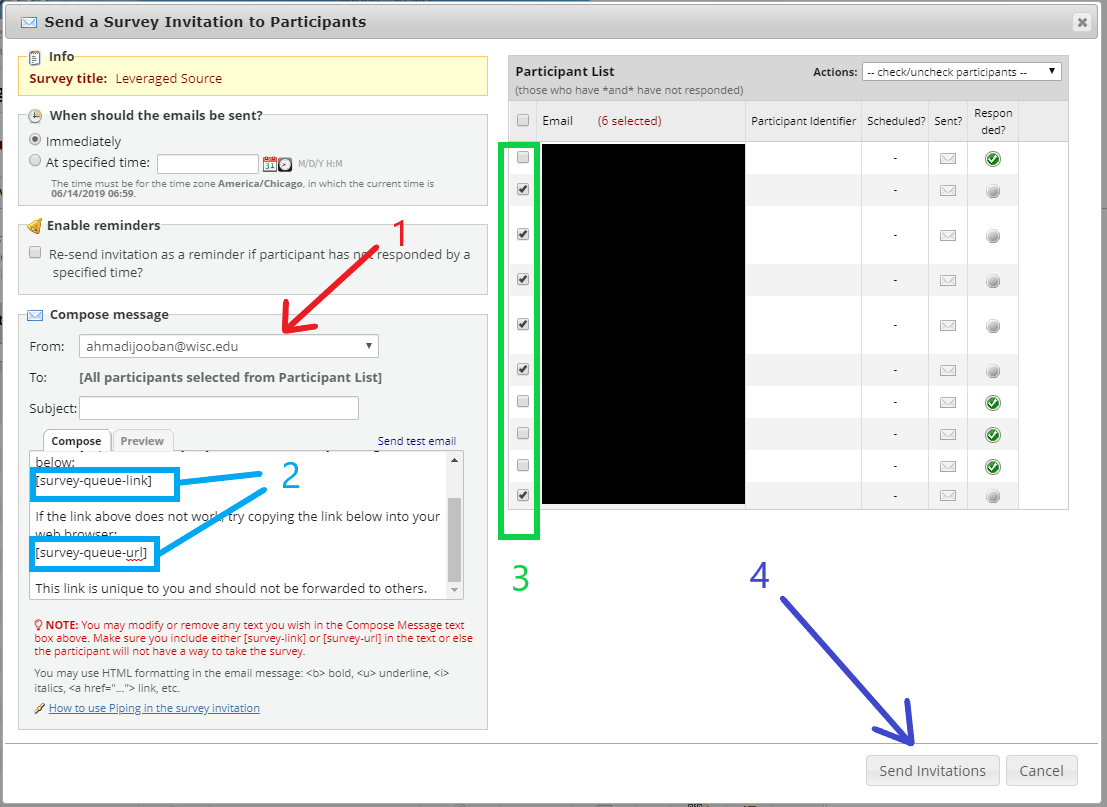
The from email does not work properly. The email is being sent by noreply@questdiagnostics.com.
In the text, make sure to change the survey-link to survey-queue-link and survey-url to survey-queue-url (as shown in the two blue boxes number 2 above number).
The emails can be chosen by checking the checkboxes beside them in green box (3) above.
If everything looks good, then click the "Send Invitation" button to send it. Because we changed the survey-url to survey-queue-url, we will see the following warning popping up:

Click the "Leave as id with no survey link" button (red arrow number 1) and if the popup keeps appearing, then click on the "x" button on top (shown with green arrow number 2). And if all goes well, the following popup appears:
