...
Looking at one of the views from the list, we can see when it was last updated and also the following functions:
- Mobile icon: makes it default mobile view for the record type.
- Pencil icon: will bring up the edit screen.
- Copy icon: will make a copy and saves it in the list.
- 'X' icon: will remove the view after a warning pop up receives proper response (Yes/No).
Clicking the pencil (Edit) button will bring up the edit screen:
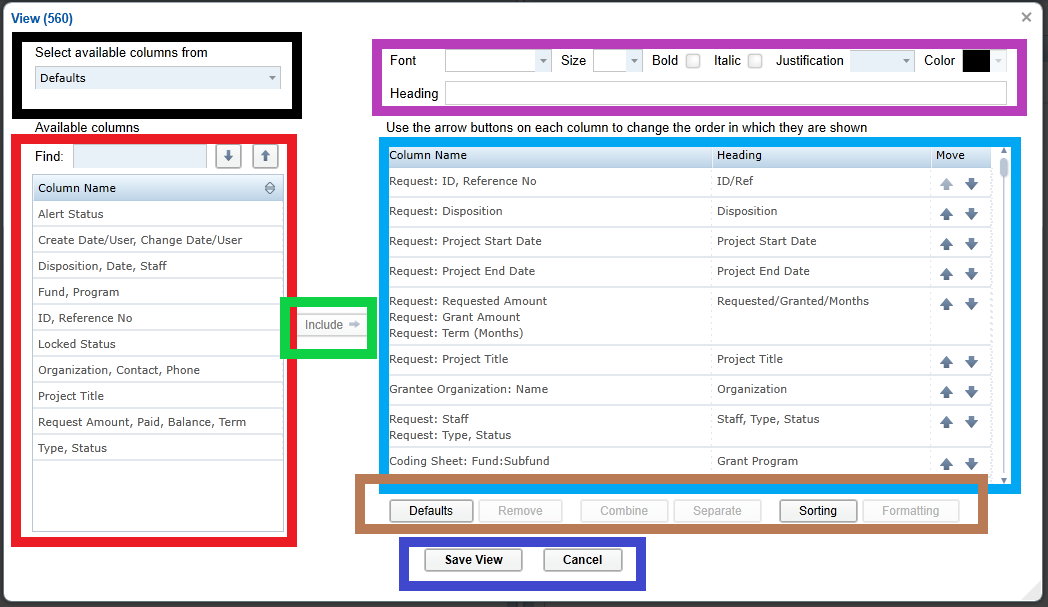
This screen is made out of a few sections explained below:
Black box on top left hand side:
This includes a dropdown with accessible options for the record type our view is in. Choosing any of them will allow user to use the set of columns in that modules to be available for adding to the view.
Red box on left hand side:
The list of the available columns to choose from will appear in this frame. We can choose them then hit include or double click them. They can even be added more than one at once by clicking on them while holding the 'Ctrl' key down to select as many as we wish and then hit include.
Green box:
See the 'Red box' description for it.
Blue box in the middle of right hand side/ the main area:
This is the main area for showing the decisions made on how the view will present. It includes the columns that were chosen from the left hand side list. It will also allow the user to customize the columns by combining multiple of them into one or splitting them up for example. The arrows will move the column to top or bottom.
Pink box from top right bottom:
This will allow font changes and also the heading of the column can be modified.
Purple box at the bottom:
Will save or revert changes.
Brown box from near bottom:
This will give further options that can be modified some through a different screen:
Defaults: Will through out all customization and bring back the default settings for the view on that particular record type.
Combine: Will combine two or more columns when selected.
Remove: Will remove the column(s) when chosen
Separate: Will split the combined columns back up
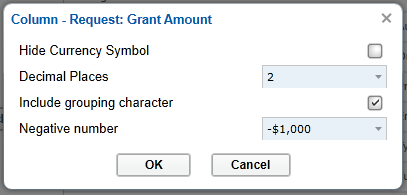
Formatting:
Will bring a format setting window depending on the type of data for the chosen column. For example, a currency field:
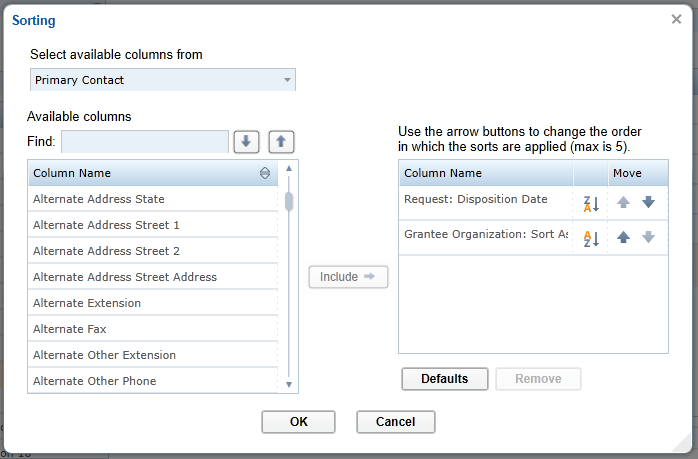
Sorting:
This is very similar to the Edit View screen except the columns in the right hand side will determine the sort order and direction:
Hit OK to save and 'Save View' to save the view brings the following screen:
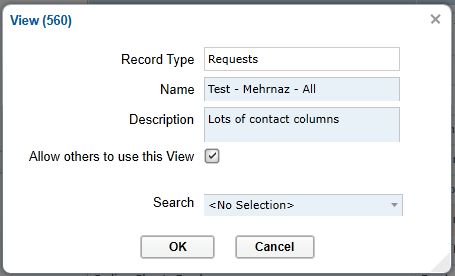
The user can review this and modify if necessary or leave it as is and then hit OK.
You're done!