...
Fluxx has a great article discussing all of this that can be found here: https://fluxxdev.atlassian.net/servicedesk/customer/portal/1/article/1795951428?src=-1634618103
To send an email from the Fluxx system, six things are required:
- The "Alert Enabled?" checkbox must be checked (otherwise the email will not generate)
- An internal name for the email must be supplied (needed just to save the email alert)
- A subject line for the email must be entered (otherwise email will have 'No Subject'; emails that lack subjects sometimes gets automatically moved to the Spam folder, so this is not desired)
- Text for the body of the email must be entered (otherwise what is the point of this email alert)
- At least one recipient must be specified (otherwise no one will receive the email)
- A trigger mechanism has to be supplied (otherwise the email will never be sent)
Emails Tab Overview – First Settings
See the screenshot below to see the highlighted items from the Emails tab and beneath the screenshot for descriptions of those highlighted items. These settings fulfill the first 4 requirements from above, but do not completely cover the recipients or the trigger mechanism (continue to the next subsection for the settings that deal more completely with those requirements).
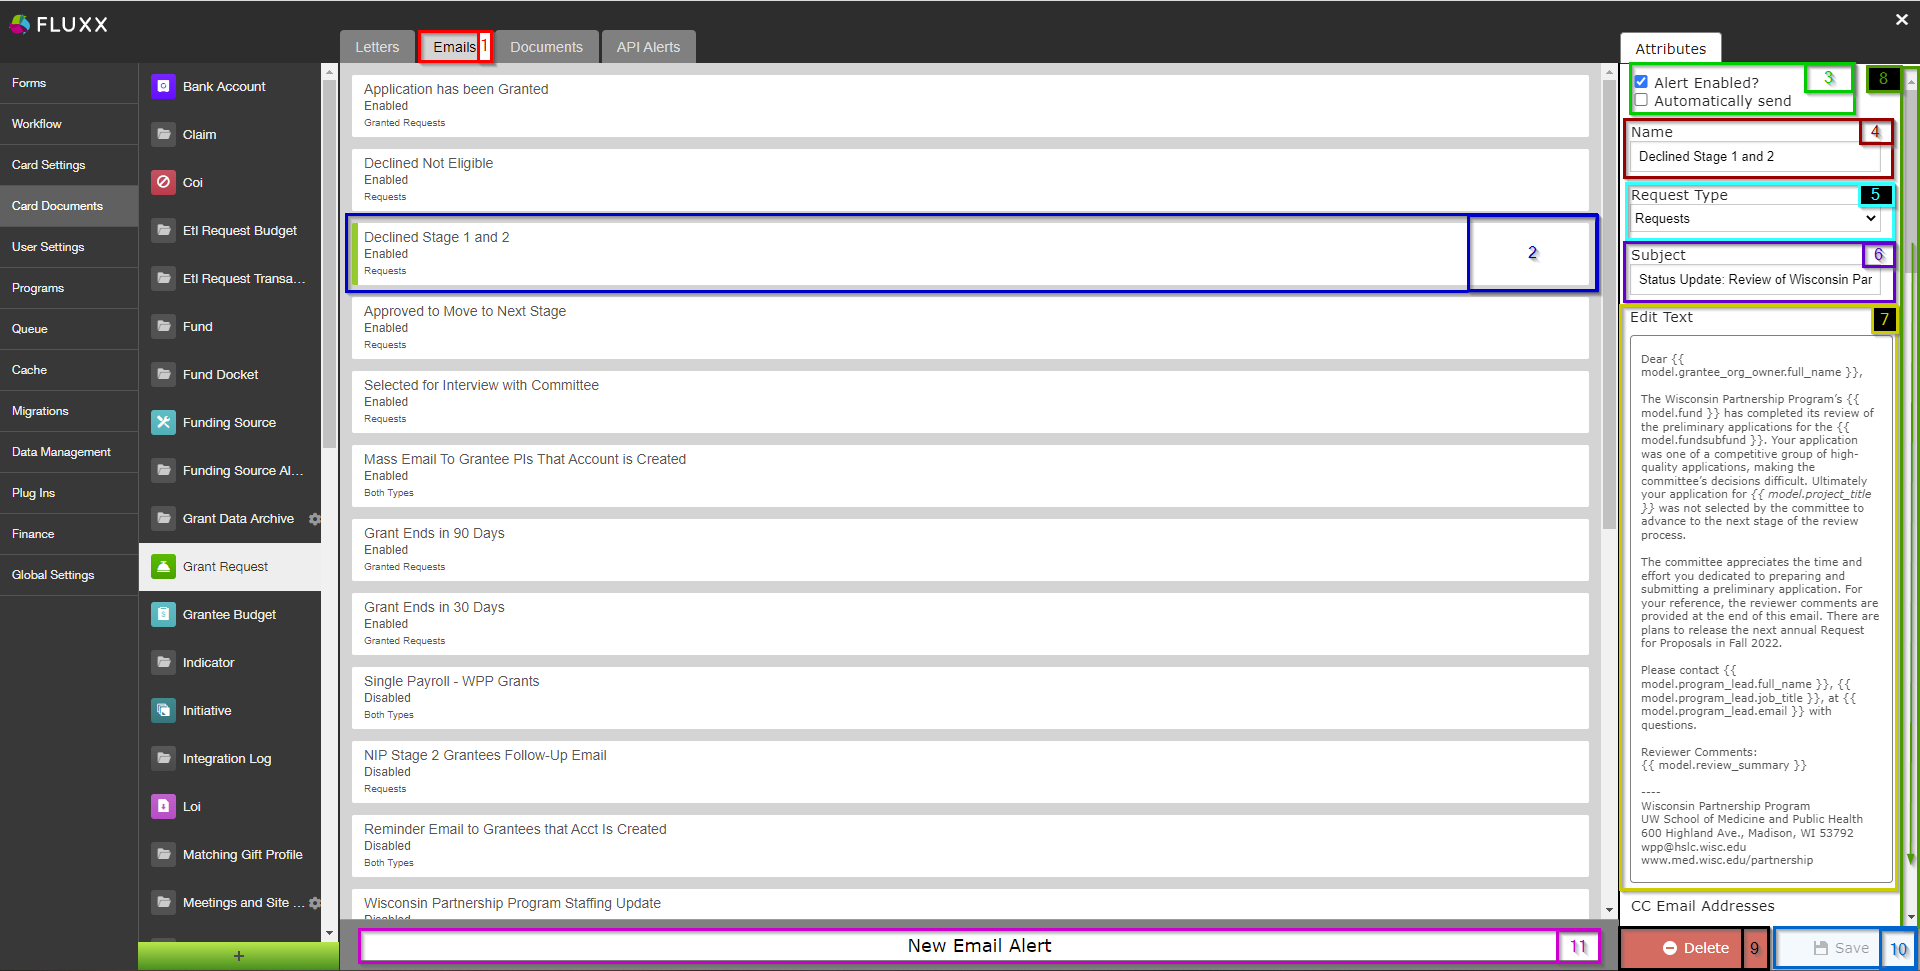
- Box # 1: Shows the Emails tab selected.
- Box # 2: Shows the Email that you currently have selected. You can tell which Email is currently selected NOT ONLY based off of the name (match name of Email with "Name" from box # 4), BUT ALSO from the slim green line that appears to the LEFT of the Email name.
- Box # 3: Shows two very important checkboxes that control whether or not (1) the email is active and (2) the email will send automatically and bypass the email queue.
- Alert Enabled Checkbox: Determines whether or not the Email alert is Enabled. If checked, the email is considered Enabled and can be sent. If NOT checked, then the email will not send even if the criteria are met.
- Automatically Send Checkbox: Determines whether or not the Email will go to the Email Queue when it 'triggers' (see the section below for email triggering). If NOT checked, when the email is triggered it will go to the Email Queue and will need to be manually pushed out of the queue by a user. If the checkbox IS checked, then, when triggered, the email will completely skip the email queue and be sent directly to the selected recipients.
- Box # 4: Shows the internal Name of the email alert. This can be changed at any time without breaking/impacting anything in the system (except for the name of this email alert as it appears in the list of email alerts for the selected Record Type).
- Box # 5: Shows the Request Type. This is only an option on the Grant Requests Record Type; it allows you to choose from Requests (Applications), Granted Requests (Awarded Grants), or Both (Applications and Fully Awarded Grants).
- Box # 6: Shows where you can edit the Subject Line of the email message. Note: This is the ONLY part of the email message where you CANNOT pull in dynamic information (i.e. Project Title from a Grant Application). Therefore, subject lines should be as generic as possible.
- Box # 7: Shows where the text for the Body of the Email is configured. To edit the text here, click on the button "Edit Text." Editing Email body text is the same as editing text in Forms. See "Editing Text" for more information.
- Box # 8: Shows the Scroll Bar that you can and should use to view more email settings. One needs to scroll down in order to see the additional settings.
- Box # 9: Shows where you can delete this email alert.
- Box # 10: Shows where you can save your work on the email alert. Note: You need to Save this record after making any changes in order for those changes to be applied; if you close this page/switch to another after making changes without previously clicking on the Save button, all unsaved changes will be discarded.
- Box # 11: Shows where you can create a New Email Alert for this given Record Type (in this screenshot, Grant Requests).
...
The screenshot below is taken after scrolling down on the "Attributes" tab using the scroll bar called out in box # 8 from the screenshot above. See the screenshot for highlighted items and beneath the screenshot for descriptions of said items. These items begin to deal with the Recipients requirement, but are not the only settings that determine who will receive the alert.
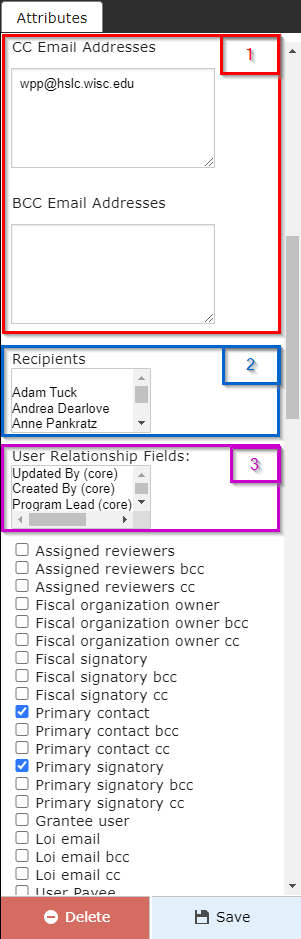
- Box # 1: Shows where you can configure hard-coded CC and BCC email addresses. These have to be typed in manually, and if multiple emails addresses are desired in one box (i.e. two email addresses in the CC Email Addresses) then the email addresses must be comma-separated.
- Box # 2: Shows the "Recipients" box that displays a list of all users in the system marked as "Employees" to allow you to send emails to specific employees if so desired. If it desired to select multiple employees to send the email alert to, then CTRL + Clicking will allow you to select multiple users from the list. Alternatively, Shift + Clicking will perform an inclusive selection (i.e. selecting every user between two records including the starting and ending record).
- Box # 3: Shows the "User Relationship Fields" allowing you to send this email alert dynamically to users based off of their relationship to the record. For example, you can send email to the last person who Updated the record (though this particular relationship is not recommended for use in email alerts).
...
- Box # 1: Shows more user relationship fields that can be used to determine to whom the email alert should be sent. At the WPP, we generally use these checkboxes to determine who the email should go to. The User relationship fields here relate back to the Grant Request record, even if the email is NOT in the Grant Request record type. For example, if I'm creating an email in the Request Report (AKA Requirements) record type, selecting the "Primary Contact" and "Primary Signatory" to send the email to will make the system link back from the Requirement to the related Grant record and pull in the email address's from the Grant's Primary Contact and Primary Signatory.
- Additionally, other users linked to the Grant that AREN'T grantees can be selected as well; you can see from the list that "Program Lead" (as well as Program Lead CC and Program Lead BCC) are all options in the list in case you always want to include the Program Officer in any email alert to the Grantees.
- This is the main section used to complete the recipients requirement
- Box # 2: Shows the first part of the email alert page where you can configure how the email alert is triggered. The main way that the WPP triggers email alerts is based off of status changes.
- This is how to configure the Trigger Mechanism email alert requirement.
- The Alert Trigger Type has four different options for selection:
- Filter: email alerts with this option selected will send anytime a record meets the filter criteria and has a value change on the record. This alert will trigger over and over every time the condition is met. For this reason, One Time Filter is generally recommended over the simple Filter option.
- One Time Filter: email alerts with this option selected will trigger the same as filtered alerts with one important distinction: this email will only trigger once and will NOT send again. For this reason, it's generally preferred to use One Time Filter rather than Filter.
- Field: Any change in any of the fields that are selected will trigger the email alert to be sent. You can select multiple fields to be the triggered, and one email will trigger for changes to ALL the fields selected.
- Once Field is selected, a list of all available fields for that model will appear. Select the field(s) you want to trigger the alert to be based on from the list.
- State: triggers an email alert when a record enters (i.e. first moves to) the workflow status (AKA state) configured for the specific email alert. This is the most used Alert Trigger Type by the WPP.
- Once this option is selected, a workflow state or states will need to be selected in the box that appears.
...