Child Articles Underneath This Parent Article
- (WPP Staff Only) Fluxx Training Video Recordings
- IMPORTANT: Fluxx Considerations
- Contacts in Fluxx
- Fields, Field Types, and Field Modification
- Fluxx Applications
- Fluxx Data Structure Simplified
- Fluxx Funded Projects Page Report
- Fluxx Grantee Portal
- Fluxx Helpful Links
- Fluxx Merging Duplicate Records
- Fluxx Progress Report Review
- Fluxx Production and Pre-Production Environment
- Fluxx External Reviewer Assignment
- Fluxx Reviewer Portal
- Fluxx Search Functionality
- Generic and Custom Fields
- How to Get Support and Frequently Asked Questions
- New Users, Organizations, and Registrations in Fluxx
- The Admin Panel
- Cache Menu of the Admin Panel
- Card Documents Menu of the Admin Panel
- Card Settings Menu of the Admin Panel
- Data Management Menu of the Admin Panel
- Finance Menu of the Admin Panel
- Forms Menu of the Fluxx Admin Panel
- Global Settings Menu of the Admin Panel
- Migrations Menu of the Admin Panel
- Plug Ins Menu of the Admin Panel
- Programs Tab of the Admin Menu
- Queue Menu of the Admin Panel
- User Settings Menu of the Admin Panel
- Workflow Menu of the Admin Panel
- DocuSign Integration with Fluxx
- Fluxx Comm Team Workflow
- Fluxx Grant Amendments
Table of Contents
Overview
Fluxx Grantmaking is a software designed to manage the grants workflow from end to end, much like the predecessor system we used, Blackbaud Grantmaking.
Some concepts to note are included in this page.
Before you begin: Please make sure to refer to the Employee Reference Guide as well.
Website URL
The main landing (home) page for WPP's Fluxx instance is: https://wpp.fluxx.io/user_sessions/new
Record Types
To organize data properly, the data is managed with several unique record types.
All of these record types can be displayed in various ways using Cards – more on that in the Cards section, below.
The main record types that the WPP uses are:
Organization Records
These records store data on the organization that submitted the request (or, in PERC's case, shows data relating to the Principal Investigator of the project). In OAC's case, they also store the Tax ID of the organization in question.
Request/Grant Records
These records store all of the data related to grant applications, and subsequently grants if the application is approved. Request/Grant records are the central record from which all other records in the system link in one way or another.
People Records
These records store information regarding the person or user who is signing into Fluxx. These records store the email addresses, titles, and login information (i.e. password) of the users in question.
Review Records
These records store the scores, comments, and other information relating to the reviews that a reviewer has been assigned.
Requirement Records
These records store information relating to regularly scheduled requirements (such as Financial Status Reports, OAC and PERC Progress Reports, etc.) that are assigned to specific Grants and Grantees.
Cards
Within Fluxx, a Card is the visual display of a single record type or of a subset of records within a single record type.
For example: the People Card, when not filtered, will display EVERY person/user record in the database, including staff members, reviewers, grantees, and various other contacts.
Not all cards display all records of a specific record type, however. As another example: the Requests and Grants Card stores ALL records for applications – ranging from those applications that were actually granted and are now closed grants to the applications we received and declined for one reason or another. The Requests Card also shows data from the “Request and Grants” record type; however, it will ONLY show you applications that were NOT granted, either because the application cycle is still in an early phase or because the application was declined.
Cards are also the individual "components" that form together to make a complete dashboard. For example, "3. Requirements Dashboard" contains a several different cards filtered to show Requirements moving through the workflow. The first Card, called "New" displays Requirements in that status of "New," I.e. they have been published and are waiting to be submitted by the grantee. After that, there's a Card called "Finance Review," showing all Requirements that are waiting for a review from the Finance Team, and so on.
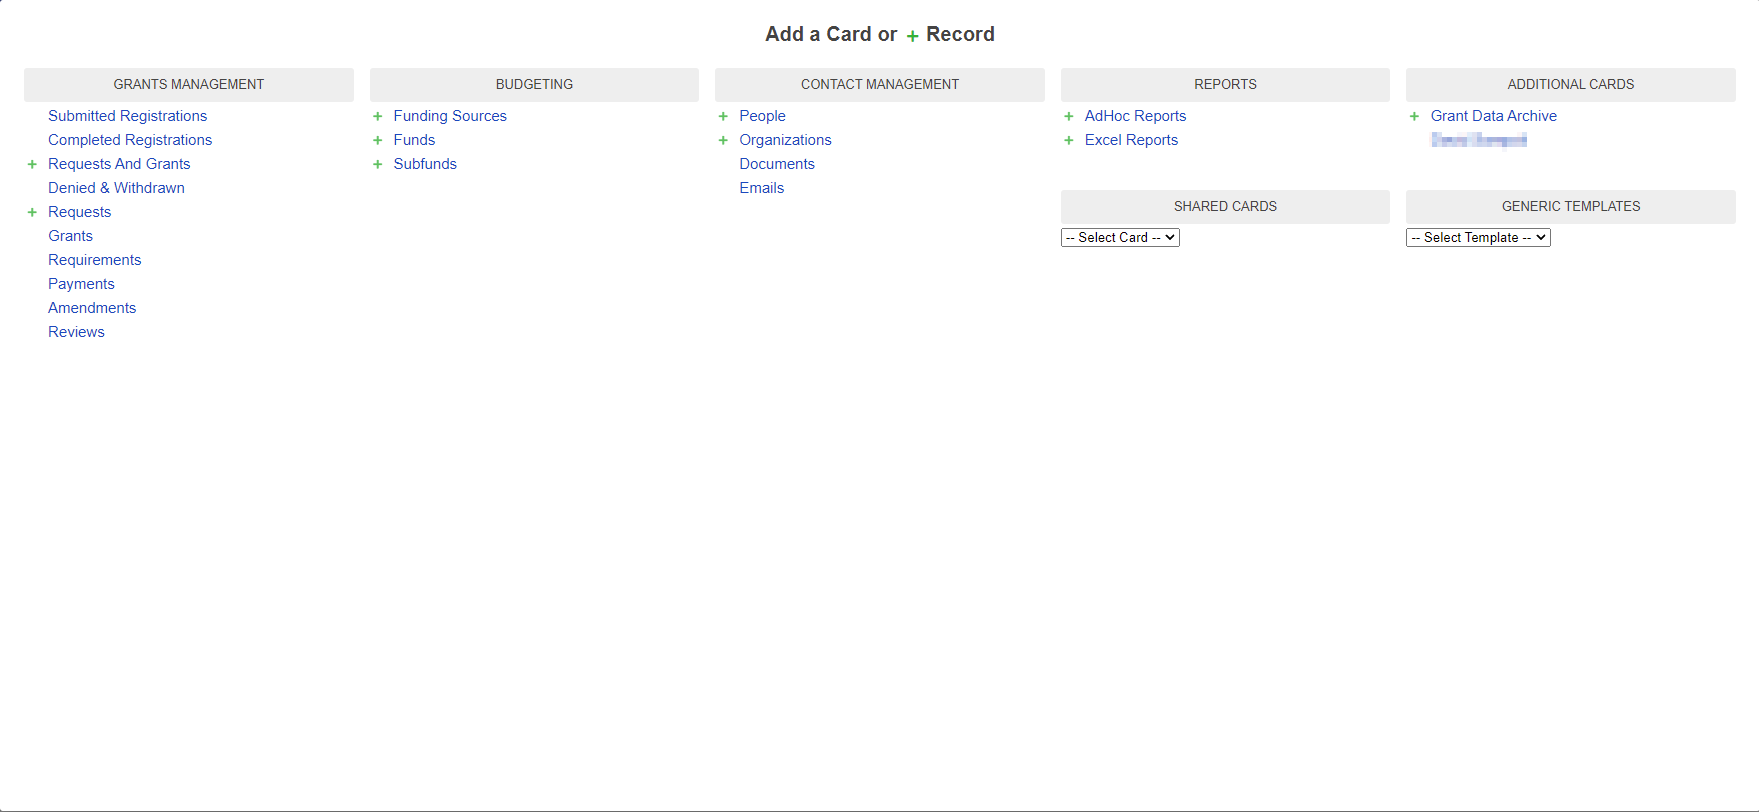
A view of ALL of the various Cards available in the system:
Finding Linked Records On a Card
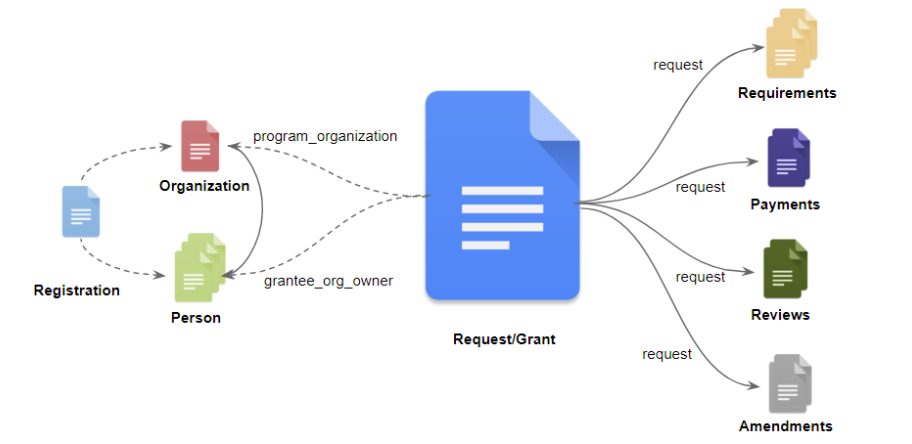
There is a relationship between the records types listed above. Please see the diagram below which outlines exactly how every data type connects to every other type within the Fluxx database (as you can see, the Request/Grant is at the center of all connections):
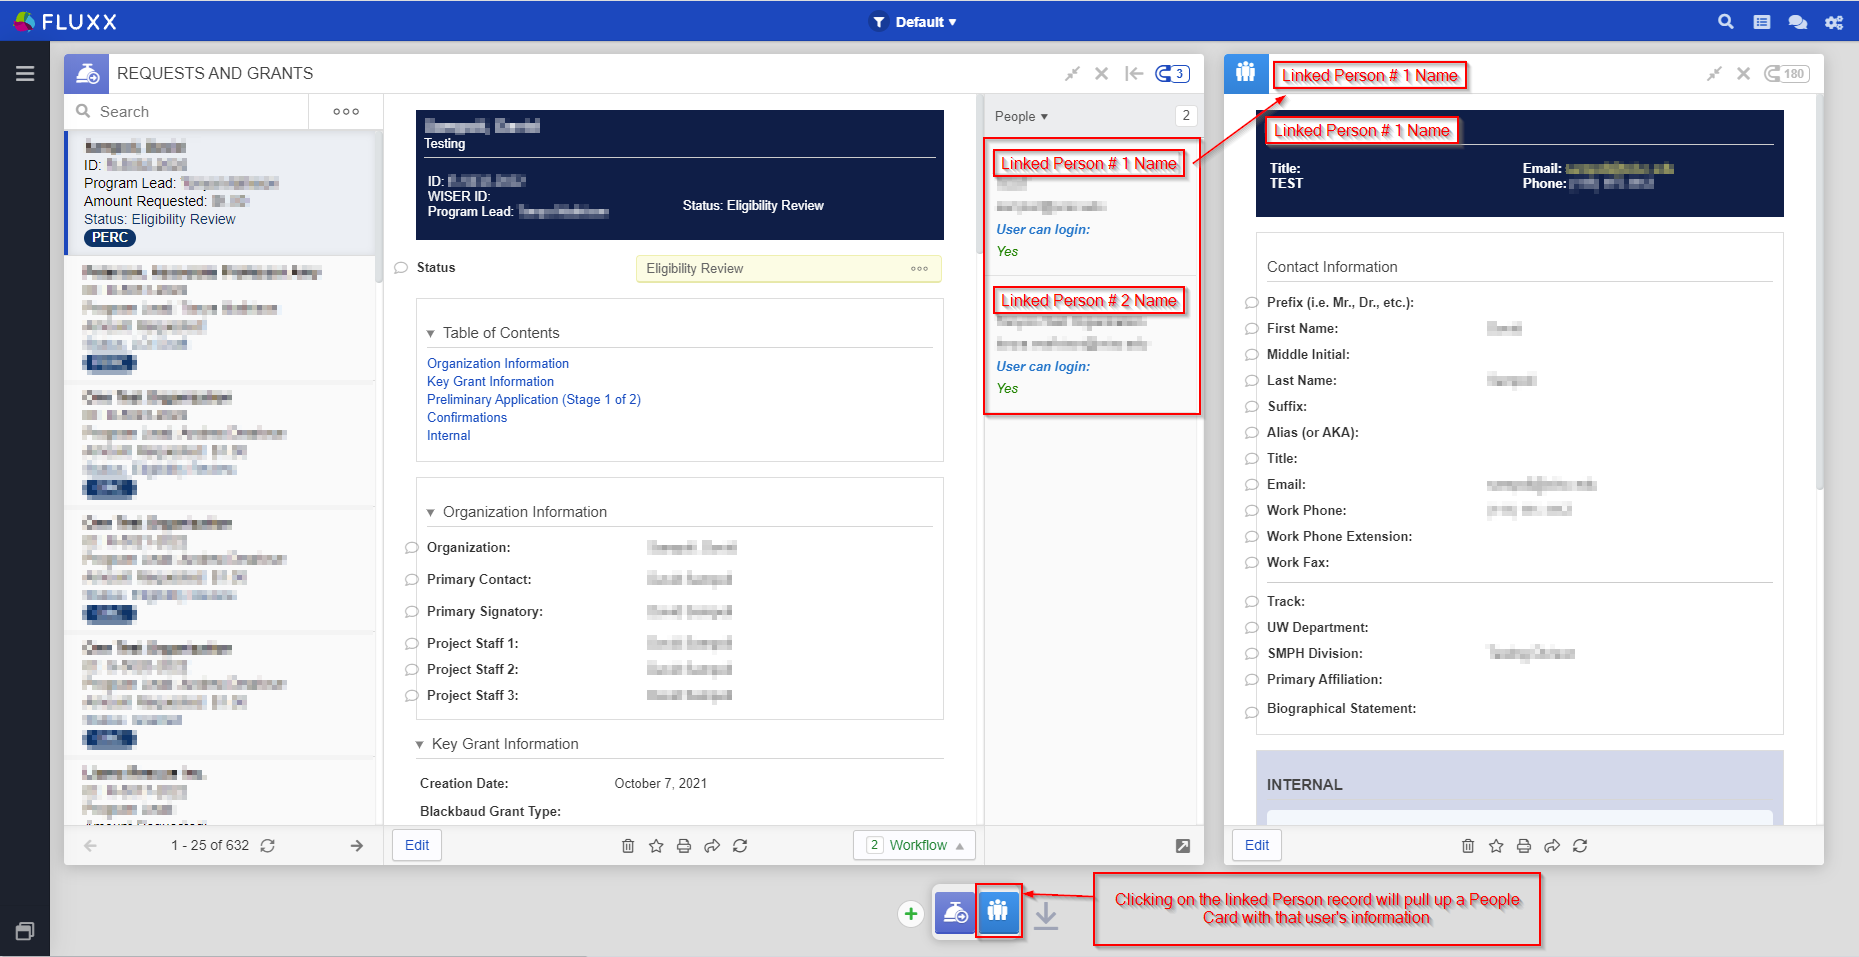
When looking at any record of any record type, you can find connections to other records via the "Magnet" icon found in the top right-hand corner of the Card (see red # 1 in the screenshot, below). As displayed in the screenshot, there is a number next to the "Magnet" icon which represents the total number of linked records to the currently selected/displayed record. When you click on the "Magnet" icon, a dropdown menu will appear (see red # 2 in the screenshot, below) showing you specifically which records are connected. In the example shown, below, the selected record has 2 linked "People" records and 1 linked "Organization" record.
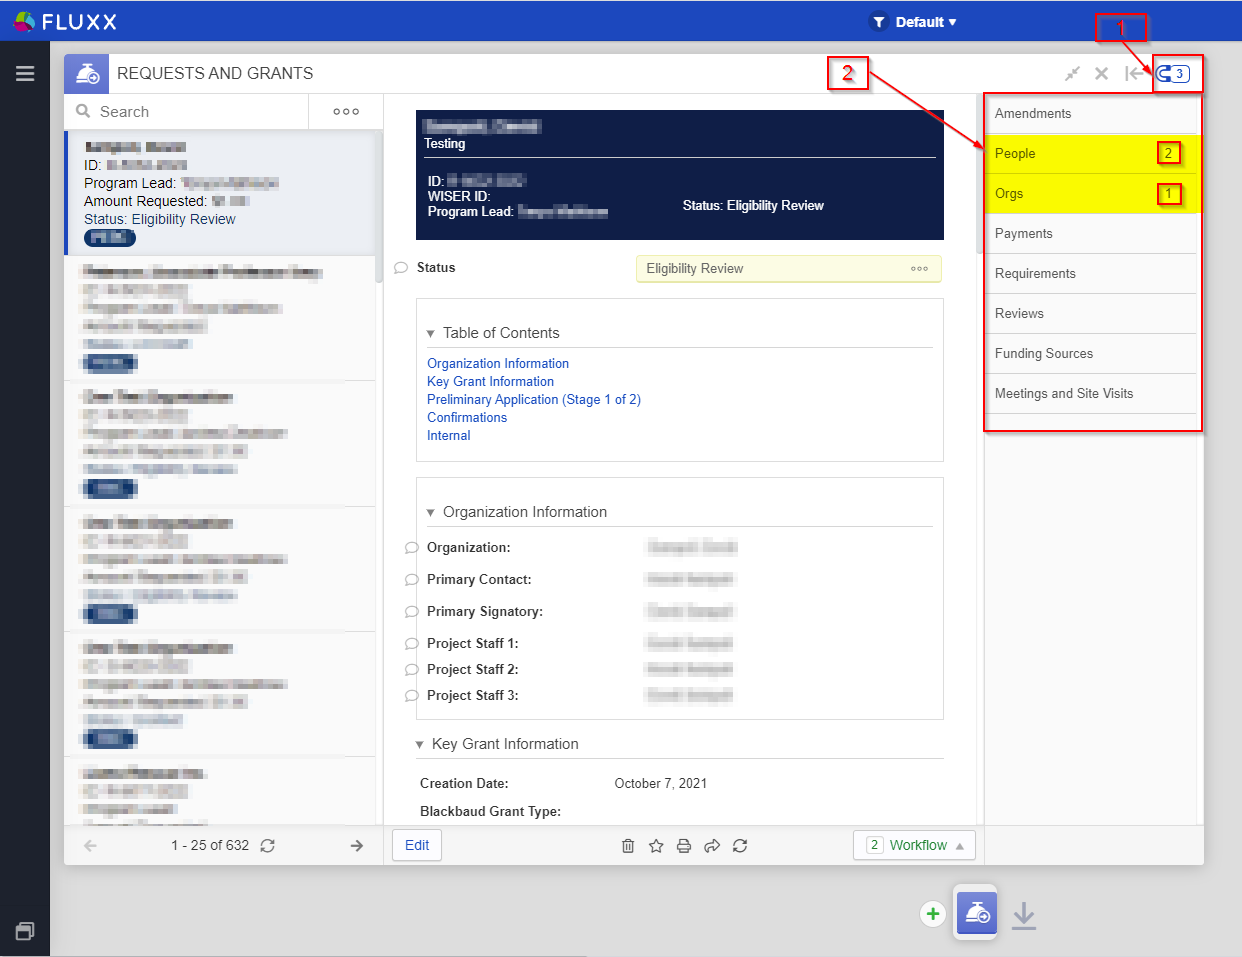
If you would like to see specific details about the connected records, you need to click on the name of the record type itself (I.e. click on "People" to see the People records connected to this record).
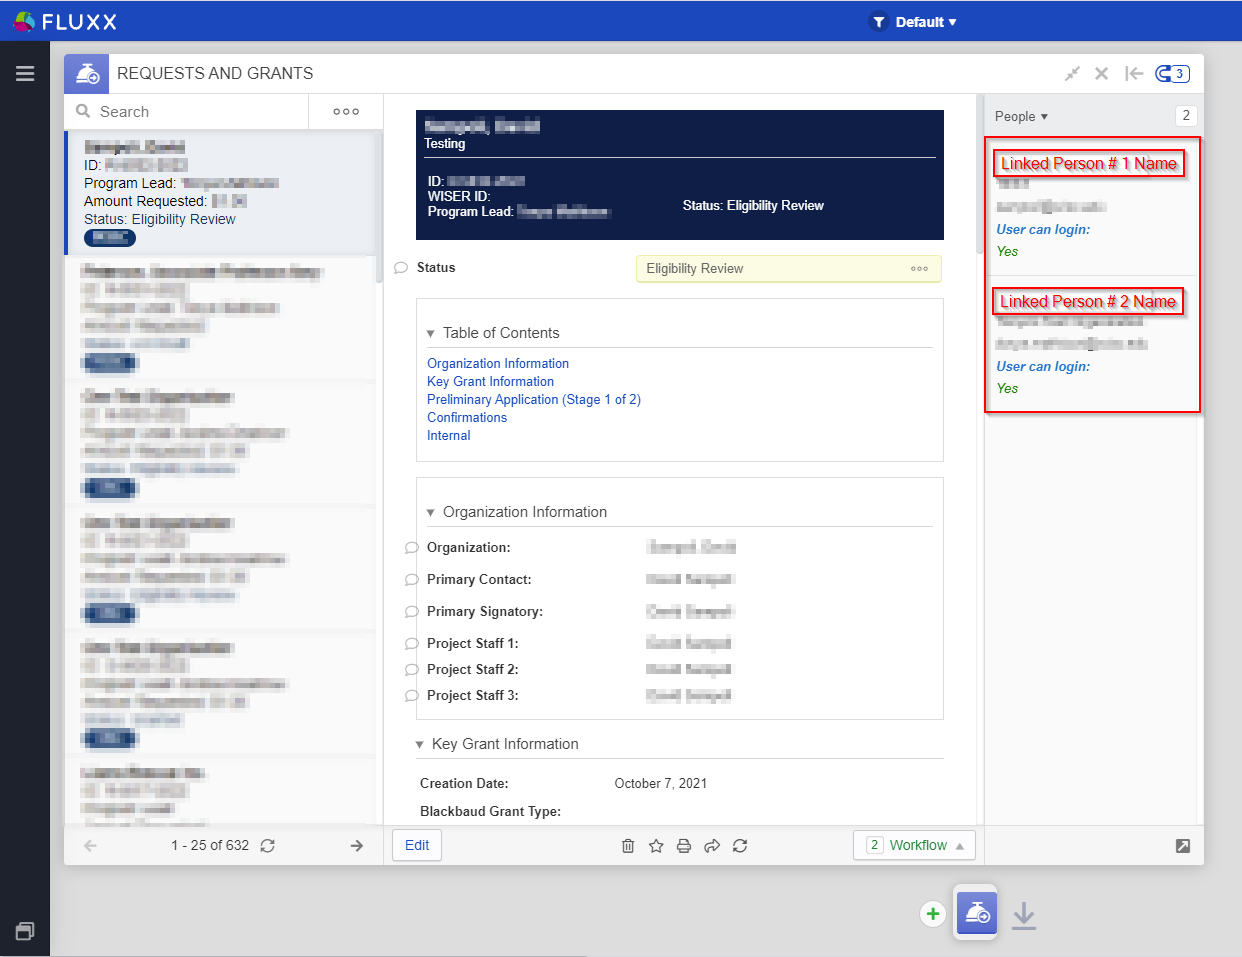
From here, it's easy to jump to the connected records. If you'd like to open Linked Person # 1, for example, you would just need to click on their name from the dropdown menu. Doing so will open up another card to the right of your currently selected one (so, in this example a People Card would pop up to the right of the "Requests and Grants" Card). Please see the screenshot below to see how that People Card will appear.
Forms
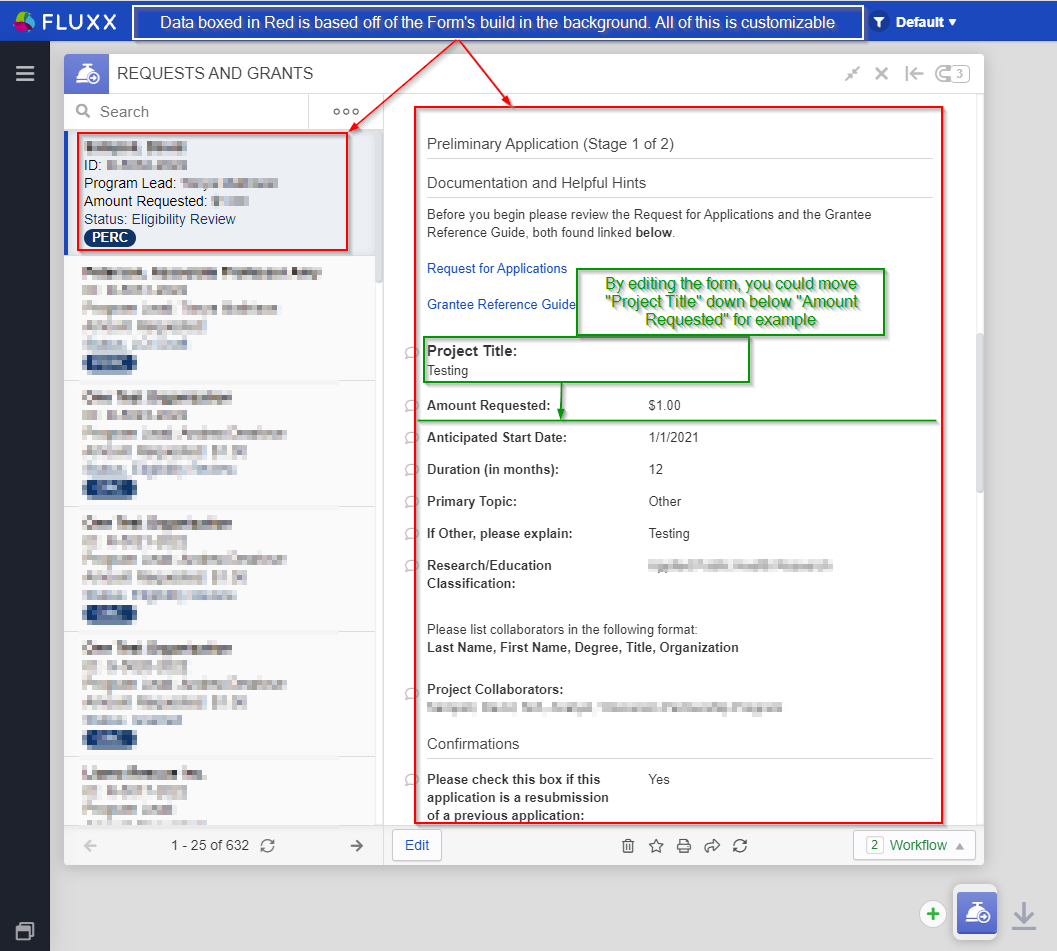
While Cards hold the data are the individual "components" that form dashboards, Forms are what determine how the data is displayed. For example, by editing a Form you could move the a field, say "Project Title," on a Request/Grant down below the field "Amount Requested." Please see the screenshot, below, for an example of this. Forms determine how essentially everything in the system looks from Applications and Requirements to Users and Organizations.
All Forms are edited via the Admin Panel. Please see the dedicated Admin Panel page for detailed information on how to edit forms.
Reporting
Within Fluxx, there are many different ways to report on data that you need to view. The first, and main way, we report is simply by using our dashboards. The WPP has set up several dashboard templates that are pre-filtered to show groups of records that are important for us (e.g. the Requirements dashboard displays the Grantee Requirements that we need to track). Each Card can also be exported to Excel if so required.
Beyond standard dashboards and cards, there are two other types of reports that can be used: Ad-Hoc Reports and Excel Reports. Please see the dedicated Advanced Reporting page for detailed information on these two types of reports.
Searching
There are three different search types:
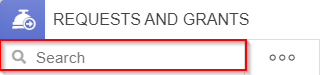
Card Search – From within the card itself, you can type in the "Search" bar to find specific records. This is a "brute force" way of searching as it will try to find exact matches and can't be used for specific field criteria (e.g. via this method I cannot search for Grants whose Grant Amount is greater than $XXXX). Instead, you can type in things such as the 4 digit Grant Reference Number (or grantee organization name) in order to find records associated with a specific Grant.
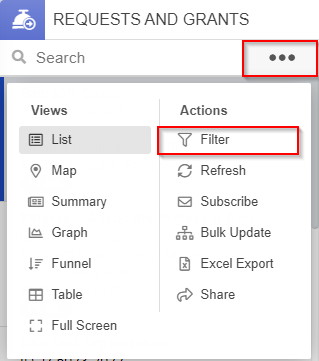
Card Filter – Also found within the card itself, this is the precision method for searching records. From within the filter menu (found by clicking on the "Three Dot Menu" from within the card and then clicking the action "Filter"), you can search on any field within the system to find records that match the specific criteria you enter. For example, within filters you could find Grants whose Grant Amount is greater than $XXXX and where the Primary Topic is Cancer.
Universal Search – Allows you to search every record in the system at once for key words/IDs, names, etc. Very powerful for certain queries, but don't rely upon it for more complexes searches/to find records based off a certain criteria (i.e. something that can't be done easily in Universal Search is finding all grants whose grant amount is greater than $100,000).

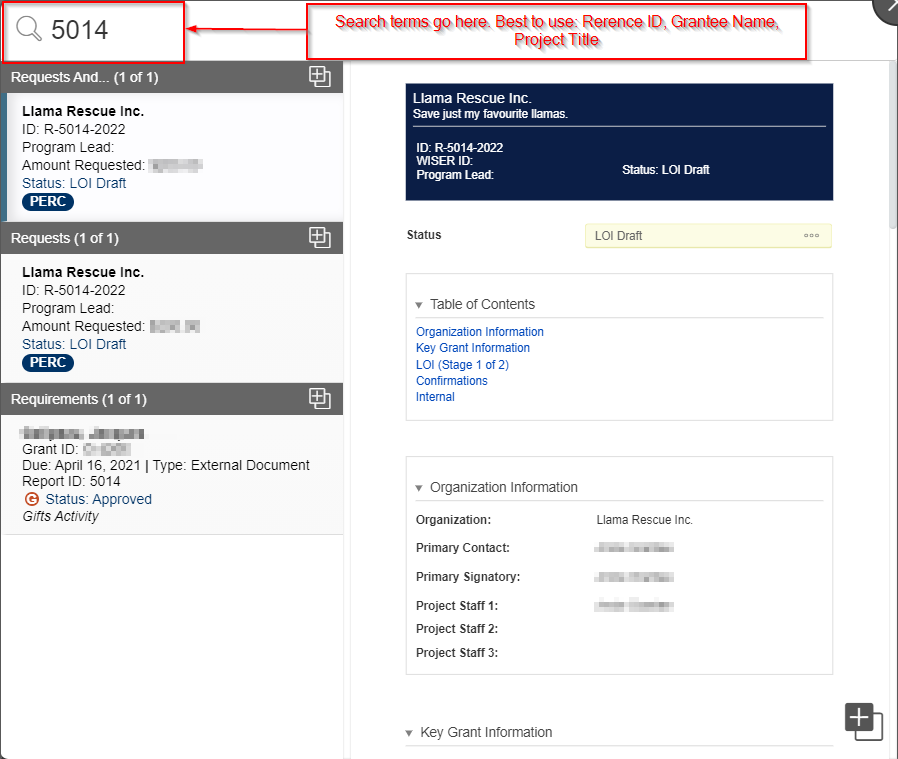
Once Universal Search is open, you can type terms or numbers into the search bar to search all records that might meet that criteria. For example: I know I have a test application with request # 5014. I type that number into the Universal Search, and I find the Request and any Requirements, Payments, Contacts, etc. that have that ID or that are connected to that request ID.
Note: Not all records that are returned are necessarily related to the Request I'm trying to look for. As you can see from my screenshot, below, the Requirement that is returned is NOT related to the Llama Rescue Inc. testing grant application, but was returned by the Universal Search because it's ID (requirement ID) is also 5014.
More on Searches under Search Functionality page.
Correspondence with Grantee in Fluxx
Within Fluxx, there are many different ways to generate correspondence to grantees. Additionally, Fluxx has a way to store correspondence that occurs outside of the system to records that exist within the system.
Saving Correspondence From Outside the System to Fluxx
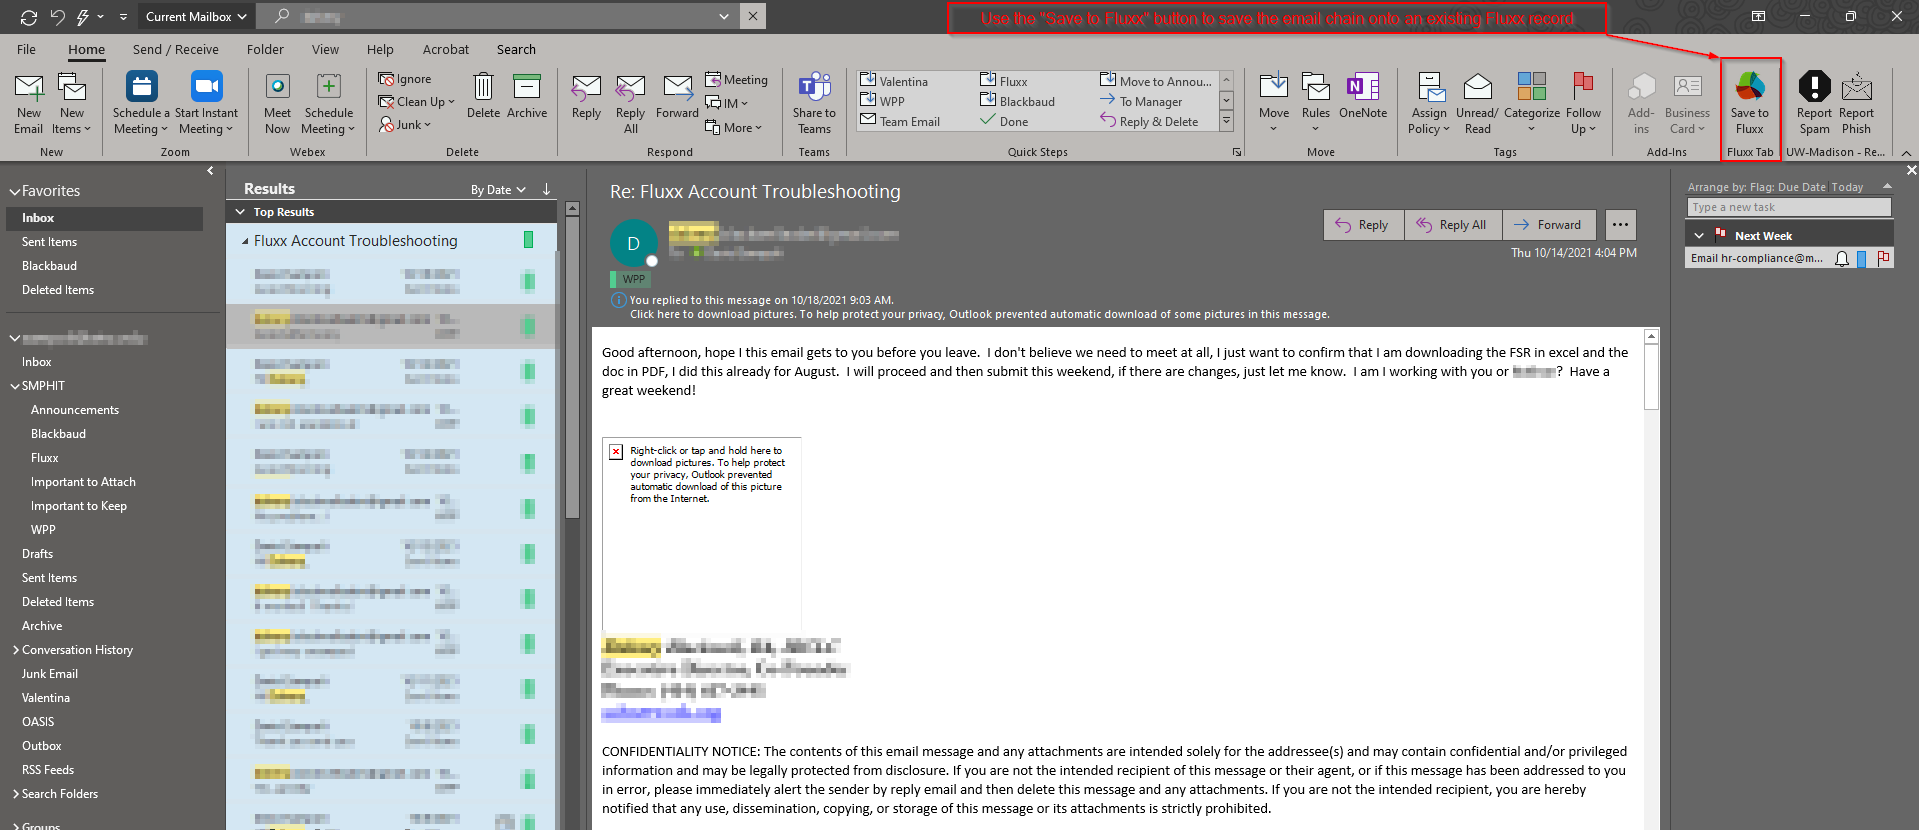
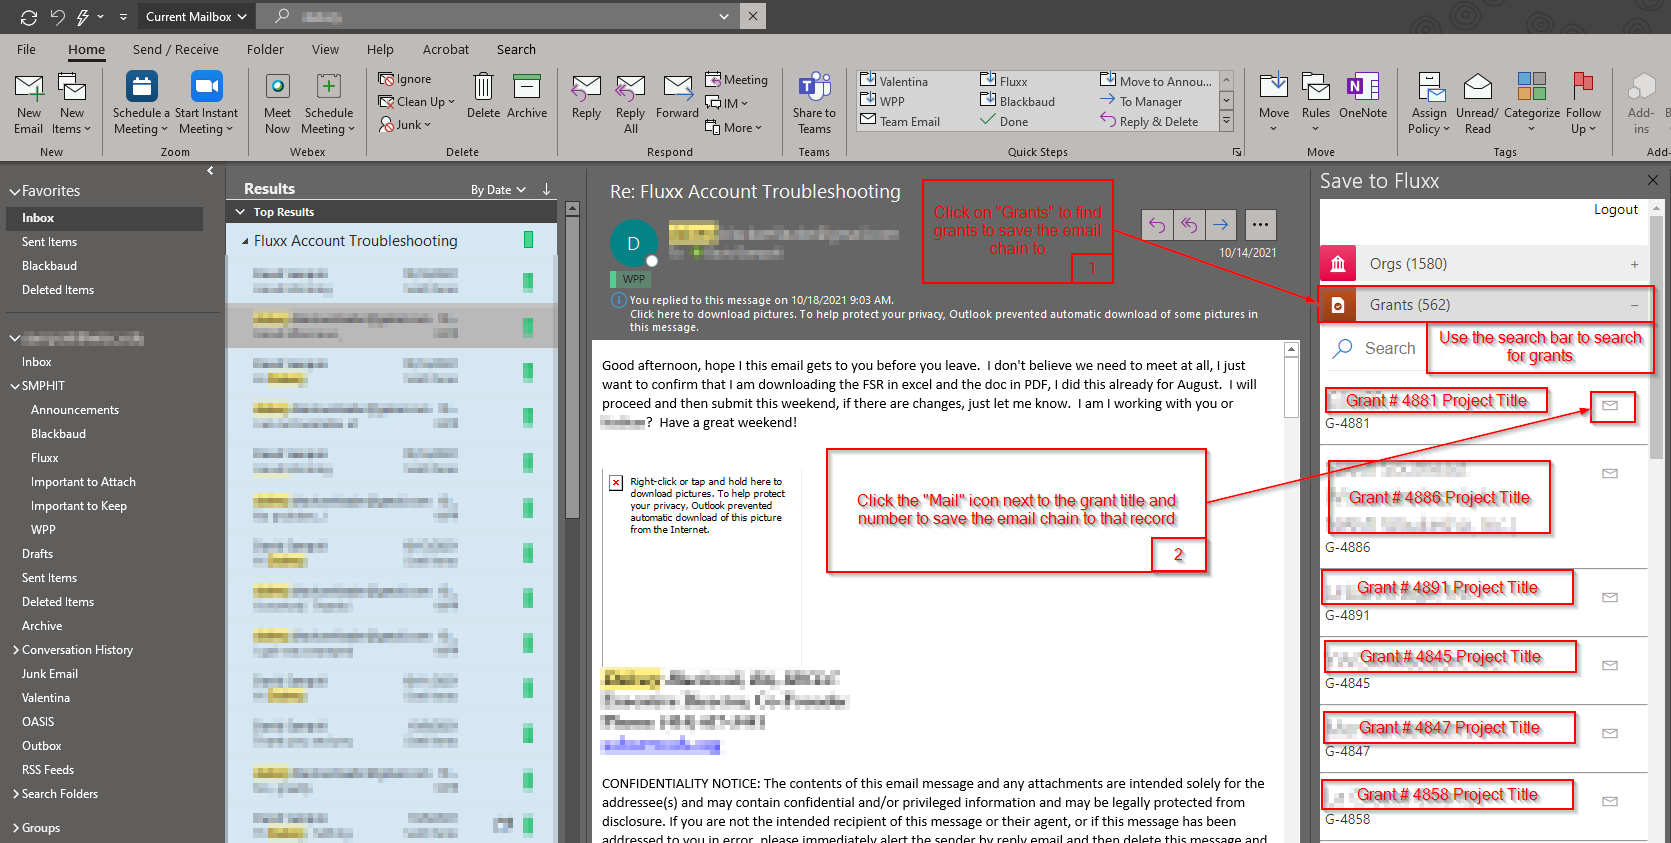
Correspondence with Grantees in Outlook: One of the main ways that Grantees communicate with the WPP is by emailing the Partnership Program. From Outlook, you can save an email chain onto an existing record within our Fluxx system using the Fluxx Outlook Plugin.
To begin, first download the Fluxx Outlook plugin by following the link above. Once the plugin is installed, you can save an email chain to Fluxx by selecting the plugin button "Save to Fluxx."
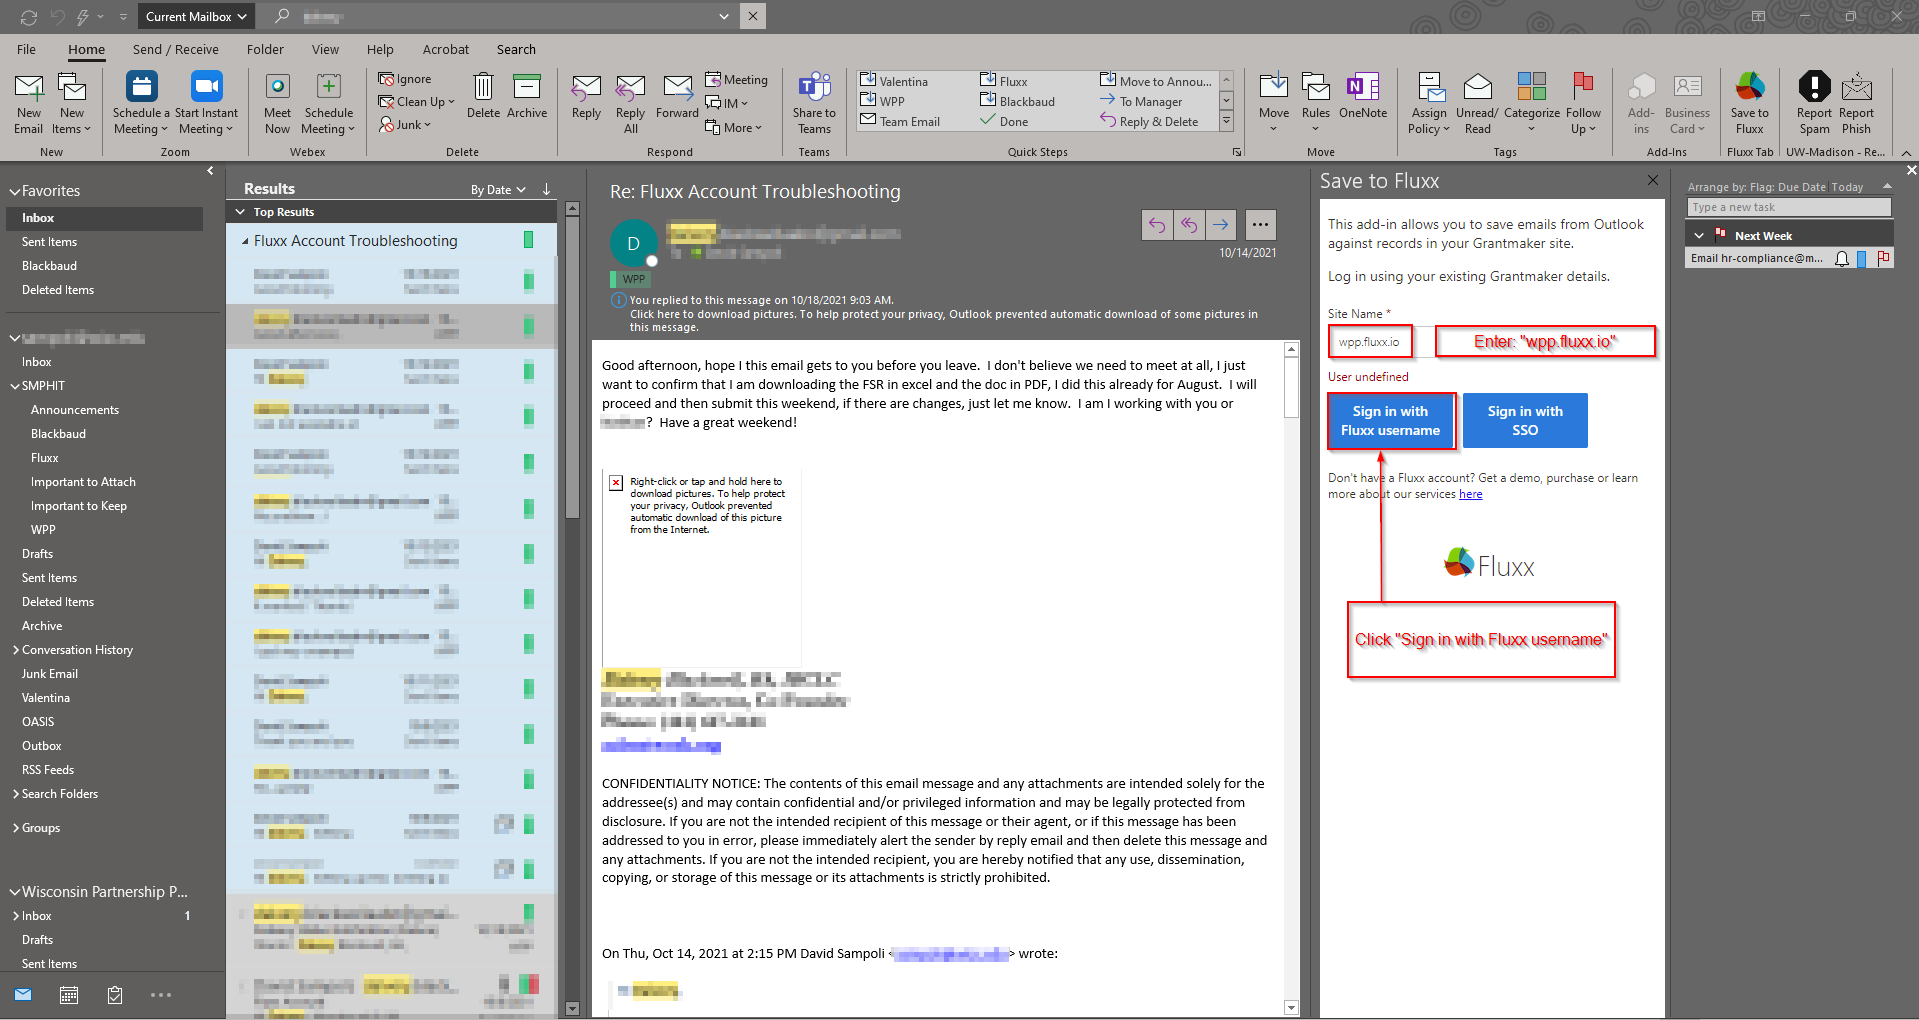
After you click "Save to Fluxx," you'll be prompted to enter information about our Fluxx instance. For "Site Name," you should type in "wpp.fluxx.io." Then click "Sign in with Fluxx username."
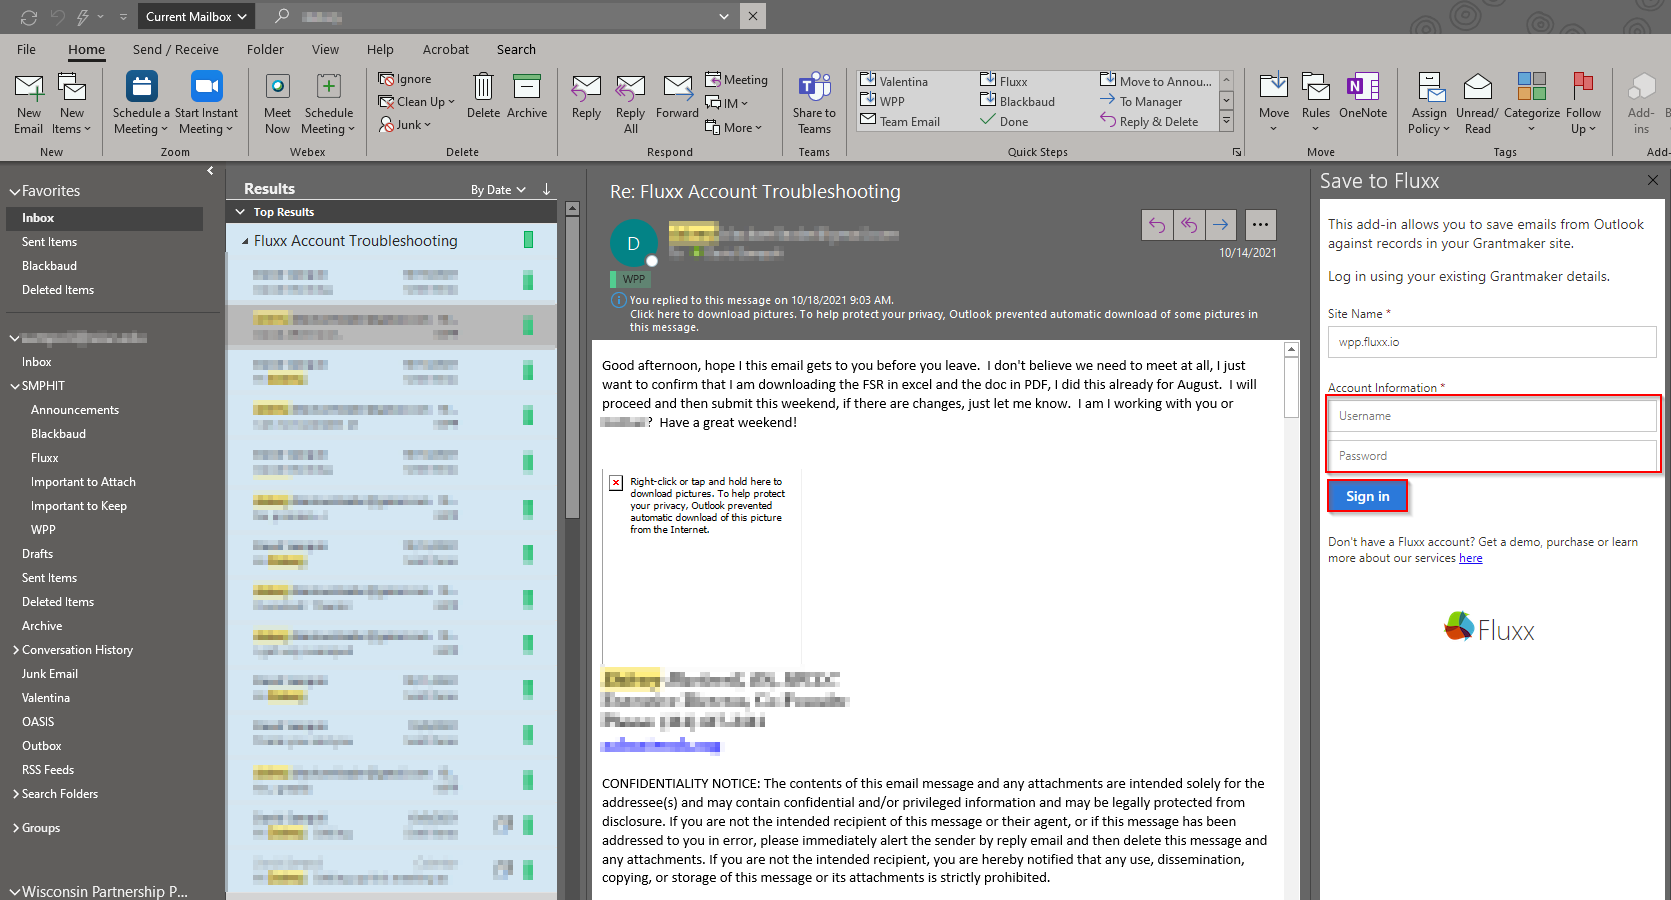
Once you do so, two boxes for your Fluxx account Username and Password will appear. Enter in the Username (email address) and Password that you use normally to sign into Fluxx and then click "Sign in."
After you click "Sign in," all of the records in the WPP's grant management database will appear organized under their record type (e.g. Grants will appear under the "Grants" tab). To save the email chain, first select a record type to save the email to (For the most part, it is recommended to save correspondence to a relevant Grant record since the Grant record type is at the center of the data from a Fluxx data mapping perspective.) After clicking the record type, all of the records underneath that type will appear with their Name and ID (you can also use the "Search" bar to find specific records). When you've found the record you want to save the email chain to, you can click the "Mail" icon next to the Record Name and ID. This will save the email chain to the record.
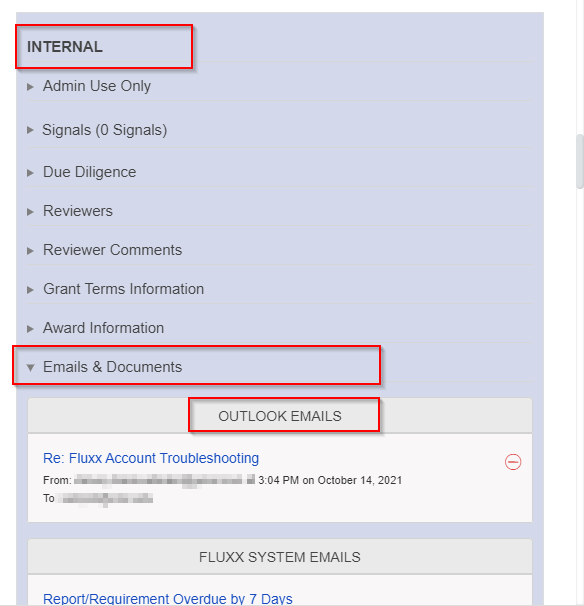
To see the email chain you saved, you'll just need to go to the record you saved the chain to in Fluxx and navigate to the "Internal" section. Within the Internal section, open up the subsection "Emails & Documents." The first item in "Email & Documents" is called "Outlook Emails" and stores the correspondence saved to the system from Outlook. Here, you can click on the hyperlink of the email subject like (in this case, "Re: Fluxx Account Troubleshooting") and the email chain will be opened up in a new Card on your current Fluxx dashboard.
Emailing a Grantee From Within Fluxx
Within Fluxx, you send emails to grantees using Email Templates.
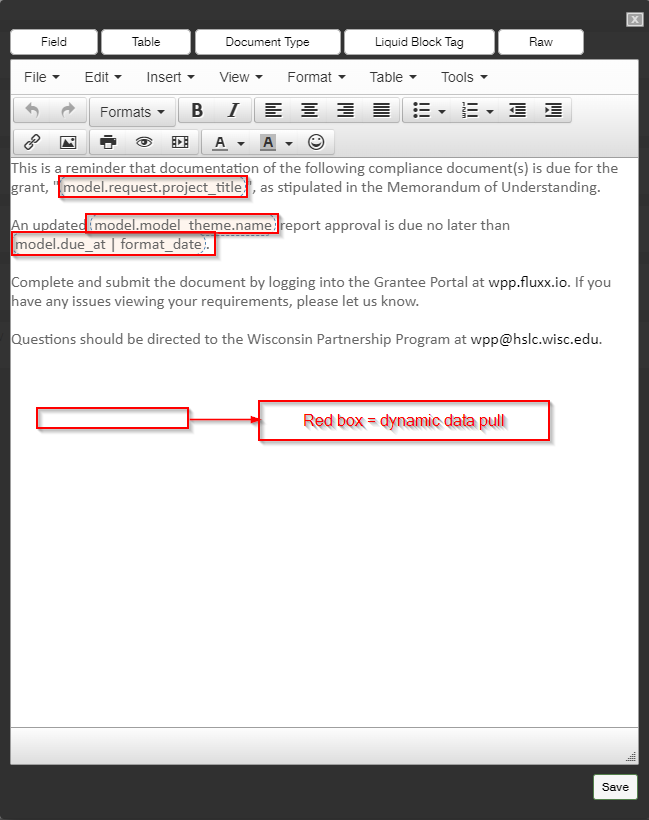
Email Templates store a combination of both plain, static text and dynamic text (which pulls data dynamically from the records that the email is being generated for) to generate messages that can be used for specific situations. Example: We have email templates set up to remind grantees when they have Requirements due within certain time windows (i.e. 30 days before, 1 day before, and 7 days after a Requirement Due Date). These messages pull dynamic data (such as the grantee's Grant Project Title name) and combine it with static text (i.e. "as stipulated in the Memorandum of Understanding.") to produce one cohesive email message.
Example of what an email template looks like within the Fluxx Admin Panel (this is the template for Requirement Due in 30 days). Text surrounded by a red box will dynamically pull data from the Requirement/Grant associated with this reminder; all other text is static.
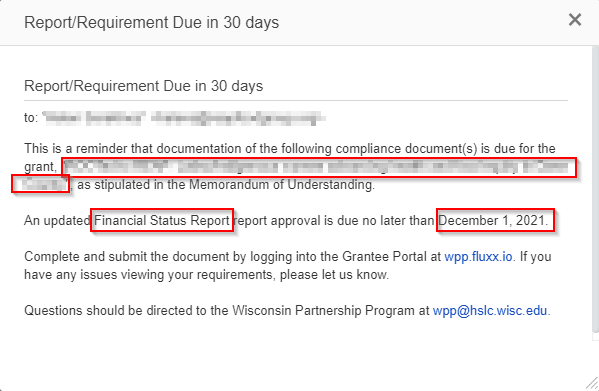
When that Report is Generated/Sent to the Grantee, those dynamic fields are replaced with the data found on the Grant/Requirement. The example below keeps all of the Dynamically pulled fields boxed in red, but shows how those fields populate with data now that the email is sent to a specific requirement:
There are two ways to send these email templates in Fluxx:
- System Emails: The first way, which is both the most common way and the main way recommended, is to allow the system to send the email alert for you using logic. The system is capable of sending emails based on a record meeting specific criteria, i.e. that a Requirement is 30 days away from its Due Date and its status is still "New." When a record meets these criteria, the email alert will be automatically generated (and potentially automatically sent if "Automatically Send?" is set to yes).
- This is the way that all email reminders are set up; i.e. 30 days before a Requirement's Due Date the grantees will receive an email letting them know that the requirement is due in 30 days.
- Manual Bulk Emails: The second way is to use "Bulk Update" from within a Card screen in order to Bulk Send an email alert from a template. You will still need an email template, but instead of sending the email to only the records that meet specific criteria you can send the email alert out to a specific list of records that you want. You can also then utilize the Email Queue functionality in order to filter out emails even more granularly to only the specific contacts you need/want to contact.
Letters
Letter: The user can generate longer-form documents that dynamically pull in fields from the related Grant Request; these are called Letters. These letters can be a big time saver; for example, in the past Partnership Program staff might have needed to manually write up the whole Grant Award Letter, but with the Letter functionality we can automate the generation of the Grant Award Letter from data we already have.
Record Locking
Record locking is the technique prevalent across computing software platforms of preventing simultaneous access to data in a database (such as Fluxx), to prevent inconsistent results.
The classic example of what can occur without the use of record locking is demonstrated by two bank clerks attempting to update the same bank account for two different transactions in a system lacking record locking. Clerks 1 and 2 both retrieve (i.e., copy) the account's record. Clerk 1 applies and saves a transaction. Clerk 2 applies a different transaction to his saved copy, and saves the result, based on the original record and his changes, overwriting the transaction entered by clerk 1. The record no longer reflects the first transaction, as if it had never taken place.
A simple way to prevent this is to lock the file whenever a record is being modified by any user, so that no other user can save data while the first holds the lock. This prevents records from being overwritten incorrectly, but allows only one record to be processed at a time, locking out other users who need to edit records at the same time.
To allow several users to edit a database table at the same time and also prevent inconsistencies created by unrestricted access, a single record can be locked when attempting to edit or update it. Anyone attempting to edit the same record is denied edit access because of the lock (although they are be able to view the record without editing it). Once the record is saved or edits are canceled, the lock is released. Records can never be saved so as to overwrite other changes, preserving data integrity.
What It Looks Like in Fluxx
In Fluxx, all records are always readable. However, when you go to "Edit" the record, you may encounter a message stating that the record you are attempting to edit is locked and will also say which user is locking the record. An example of the message can be seen here:

When the user who holds the lock Saves & Closes out of the record (i.e. their view returns to the "view-only" view), the record can be edited by the second user. The second user will then hold the lock on the record until they also Save & Close the record.