...
- Box # 1: Shows the Documents tab currently selected.
- Box # 2: Shows the Document that you currently have selected. You can tell which Document is currently selected NOT ONLY based off of the name (match name of Document with "Name" from box # 3), BUT ALSO from the slim green line that appears to the LEFT of the Document name.
- Box # 3: Shows the internal Name of the document. This can be changed at any time without breaking/impacting anything in the system (except for the name of this document as it appears to both internal and external users).
- Box # 4: Shows the Abbreviation. This is used in a very small number of screens, and is generally left blank by the WPP.
- Box # 5: Shows the Type of Recordthat the document type is linked to. This allows you to move a Document Type from one Record Type to another if needed/desired. However, it is generally recommended against moving a document this was between Record Types as it can cause confusion for admins who attempt to edit the document in the old Record Type but don't see the document there anymore (because it moved to a different record type). If not moved correctly, it can also cause issues with any previous uploads to that same document type. In general, it's preferable to simply "Retire" the old document and to create the newly desired document type under the correct Record Type (this is safer).
- Box # 6: Shows the Model Theme (AKA Form Type) that the document can be applied to. If left blank, the Document Type can be used for every form under this record type. Otherwise, it will only be accessible on the form selected in this field.
- Box # 7: Shows the Sub type config, which allows you to force a user uploading a document to add in a type of date field when uploading the document selected. The two options are:
- Date: Forces the user to enter in a full date when uploading the document, i.e. 1/1/2022.
- Year: Forces the user to enter in a calendar year when uploading the document, i.e. 2022.
- Box # 8: Shows three checkboxes that have an impact on document upload functionality. They are:
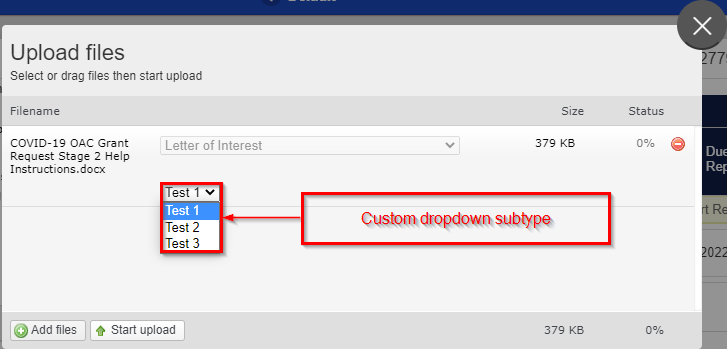
- Display Dropdown Subtype: Allows the user to enter in a custom list of dropdown values for the user uploading the document to select from. Similar to the the Sub type config, but the values are custom and NOT solely year or date-based.
- Example of what a custom Dropdown Subtype looks like in the system:
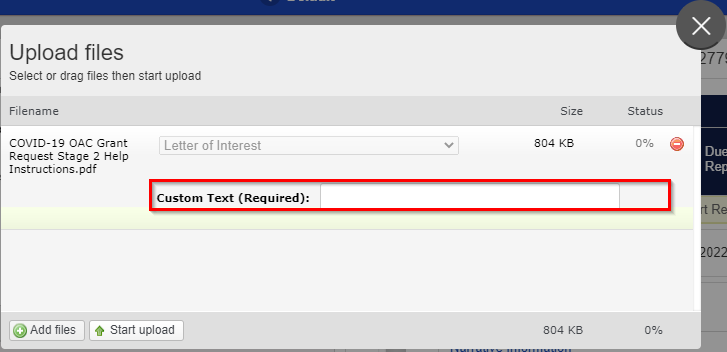
- Display custom text: When checked, forces the user uploading the selected document to enter in Custom Text with their uploaded document. No other configuration is available with this settings.
- Example of what "Display custom text" looks like in the system:
- Required: Checking this box will always make this document required on any form it is added to. It is generally recommended against checking this box as documents can be made mandatory on the particular form it is added to as well. Generally, we prefer to make the document required on the Form so that, if needed, we can always have the document be an optional upload on a different form (again, if it is required on the Document level then it will be Required regardless of the Form that it is on, so you'll never have the possibility of making it optional).
- Display Dropdown Subtype: Allows the user to enter in a custom list of dropdown values for the user uploading the document to select from. Similar to the the Sub type config, but the values are custom and NOT solely year or date-based.
- Box # 9: Displays the Permissions dropdown menu for this particular document type. See below for the options for the Permissions menu.
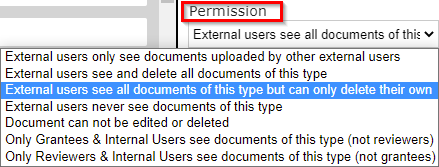
- Screenshot of the options available in this dropdown menu:
- Description of those Permissions:
- External users only see documents uploaded by other external users: As the name implies, external users (non-employees) only see this document when it is uploaded by other external users; non-employees will NOT see the document if it is uploaded by an employee.
- External users see and delete all documents of this type: External users are able to see all documents of this type (regardless of how it was uploaded) and can delete all documents of this type.
- External users see all documents of this type but can only delete their own: External users are able to see all documents of this type (regardless of how it was uploaded) and can delete the document of this type ONLY if they themselves uploaded it. This is the recommended permissions type for all documents.
- External users never see documents of this type: As the name implies, external users will never be able to see a document with these permissions.
- Document can not be edited or deleted: Self-explanatory.
- Only Grantees & Internal Users see documents of this type (not reviewers): Employees and Grantees can see this document type; reviewers cannot.
- Only Reviewers & Internal Users see documents of this type (not grantees): Employees and Reviewers can see this document type; grantees cannot.
- Box # 10: Shows the Required State dropdown menu which contains a list of all of the available statuses for the Record Type that this document is currently in. This will make it so that this document is always required at that specific status. As with the Required checkbox above, it is generally recommended to make documents required on the specific Form that they're on and to leave this field blank.
- Box # 11: Shows the form's default Doc label. The Doc Label pairs with the Doc label on the Documents component as added to a form. Essentially, a Document will, once uploaded, display in the Document Uploads component with the same Doc label as the document itself. The Doc label for a document can be changed on the Form level as well, so it's generally recommended against changing the label here and instead recommended to change the label on the Form level.
- Box # 12: Shows two checkboxes that store important functionality for this document:
- Upload Only Once: Forces the user uploading the document to only upload one version of this document (i.e. not able to select 4 different files to count as my 1 'document upload'). Additionally, it prevents the usage of the use of the "Add New Version of Document" button.
- Example of the 'Upload New Version of Document' button:
- Retired: Checking this box will make the system consider this document to be Retired, i.e. no longer in use, but still existing in the system. This allows for old documents uploaded with this type to stay around in the system, but prevents users from adding this document to new Forms in the future.
- Upload Only Once: Forces the user uploading the document to only upload one version of this document (i.e. not able to select 4 different files to count as my 1 'document upload'). Additionally, it prevents the usage of the use of the "Add New Version of Document" button.
- Box # 13: Shows where you can Delete the document in question. It's recommended against doing this unless the Document Type was created in error and no documents have been uploaded with that type. In general, it's preferable to Retire an old Document Type than it is to delete it.
- Box # 14: Shows where you can save your work on the Document Type. Note: You need to Save this record after making any changes in order for those changes to be applied; if you close this page/switch to another after making changes without previously clicking on the Save button, all unsaved changes will be discarded.
- Box # 15: Shows where you can Create a New Document Type within this Record Type.
API Alerts
The WPP does not currently use API Alerts; however, Fluxx has a good article regarding API Alerts and the API Queue that is linked out below.
Link to Fluxx article: https://fluxxdev.atlassian.net/servicedesk/customer/portal/1/article/1795884009?src=1177191611


