| HTML |
|---|
<div style="background-color: yellow; border: 2px solid red; margin: 4px; padding: 2px; font-weight: bold; text-align: center;">
This page was moved to <a href="https://kb.wisc.edu/134213">kb.wisc.edu/134213</a>
<br>
Click in the link above if you are not automatically redirected in 10 seconds.
</br>
</div>
<meta http-equiv="refresh" content="5; URL='https://kb.wisc.edu/134213'" /> |
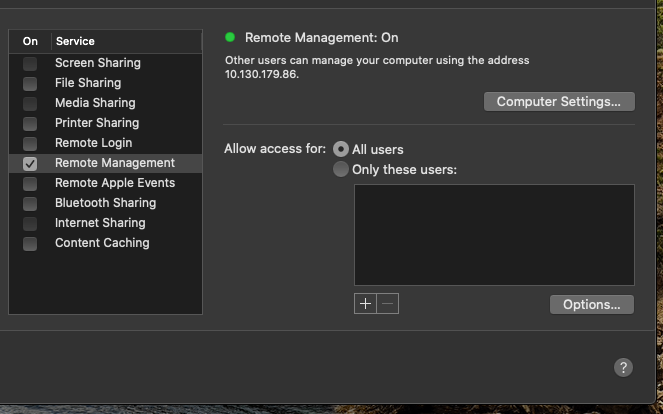
Verify the Following Settings are Properly in Place on your Mac at Work (the one you are connecting to)
SMPH Shared Services has pushed settings out to your work computer use the following to verify they are set.
| Expand | ||
|---|---|---|
|
Connecting to a Mac from a Windows PC
Connecting to a Mac from a Windows PC is a little different. You’re not going to be able to use Remote Desktop, but that’s okay because there’s a free client called RealVNC viewer that will allow for access. You need to download and install this client on the PC you will be accessing your Mac from (your home or traveling computer).
...
Just like with Windows, you first have to set up your work Mac for screen sharing. Press on the Apple Menu, and then press "System Preferences".
Open the “Sharing” preference panel |

...
.
Uncheck all boxes except for Remote Management. Press the Remote Management box to check it (if it is not already). It may ask you to give access controls, if it does, check all the boxes in that pop-up window and hit OK.
Select options and Check all options
|


Connecting From Mac
WiscVPN - Installing and Connecting the GlobalProtect Client (Mac) - https://kb.wisc.edu/73116
Open spotlight and type in "Screen Sharing.app" and select it

Enter the computer name or IP of your work computer
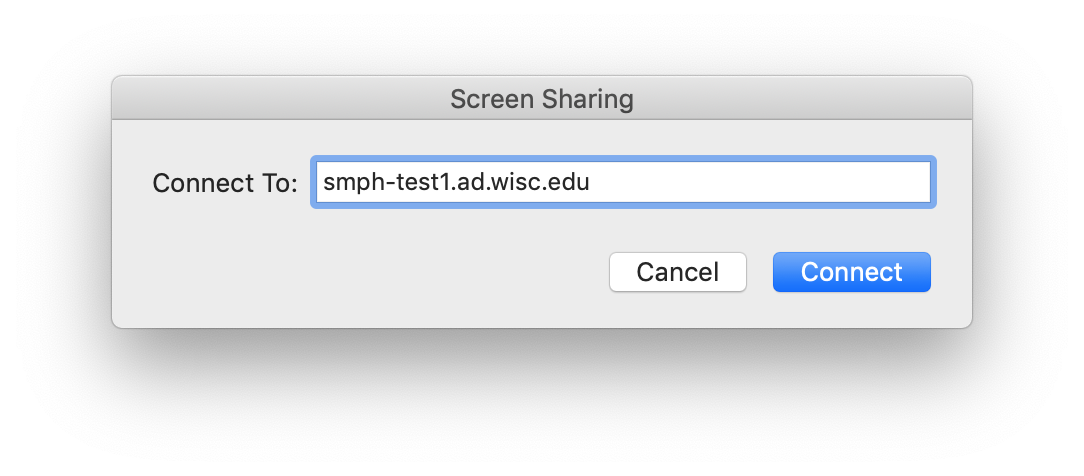
Enter Username and password
*note account needs to be on the remote computer
When you connect to the target Mac, you will also need to log into your user account for that computer.
Connecting from PC
Install RealVNC from http://www.realvnc.com/download/viewer/
WiscVPN - Installing and Connecting the GlobalProtect Client (Windows) - https://kb.wisc.edu/91915
Once installed Open Real VNC
enter computer name or IP

Click “Computer Settings…” and make sure “VNC viewers may control screen with password” is checked. Then enter a password to use. Please use between 4-8 characters and a combination of at least 1 uppercase letter, 1 lowercase letter, 1 symbol, and one number.

Setting up the PC you will use to connect to your work Mac
Your Mac’s screen can be accessed by its VNC numbered address or COMPUTERNAME.local. If you’re unsure how to access your Mac, go back to your Sharing preferences and double-check the information on the Screen Sharing settings.
For this example, we entered the numbered address in our VNC client and leave the encryption as it is.

After entering in the address of the work computer, hit Enter.
You will get a security warning, check the box to not warn about the connection again, and click Continue.

An authentication box will appear where you will need to enter the password you created in the Sharing preferences on username and password for your Mac.

...
*note account needs to be on the remote computer

When you connect to the target Mac, you will also need to log into your user account for that computer.
If your computer name had AD in front of it, you will need to include this, or MSAD if it had that. Once logged in, your Mac desktop will now appear in the VNC Viewer window in the same state as you left it.

If you mouse to the top-middle of the window, you can spawn extra controls, which when you hover will give you a tooltip explaining what each one does.

This little toolbar will let you take actions such as close the connection, go to full-screen, and more. Hover over each button to learn what it does.
...
On the work Mac side of things, a Screen Sharing icon will appear in the menu bar. This lets you quickly and easily access the Screen Sharing preferences or disconnect clients.
