...
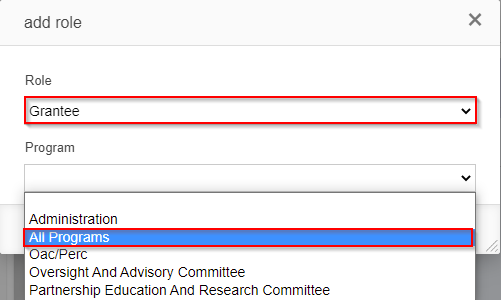
When you click "Add Role," a window will pop up with a "Role" and a "Program" dropdown. Start with the Role. For grantees, role will always be "Grantee." Please see the "Program Roles and User Profiles Definitions" page linked again below for a more complete picture of what each of the "Roles" is used for. Finally, for the "Program" dropdown, always select "All Programs." Never select just "Oversight and Advisory Committee" or "Partnership Education and Research Committee" even if you know that the user will only be working with OAC or PERC.
Program Roles and User Profiles Definitions can be found on this page here.
Once you've selected the correct Program Role and the Program "All Programs," click Create Role user. This will add the role to the user in question. That completes the steps for manually creating a new user; now this user will just have to set their password as described in the Grantee Reference Guide in order to activate their account and be able to log in.
...
- Organization Name
- Street Address
- Street Address 2 (if applicable)
- City
- Country (always pre-populated with "United States")
- State/Province (almost always "Wisconsin")
- County (almost always one of the counties in Wisconsin)
- Postal/ZIP Code
- Organization Phone Number (can be principal investigator's phone number)
- Organization Fax Number (can be principal investigator's fax number if applicable; a lot of folks are removing their fax machines these days so this one is very optional)
- Organization Email (can be principal investigator's email address)
- Website (for OAC organizations that have a dedicated website, ignored for PERC)
- Tax ID (critical for OAC organizations, but no PERC organizations will have a tax ID)
- Primary Contact
...
Once you've filled out all relevant fields on the form, click the "Save and Close" button in order to create the new organization record.
Linking Your New Organization (or an existing one) to a User
Now that you've created the new organization record , you'll (or even if you have an old one that's not yet linked to a user to which it should be linked), you'll need to link it to a user in order for that organization to be able to come through on an application. To link your new organization to a user, you'll first have to pull up a user record.
...
After clicking the link, a window titled "link an existing org" will come up. Under "Organization," begin typing in the name of your newly creating organization (or the name of the existing organization that you would like to link to this user). As you type, suggested extant organizations will display below the text box; when you see your organization in the list of suggestions, click on it. Finally, navigate to the bottom of the window and click "Create Relationship." This will link the user in question with the organization record you selected.
...
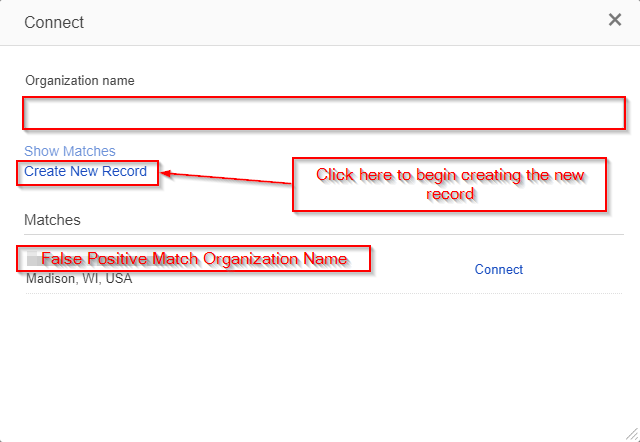
Once you click the "Connect" button, a screen will pop up with the Registered Organization's name shown along with a list of any potential matches to existing Organization records in the system (see also the screenshot below). The "Matches" section can help you to double check to ensure you didn't miss any potential matching existing organizations – just be weary that some false positive matches might also appear in that section, so keep a critical eye when comparing "Matches" to the registered organization's name and Tax ID (as well as any other data points they may have provided). If you don't see any matches (or the matches are false positives), you can create a new user record for this organization by clicking the blue "Create New Record" button in the middle of the screen.
...
If you notice that there are duplicative records in the system, follow these instructions in order to merge those records.
Linking a Registered User to an Existing User for OAC
Linking a Registered User to an Existing User for PERC
...
Creating a New Organization Record
When first looking at a PERC Registration, you'll notice that no Organization information is present on a PERC form (as previously stated in this guide). Again, PERC Organizations are shell records for the Principle Investigator (PI). First, you'll want to follow the text from this section of the guide to check whether or not an organization record already exists for this PERC Registration. If you've confirmed that a matching record does NOT already exist for this PI, then you begin the process of creating a PERC organization record.
To begin the process, click on the "Connect" button to the right of the "Organization" section in the registration. See also the screenshot below.
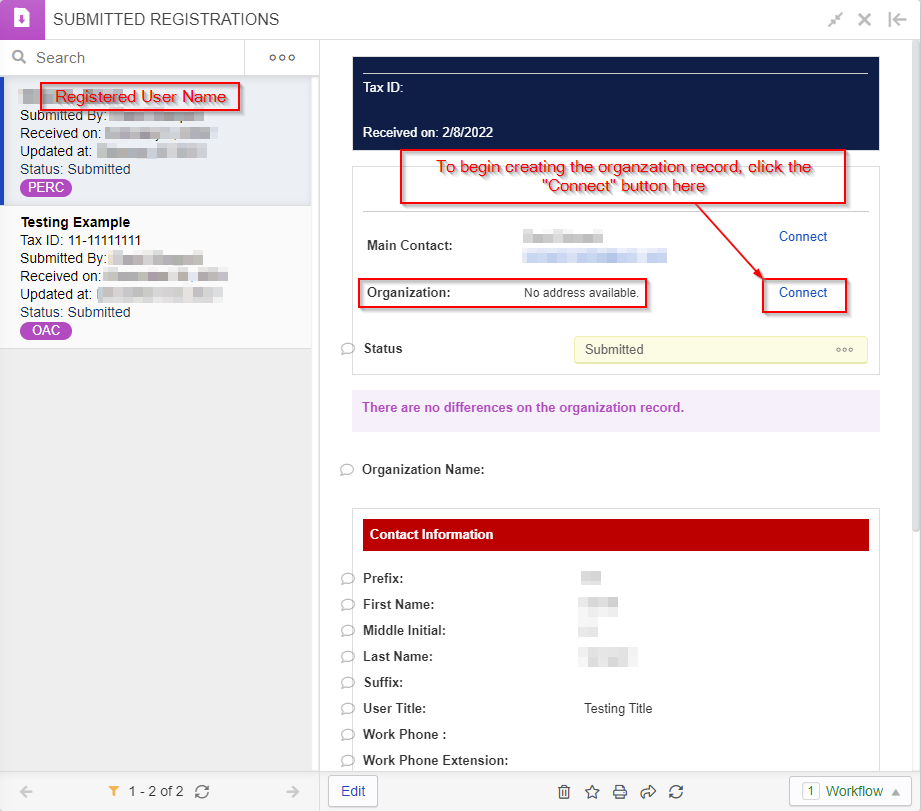
Clicking the "Connect" button will pull up a window similar to the one found in the screenshot below. Again, because the PERC Registrations does NOT include any section for Organization name, the "Organization Name" field will be blank. You may very well see one or several false positive "Matches" in the bottom section of this window; ignore these unless one of the matches has the same name as the PI who attempted to register. To begin creating the new organization record in earnest, click on the "Create New Record" button found in the middle of the window (see also the screenshot).
Linking a Registered User to an Existing User for OAC
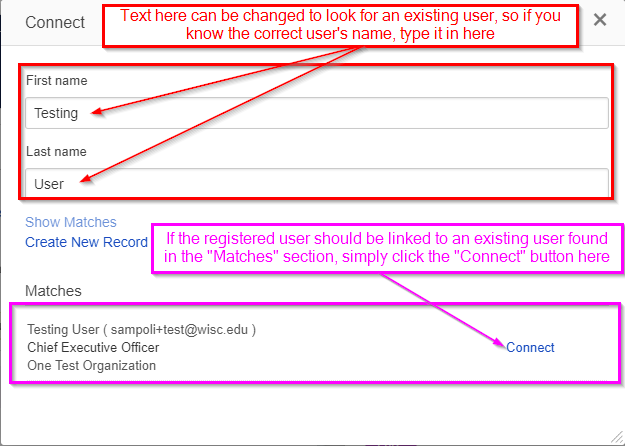
Linking a registered User to an existing user is very easy. When you click on the "Connect" button with the registration, the window for creating a new record/linking to an existing record will pop up. At the top of the window, there are two text boxes: First Name and Last Name. Both of these text boxes are free text. You can edit both the First Name and the Last Name to look for matches, so for example if you know the registered user's name is spelled incorrectly, you can correct the name and then find the correct match in the "Matches" section now that you're using the corrected name. Once you find a correct match for an existing user in the the "Matches" section, simply click on the "Connect" button next to the existing user's name and the registered user will be linked to the existing User.
Linking a Registered User to an Existing User for PERC
The steps for connect a PERC-registered user to an existing user are exactly the same as for OAC; please see the section and screenshot immediately above this for the steps on how to do so.
Linking a Registered Organization to an Existing Organization for OAC
Connecting a Registered Organization to an existing organization is also very easy. When you click on the "Connect" button within the registration, the window for creating a new record/linking to an existing record will pop up. At the top of that window, the "Organization Name" text box is free-text, so if you know for example that the organization name was misspelled, etc. you can type in the correct name in that box. Any matching, existing organization records will appear under the "Matches" section; if you would like to link the Registered Organization to an existing organization found in the "Matches" section, simply click on the "Connect" button next to the organization name (see also the screenshot below).

Linking a Registered Organization to an Existing Organization for PERC
The process for connecting PERC registered organizations to existing organizations is exactly the same as for OAC; see the section and screenshot immediately above this for the steps on how to do so.