...
The Workflows screen within the Admin Panel lets you everything described above as well as allows you to edit existing workflows in the event that these need to change after they have been finalized.
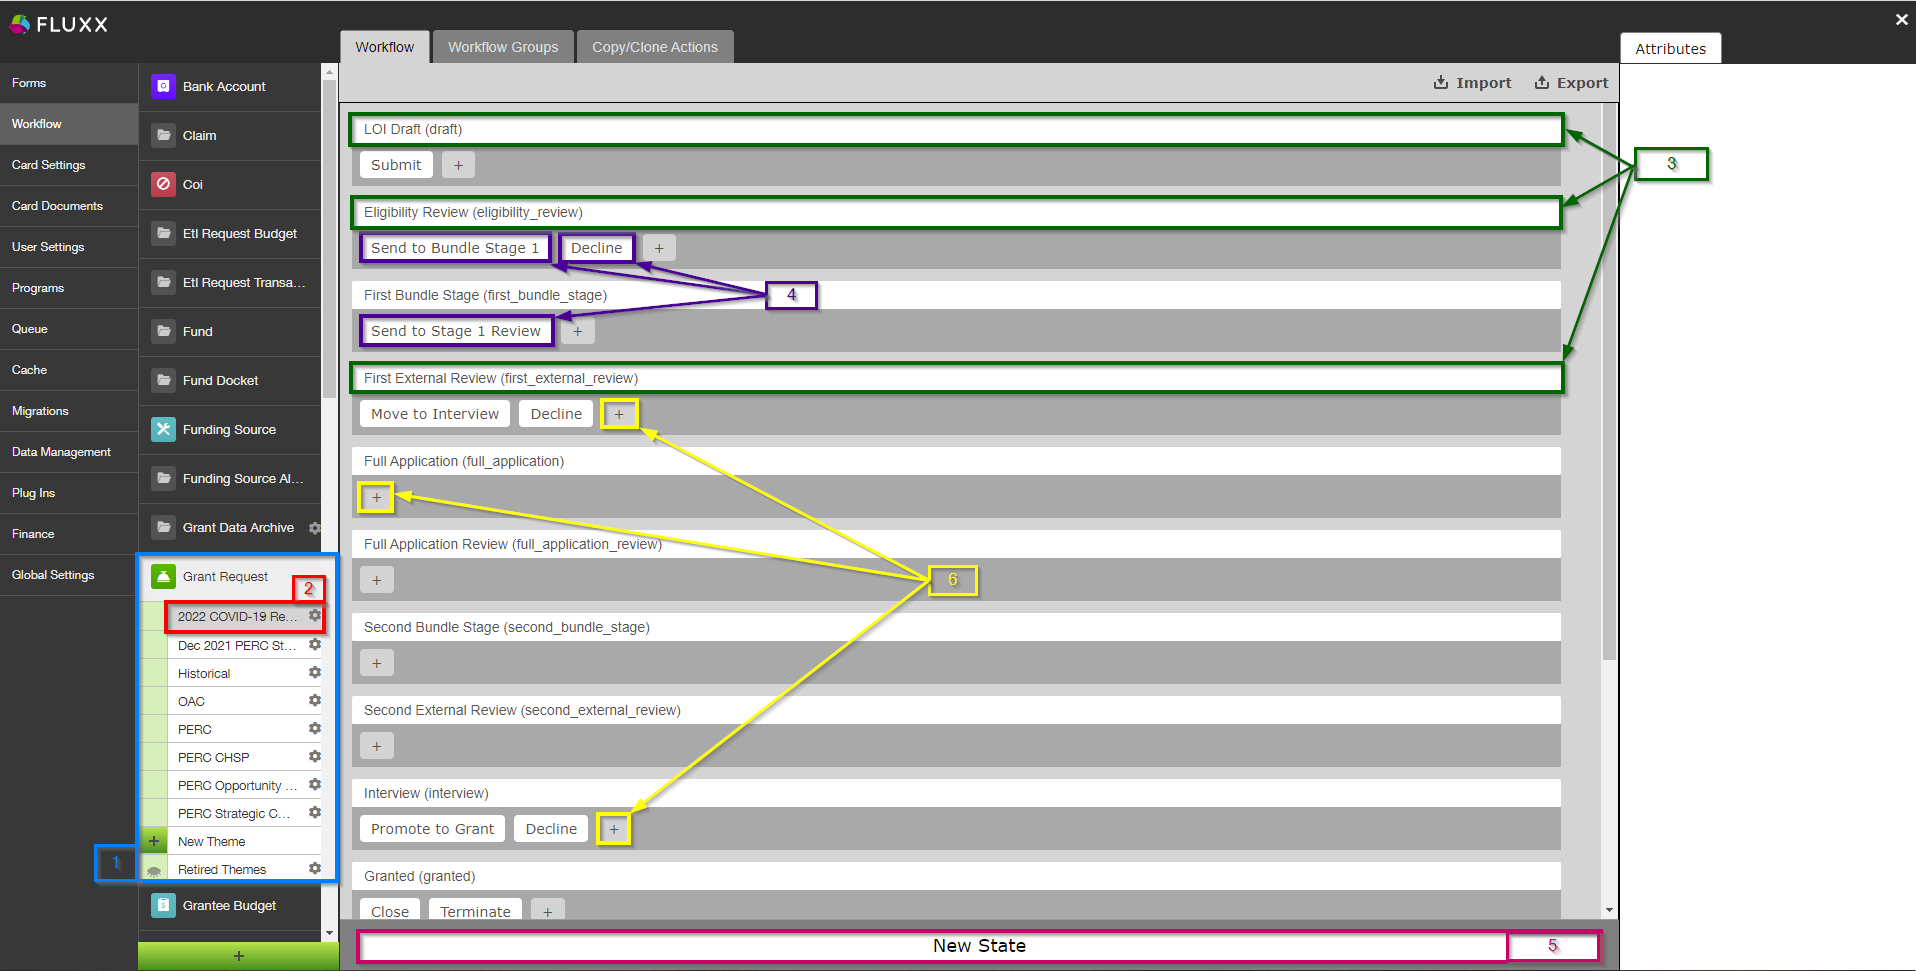
A description of the items highlighted and numbered in the picture above:
- Box # 1: The Record Type select to see Workflows for; in this image, we are looking at workflows for Grant Requests (i.e. Grants and Grant Applications).
- Box # 2: The specific Theme (form) that we are reviewing/editing the workflow for. Every separate Theme can have its own unique workflow (or they can follow the same Workflow of another Theme).
- Box # 3: Points to three different Statuses (every White Bar across the screen = a separate status). Each status displays its External Name (i.e. "LOI Draft" or "First External Review") as well as its Internal Name (i.e. "draft" or "first_external_review"). Clicking on one of these bars gives a few options. See the section Status Options to see what those options are and how these statuses can be configured/edited.
- Box # 4: Points to the various different Buttons that allow users to move a record from one status to another. Buttons are specific to a given status (hence why the buttons appear underneath Statuses; the status that the button is under is the status in which that button will be available for records of this Theme). Like with statuses, clicking on one of these buttons gives a few options to change/edit/configure these buttons. See the section Button Options to see what those options are and how these buttons can be configured.
- Box # 5: Shows the "New State" button, which allows you to create a New Status bar. It is recommended to avoid creating new statuses unless they are absolutely necessary. A status created in one record type (i.e. Grant Requests) will be available for ALL THEMES found in that record type (though not every status has to be used for every theme). Having too many statuses makes things very complicated and makes maintenance much harder. If you DO need to create a new status. see the Status Options section for tips as to how to fill out the required fields.
- Box # 6: Shows the "+" button that allows you to create a new Button underneath a particular status. The same best practices for statuses applies for Buttons (i.e. don't create unnecessary ones, avoid creating new ones unless absolutely necessary, keep number as low as possible for easier maintenance). If you DO need to create a new button, see the Button Options sections for tips as to how to fill out the required fields.
Status Options
Example image of what appears when you click on one of the statuses from the Workflow screen. See below for a description of the items seen boxed in the image.

- Box # 1: Shows the status that you currently have selected. You can tell which status is currently selected NOT ONLY based off of the name (match name of status with "Internal Name" from box # 2), BUT ALSO from the slim green line that appears to the RIGHT of the status name.
- Box # 2: Shows the configurable Internal Description of this status. This is the title of the status as it appears to Staff Members when looking at records in the system that have this status.
- Box # 3: Shows the configurable External Description of this status. This is the title of the status as it appears to Grantees, Reviewers, and other non-staff members when they review records in their portal. NOTE: For most statuses that ARE NOT "New," "Approved," or "Declined," the WPP uses a Generic External Description like "Under Review" so that Grantees/Reviewers, etc. are not constantly checking for status updates/so that they don't have visibility into the exact stage that their application/record is currently in.
- Box # 4: Shows the Status (AKA "State") Type that this status is. There are four type:
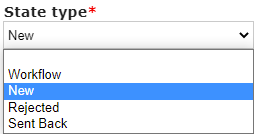
- New: Represents a workflow where the record has not yet been submitted by the grantee/is sitting in its initial stage
- Workflow: The main "Type" that we use, Workflow is basically any status that doesn't fall into one of the other categories
- Rejected: The type "Rejected" represents statuses for when the record was NOT accepted/approved by the WPP; the main status that falls into this category is the status of "Declined."
- Sent Back: The type "Sent Back" is not currently used at the WPP, but it would be used for statuses for which the Grantee/Reviewer must re-review/re-complete/fill out again a form after the WPP has decided that the Grantee/Reviewer must take a second pass at the record.
- Box # 5: Shows the "Allowed Roles" for this status. As per the help text underneath this box: "Please leave the allowed roles selection empty unless you wish to restrict the visibility of a model in this status by a program and role." That is, if an Allowed Role is selected, only users with this specific role will be able to see records in this status (users WITHOUT one of the selected roles will have the record hidden for them). The WPP leaves this blank for every status at this time.