The finance menu of the Admin Panel allows you to create, edit, or delete various Finance-related records (Bank Accounts and Funding Sources) as well as change general finance settings (like the default currency to use in the system).
Before you Begin...
You should understand how the WPP uses the Fluxx system and how the WPP uses the WISER system. Fluxx offers many settings and pieces of functionality (like payments, bank accounts, full accounting etc.) that the WPP does NOT make use of because the WPP uses the University's WISER Financial System to do accounting and payments instead.
Per the WPP's founding documents, all financial accounting for the Partnership Program MUST be done via the University's Financial system (AKA WISER). So, we can't use the payments or Bank Account records available in Fluxx. Therefore, most of these tabs and settings are NOT APPLICABLE for the WPP. Still, there are some settings in this menu that would be useful for a Database Administrator to be aware of.
Bank Accounts Tab
The first tab in the Finance Menu of the Admin Panel is the Bank Accounts tab. Within this tab, you can create, edit, or delete Bank Accounts. As stated above, the WPP does not use these. See the screenshot below for highlighted items from this tab and beneath the screenshot for descriptions of said items.
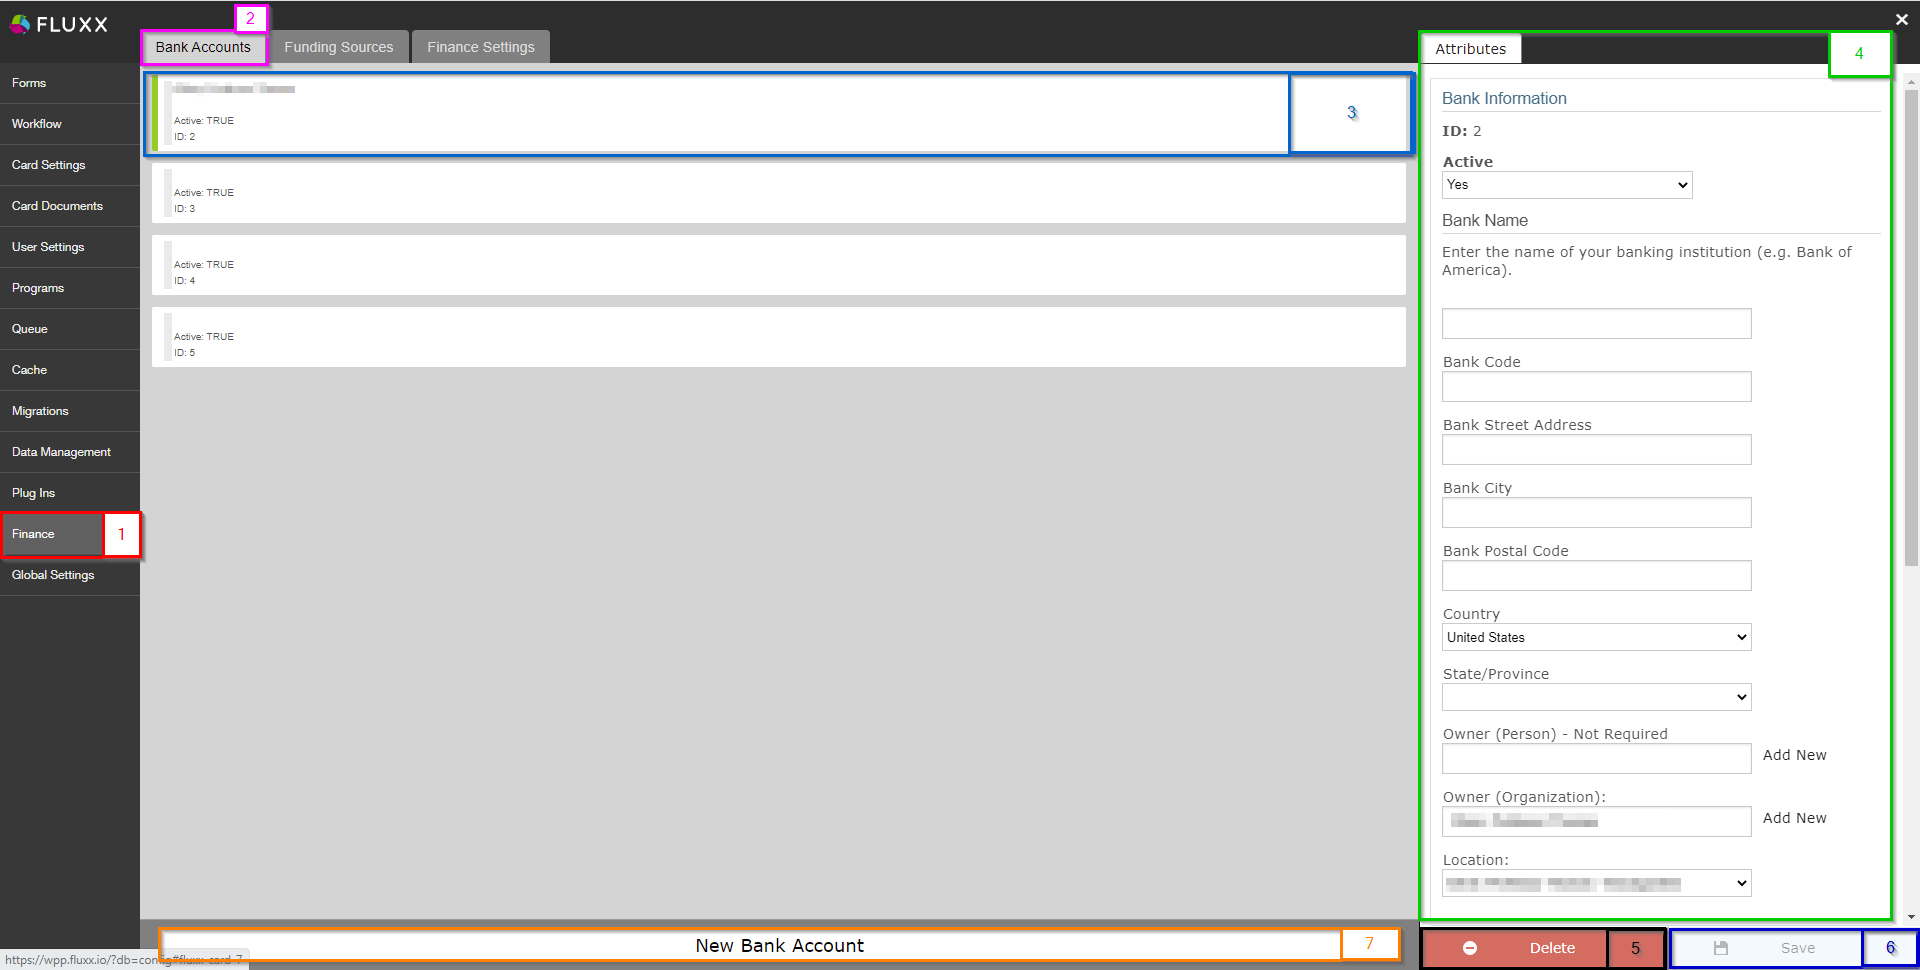
- Box # 1: Shows the Finance menu of the Admin Panel as currently selected.
- Box # 2: Shows the Bank Accounts tab as currently selected.
- Box # 3: Shows the Bank Account record that is currently selected. You can tell which bank account is currently selected NOT ONLY based off of the ID number (match the ID seen at the bottom of the box highlighted in box # 3 with the ID found near the top of box # 4), BUT ALSO based off of the slim green line that displays on the left-hand side of the record selected.
- Box # 4: Shows the editable Attributes of the bank account record currently selected, such as the Bank Name, bank code, bank street address, etc. WPP does NOT currently use bank accounts, so these are rarely (if ever) filled in.
- Box # 5: Shows the Delete button. If you would like to delete a bank account record, you can select it from the Bank Accounts Tab and then click on the Delete button. Please only do this if you KNOW that you need to do so.
- Box # 6: Shows the Save button. If you made any changes to this record that you want to be effectuated, you MUST click the Save button. Otherwise, any unsaved changes will be discarded.
- Box # 7: Shows the New Bank Account button. If you need to create a new Bank Account Record, you can click this button to create the new record.
Funding Sources
The Funding Sources Tab is the second tab within the Finance Menu. Within this menu, you can create, edit, and delete Funding Sources, which for the WPP generally have a 1:1 correspondence to subfunds.
The difference between Subfunds and Funding Sources? Subfunds (within Fluxx) is a way of grouping grants that are of a similar type/for the same application program (e.g. we received 5 applications that were awarded for the same 2022 Maternal and Child Health Program Application, so all 5 of those grants will have the subfund of 2022 Maternal and Child Health Program). Funding Sources, instead, denote on the grant where the money awarded is coming from. Luckily from a WPP perspective, money is approved and awarded based off of subfunds, so although the records are different within Fluxx, their 1:1 correspondence makes it easy to know which Funding Source should be applied to a grant with a specific subfund.
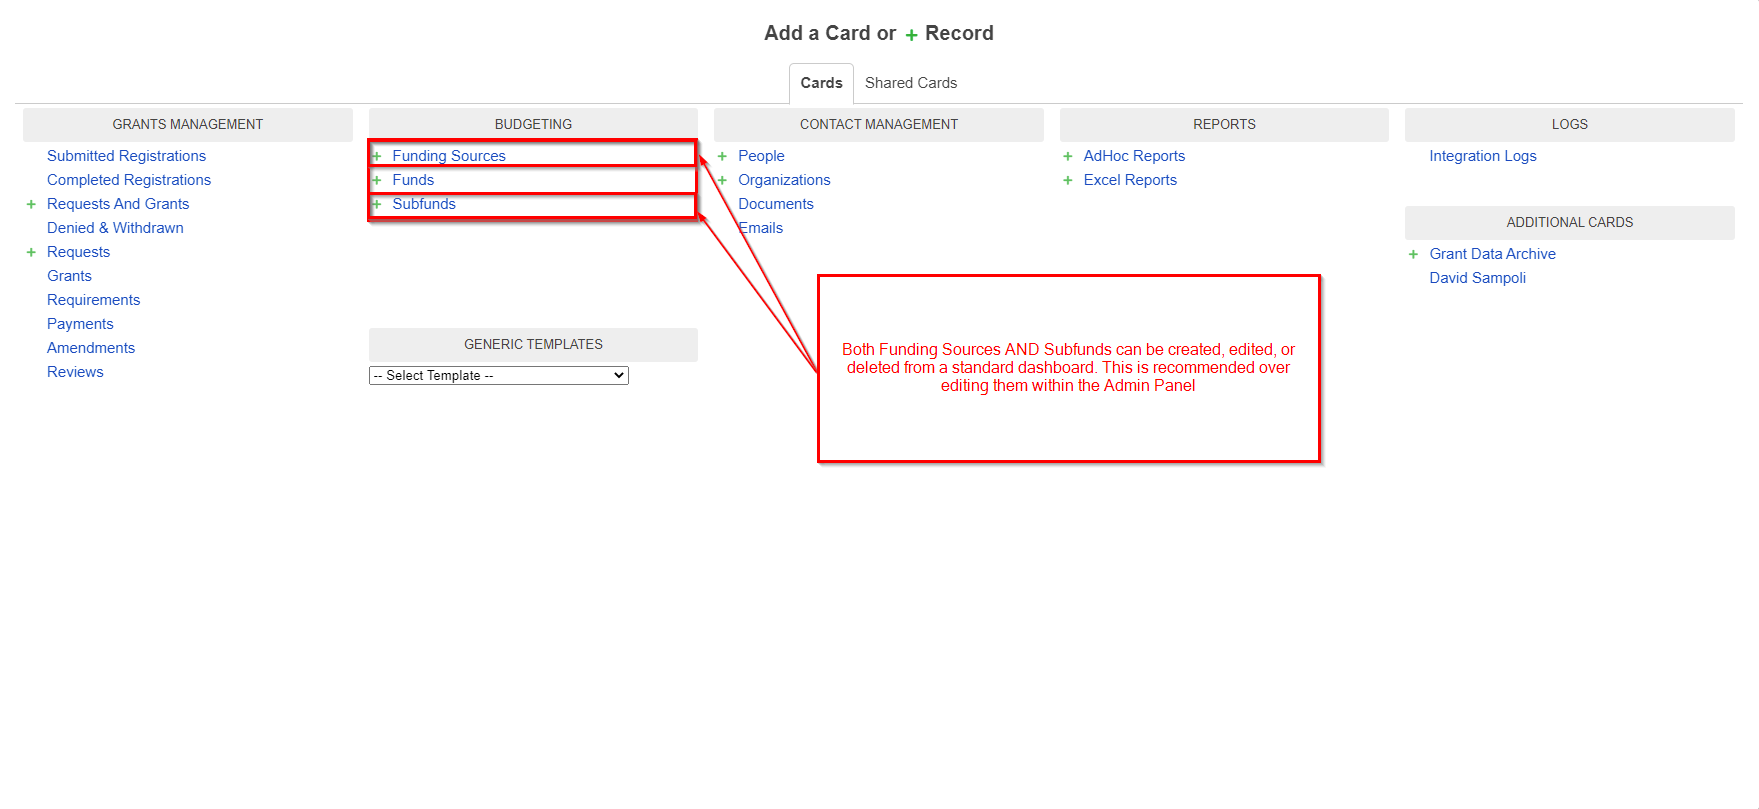
Both Subfunds AND Funding Sources can be created, edited, or deleted from a standard dashboard (i.e. NOT within the Admin Panel). This is generally recommended as the Admin Panel can be quite obtuse, whereas the Standard Dashboard view of these records is slightly more straightforward. See screenshot below for which cards to add to your standard dashboard in order to edit Funding Sources and Subfunds.
The Funding Sources Tab
The Funding Sources Tab can be used to create, edit, or delete Funding Sources, as previously stated. Again, it is generally recommended to do so from a standard dashboard rather than from here in the Admin Panel. See the screenshot below for highlighted, important items from this screen and beneath the screenshot for descriptions of said items.
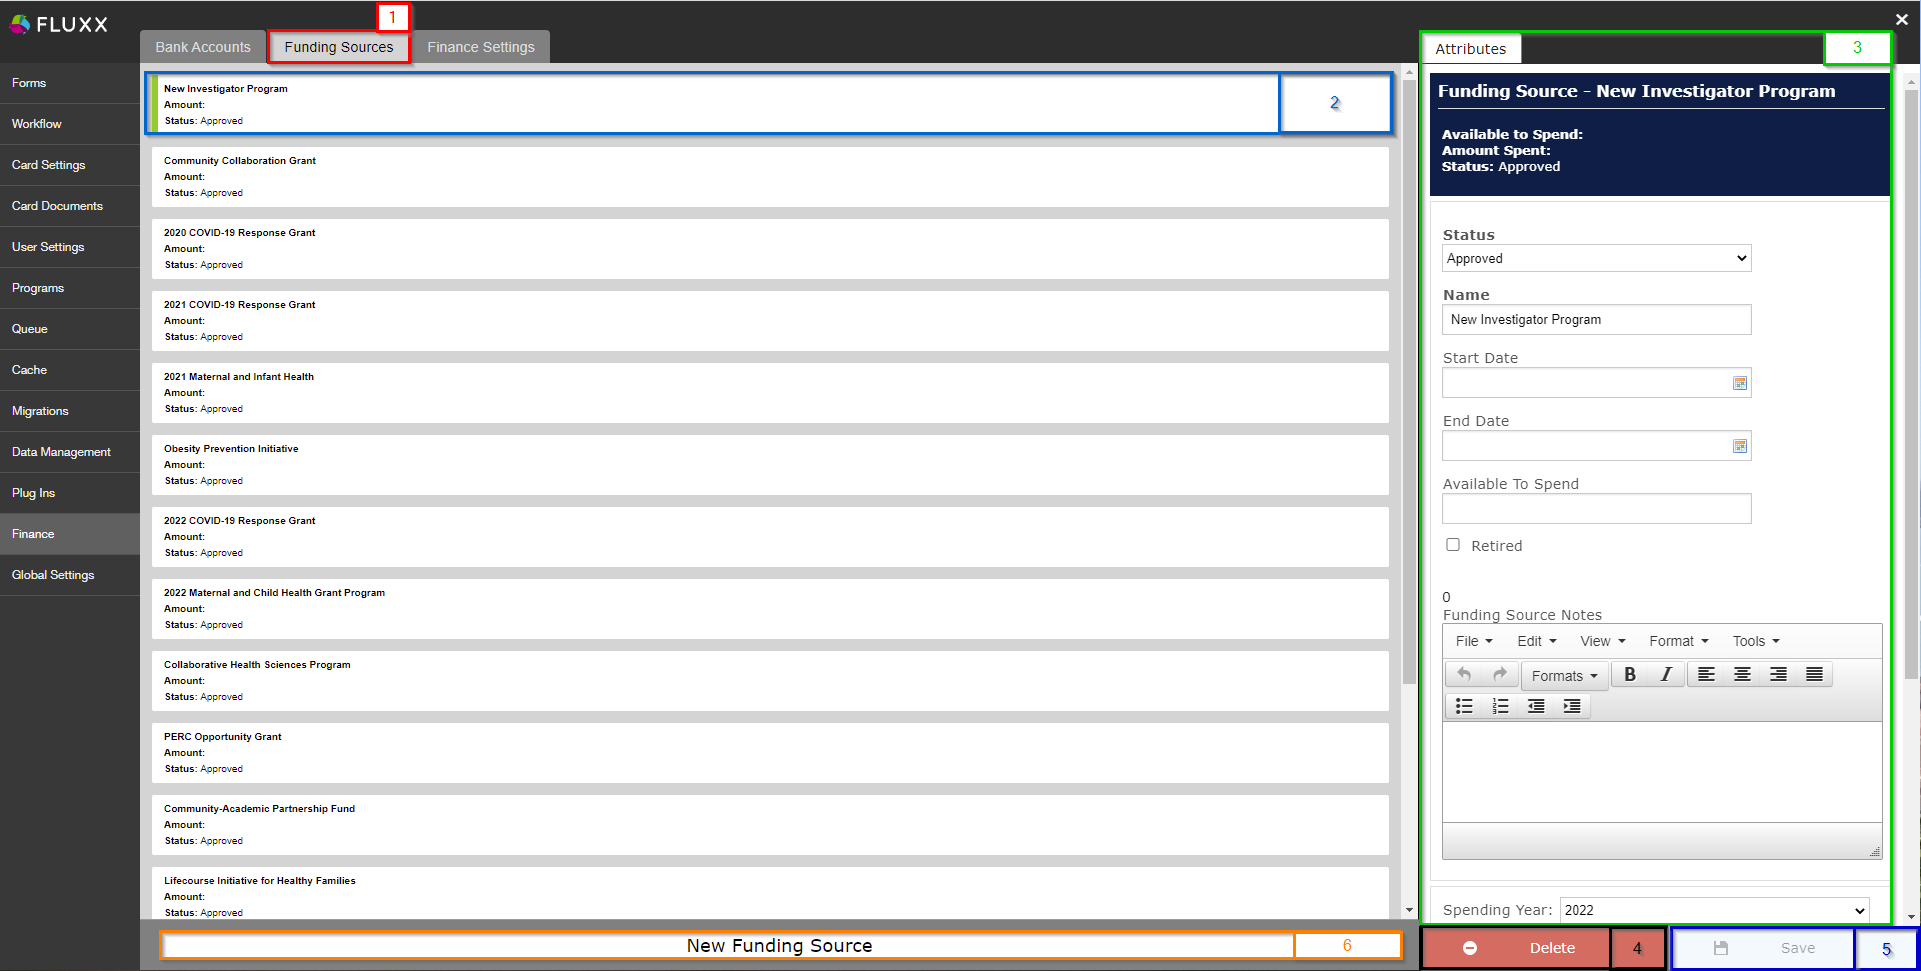
- Box # 1: Shows the Funding Sources Tab as currently selected.
- Box # 2: Shows the Funding Source that is currently selected. You can tell which bank account is currently selected NOT ONLY based off of the Funding Source Name (match the Name seen in the box highlighted in box # 2 with the Name found at the top of box # 3), BUT ALSO based off of the slim green line that displays on the left-hand side of the record selected.
- Box # 3: Shows the editable attributes for the currently selected Funding Source. Most of these fields are left blank at the WPP (except for Status, which should be 'Approved,' and Name, which should match the name of the Subfund that this Funding Source corresponds to).
- Box # 4: Shows the Delete button which allows you to delete the Funding Source currently selected. Please do NOT do this unless the Funding Source in question was created in error. Deleting Funding Sources that are tied out to an active grant can result in broken links, i.e. a Grant tied back to a Funding Source that doesn't exist any more.
- Box # 5: Shows the Save button. If you made any changes to this record that you want to be effectuated, you MUST click the Save button. Otherwise, any unsaved changes will be discarded.
- Box # 6: Shows the New Funding Source button. Clicking this button will allow you to create a new Funding Source and then edit its attributes.
Finance Settings
Before You Go On...
Fluxx has a great article that discusses many of the Finance Settings shown below and gives a more expansive explanation. Before reading below, please check out the Fluxx article here: https://fluxxdev.atlassian.net/servicedesk/customer/portal/1/article/1795916915?src=602107089
The Finance Settings Tab
The Finance Settings Tab contains a number of toggles and settings which dictate how the Finance System works in Fluxx. Please see the screenshot below for highlighted items below and beneath the screenshot for descriptions of said items. Note: As previously stated, the WPP does NOT use many (or really any) of these settings.
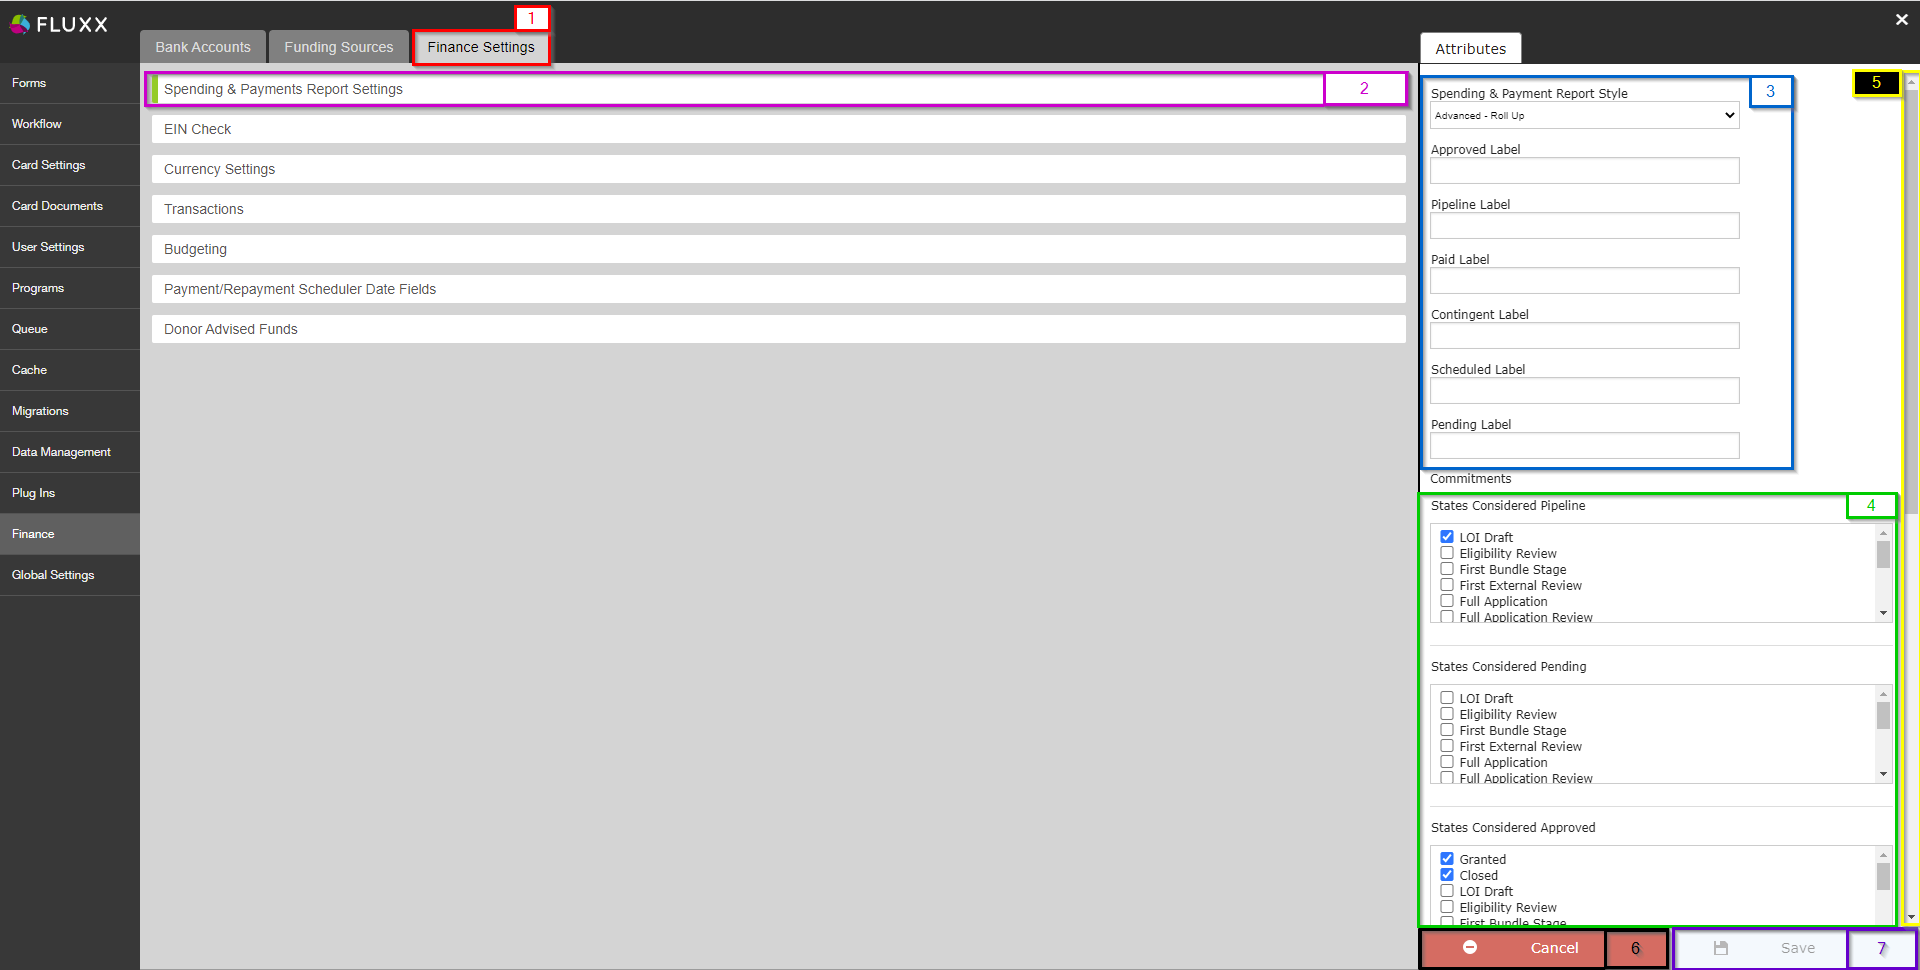
- Box # 1: Shows the Finance Settings tab as currently selected.
- Box # 2: Shows the group of settings currently selected. You can tell which bank account is currently selected based off of the slim green line that displays on the left-hand side of the group of settings selected. In this example, we're looking at the Spending and Payments Report Settings.
- Box # 3: Shows several of the settings that allow you to control how the Spending and Payments Report will appear when run.
- The Spending and Payments Report Style gives several options for the style of the report.
- The options for the style are shown below:
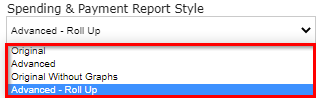
- Original: Explanation of the Original Budgeting Style can be found here: https://fluxxdev.atlassian.net/servicedesk/customer/portal/1/article/1795916915?src=602107089. Note: If Original style is selected, none of the rest of the options from Box # 3 will appear (i.e. b - g below) NOR will the options in Box # 4 appear.
- Advanced: Explanation of the Advanced Budgeting Style can be found here: https://fluxxdev.atlassian.net/servicedesk/customer/portal/1/article/1795917463?src=748060891
- Original Without Graphs: See the Original style link for further explanation; essentially equivalent to that style, but without the graphs. Note: As with the Original style, if Original Without Graphs is selected, none of the rest of the options from Box # 3 will appear (i.e. b - g below) NOR will the options in Box # 4 appear.
- Advanced - Roll Up: Explanation of the Advanced Budgeting with Roll Up Style can be found here: https://fluxxdev.atlassian.net/servicedesk/customer/portal/1/article/1795949725?src=730543791
Under the Approved Label, enter the naming convention desired for Approved grants (optional).
Under the Pipeline Label, enter the naming convention desired for Grants in Pipeline (optional).
Under the Paid Label, enter the naming convention desired for Paid payments (optional).
Under the Contingent Label, enter the naming convention desired for Contingent payments (optional).
Under the Scheduled Label, enter the naming convention desired for Scheduled payments (optional).
Under the Pending Label, enter the naming convention desired for Pending payments (optional).
- The Spending and Payments Report Style gives several options for the style of the report.
- Box # 4: Shows further options for categorizing various grants based off of their statuses.
Under “States Considered Pipeline”, select the workflow states on the grant that represent Requests in the Pipeline
Under “States Considered Pending”, select the workflow states on the grant that represent Pending requests
Under “States Considered Approved”, select the workflow states on the grant that represent Approved Grants
- Box # 5: Shows the scroll bar as there are two more settings options on this page (that won't, however, be covered here as the WPP does NOT use these options).
- Box # 6: Shows the Cancel button. If you have made changes that you do NOT want to be effectuated, you can simply click the Cancel button and the settings on this screen will return to how they were set prior to your most recent, unsaved changes.
- Box # 7: Shows the Save button. If you made any changes to this record that you want to be effectuated, you MUST click the Save button. Otherwise, any unsaved changes will be discarded.