Merging Duplicate Contacts/Organizations
In Fluxx, merging duplicate records is relatively straightforward. Follow the steps laid out below in order to merge several duplicative records into one consolidated record.
To begin, go to any Fluxx dashboard and navigate to and click on the icon found in the bottom left-hand corner of the screen (see also the screenshot, below). Clicking on the icon will bring up the "Dashboard Themes" menu; from the menu select the "Table" view.

After clicking on the table view, the system will load and eventually pull up a screen that looks like the one found in the screenshot, below. From this screen, you can switch between looking at Organizations or People (you can also look at Jobs and Emails, but these tabs are not useful for merging duplicates), Search the table for a specific record or specific records, as well see more information and find linked records to the records displayed in the table by clicking on the record ID.
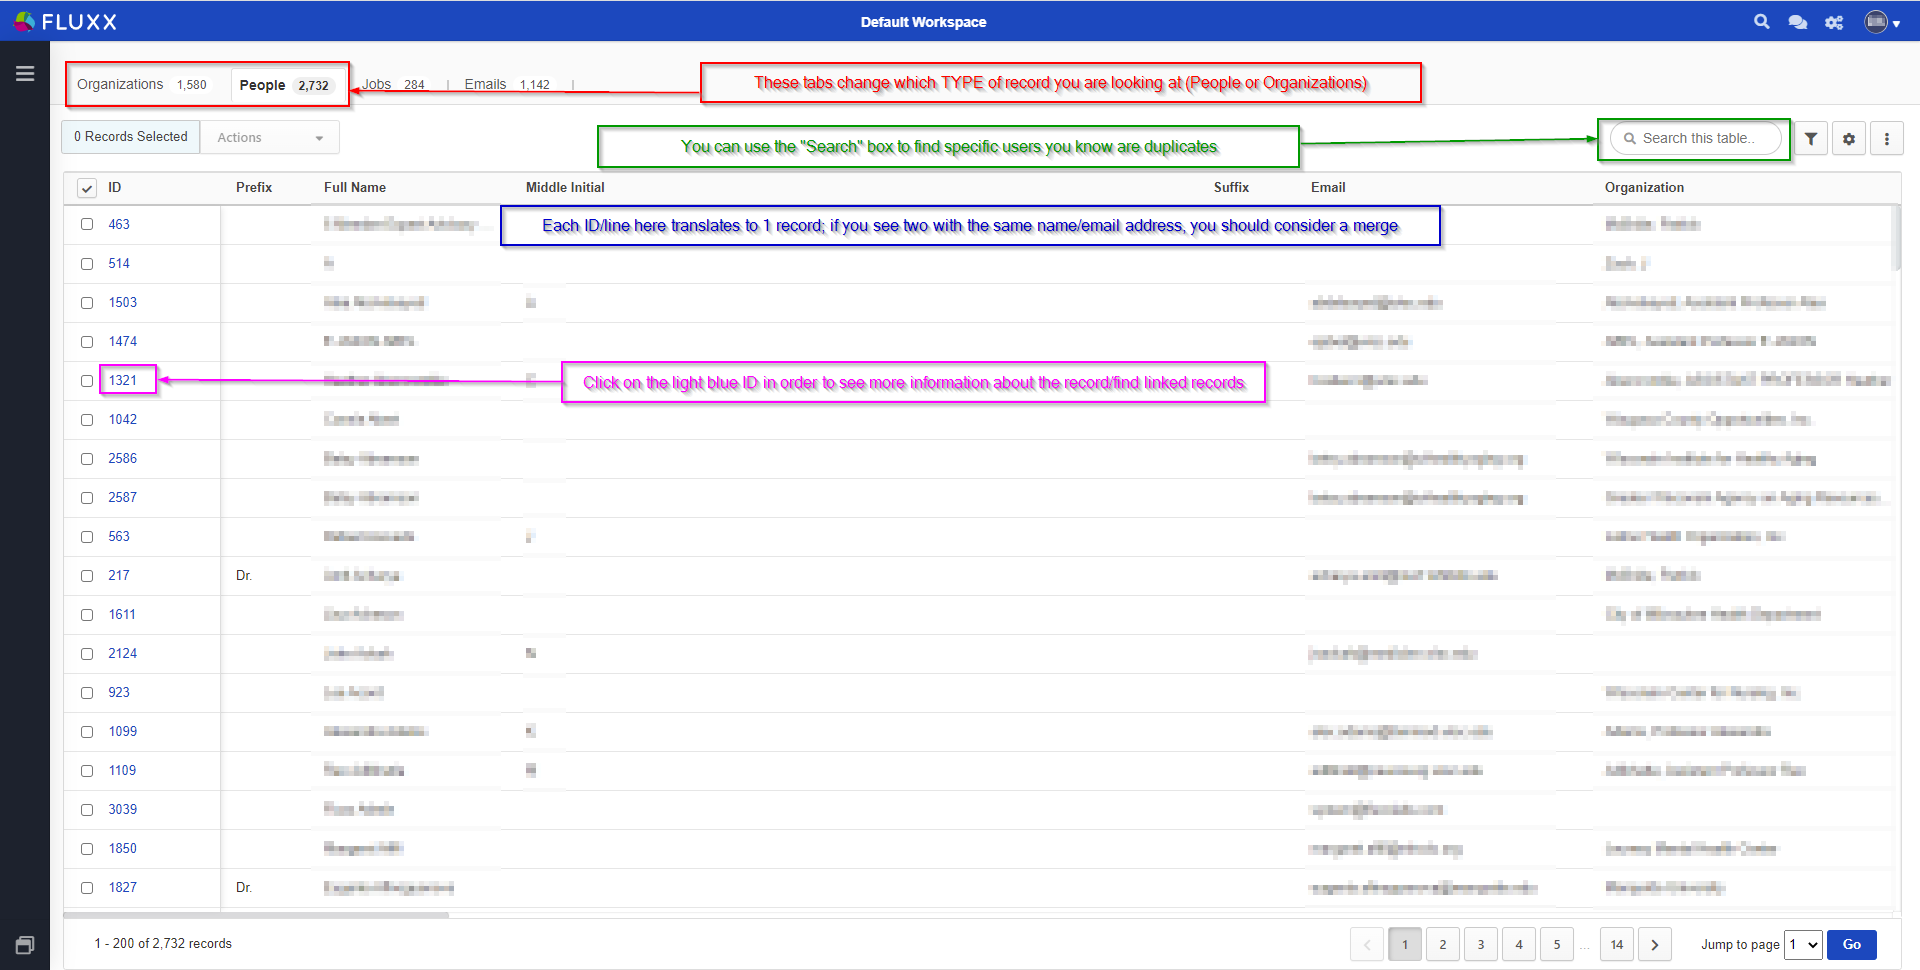
In order to merge duplicates from this screen, you'll want to select two records that look to be the same person. The best way to do this is usually to search the Person's (or Organization's) name in the search bar. When you pull up the two (or more) records that have the same name, check the other columns in the view to make sure that the user is really same. As we can see, not all the fields are the same across the two (or more) records (for example, the Organization name is different for these two User records, despite the fact that they represent the same person). In order to select these records for merging, you'll want to CTRL or Shift + Click on the Check Boxes next to the IDs of the records.

Once you've selected the two (or more) records, click on the "Actions" button and then select "Merge Selected" from the dropdown menu that appears:

One final screen will appear with all of the duplicate records you've selected. Now to finally consolidate the records. To do so, first click the check box next to the record that you want to be primary in the merge (i.e., the primary is by default the record that will carry all of its information over to the consolidated, merged record except for any fields you choose to overwrite from the other duplicative records), then you'll click on any records that should be secondary in the merge (i.e. their Linked records will flow to the consolidated record, but by default information on them will be overwritten by the data on the primary record). When you select the two (or more) records, Bubbles will appear next to each field. Any bubble that is filled in will pull that bubble's information onto the consolidated record.
For example, in the screenshot below all information will be coming from the record on the first line because all of the bubbles on line 1 are selected; if I wanted to pull over the Title from line two, however, I'd just need to select the Title bubble found on line two. When I've finished deciding what data should be on the consolidated, merged record, I just need to click the button "Merge Selected."

Clicking "Merge Selected" will give you one last chance to go back by giving you this confirmation screen, showing that you're merging the Secondary record (the first one in the list) into the Primary record (the second ID in the list). Click "OK" to proceed and merge the records.

Now the contacts will be merged and all linked data to each of the two records will be re-linked to the one, consolidated record. You'll be brought back to the "Dedupe People (Or Organizations)" screen, but with no records appearing (this is normal). To return to the dashboard you began from, navigate your mouse back to the bottom left-hand corner of the screen, select the icon found there, and from the "Dashboard Views" menu click the Default (Avant) dashboard view.

From your main dashboard, you can pull up a "People" or "Organization" card and search to verify that your two duplicate contacts were successfully merged into one record.