Table of Contents
Overview
Fluxx's search functionality works quite a bit differently from how both Blackbaud's and Legacy's did.
Within Fluxx, there are four types of searches we regularly use: Card Searches, Card Filters, Universal Searches, and Ad-Hoc Reports.
Card Searches
A Card Search is the simples of searches within Fluxx. It will search for numbers, names, or text strings that match the searched term within the card you entered the search term for. Please Note: A Card Search will only be able to search/find records for the card you are searching if the card's filters pull in those records to begin with. If, however, the filters added to your card filter out, for example, every Community Impact Grant, searching for the Reference Number (ID) of one of the Community Impact Grants will NOT return any results since those records aren't "in" the card to begin with due to your filters.
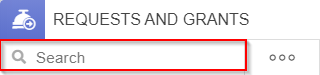
From within the card itself, you can type in the "Search" bar to find specific records. This is a "brute force" way of searching as it will try to find exact matches and can't be used for specific field criteria (e.g. via this method I cannot search for Grants whose Grant Amount is greater than $10,000). Instead, you can type in things such as the 4 digit Grant Reference Number, Principal Investigator Name, grantee organization name, etc. in order to find records associated with a specific Grant.
Please see the screenshot to below to see an example card's (in this case, a Requests and Grants card) search bar. Please note: this search bar can be found for ALL card types, not just Requests and Grants.
Card Filters
Card Filters are also found within the card itself; however, this is the precision method for searching records.
In Fluxx there are two types of filters: Basic Filters and Advanced Filters. Both allow you to filter records on the card, but Advanced Filters are both more complicated and more flexible that Basic Filters.
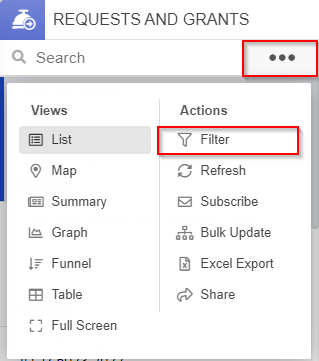
From within the filter menu (found by clicking on the "Three Dot Menu" from within the card and then clicking the action "Filter"), you can search on any field within the system (using Advanced Filters – more on that in a second) to find records that match the specific criteria you enter. For example, within filters you could find Grants whose Grant Amount is greater than $10,000 and where the Primary Topic is Cancer.
Please see the screenshot below to see the Three Dots Menu from a card and the Filter button from within the menu that pops up when you click the Three Dots Menu button.
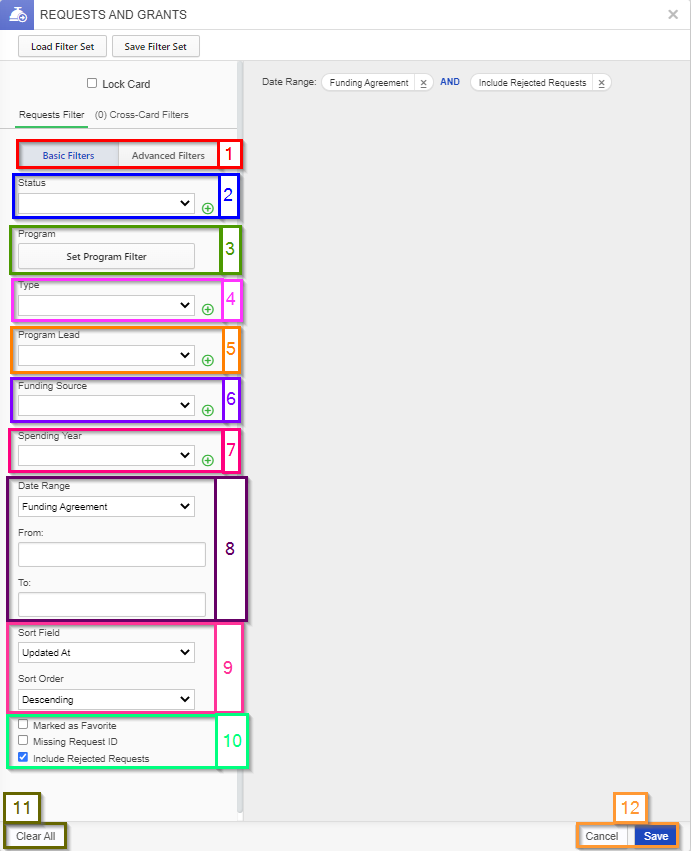
- Unlike the Program filter (Box # 3), where everything has to be split out into either OAC OR PERC, this allows for subfunds which are shared between OAC and PERC to be selected.
- For example, the 2021 COVID-19 response RfP was for BOTH OAC applications AND PERC applicants. Within the Program filter, these had to be split out as "OAC 2021 COVID-19 Response Grants" and "PERC 2021 COVID-19 Response Grants." However, the Funding Source is just "2021 COVID-19 Response Grants" and will pull back BOTH OAC and PERC Applications and Grants of this type.
- This is useful for quickly pulling all grants for one type of RfP if the RfP was split between OAC and PERC, rather than having to run two search or play with the Program filter to include BOTH OAC and PERC applications and grants of that type.
- Box # 7: Shows the Spending Year dropdown menu. This corresponds to the Fiscal Year in which funding was awarded for a given grant. For example, if I select "2022" from the dropdown menu, I will find all grants who were awarded with funding in between July 1st, 2021 and June 30th, 2022 (which is equivalent to UW's Fiscal Year 2022).
- Box # 8: Shows the Date Range search term field. The three fields here work together for the date range search to work.
- The Date Range field is the anchor field that determines how the two date fields are used. There are four options to pick for this date range:
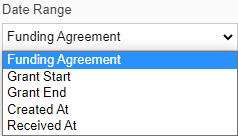
- Funding Agreement: The search will start from the From date and go to the To date looking for grants whose Funding Agreement was agreed to within that date range. Funding Agreement date means the date when the WPP agreed to fund this grant.
- Grant Start: The search will start from the From date and go to the To date looking for grants whose Project Start Date is within that date range.
- Grant End: The search will start from the From date and go to the To date looking for grants whose Project End Date is within that date range.
- Created At: The search will start from the From date and go to the To date looking for grants whose Created Date is within that date range. The Created Date is the date that the application was first started.
- Received At: The search will start from the From date and go to the To date looking for grants whose Received Date is within that date range. The Received Date is the date that the application was first submitted to the WPP.
- The Date Range field is the anchor field that determines how the two date fields are used. There are four options to pick for this date range:
- Box # 9: Shows the Sort options that determines how your card will sort the records that meet your filters. The Sort Field will determine what Field the system will sort based off of (by default: Time Last Updated). The Sort Order has two options: Ascending (going upwards) or Descending (going downwards).
- Box # 10: Shows three checkboxes that change functionality for the cards filters.
- Marked as Favorite: Will pull in only records that have been marked as a favorite (ones that you have explicitly "starred"). Please note: Since favorites are unique to each user, this will show different records to different users.
- Missing Request ID: Will pull in requests that are missing and ID. None of our requests/grants should be missing an ID, so this checkbox should not be relevant to us.
- Include Rejected Requests: Will pull in records that are technically Rejected. Records are counted as Rejected are those that are Declined and Withdrawn. If this box is NOT checked, these records will be hidden by default (even if one of these statuses is explicitly selected but the checkbox is NOT checked).
- Box # 11: Shows the Clear All button where you can clear ALL currently selected criteria from this filter.
- Box # 12: Shows the Cancel and Save buttons. Hitting Cancel will cancel whatever filters you added here and bring you back to the card as it was before you clicked the "Filter" button in the first place. Hitting Save will save your filter criteria and then proceed to filter the card to display only the records that meet your criteria.
That covers all of the options available for Basic Filters.
Advanced Filters
Similar to Basic Filters, Advanced Filters allow you to filter records in your card based on criteria. Unlike Basic Filters, however, Advanced Filters do NOT have a set of pre-configured criteria to chose from; instead, the search is entirely up to you, the user.
Before You Begin...
When using Advanced Filters, you'll need to know what the column names for important fields are. Please see the Excel sheet linked below to find important and frequently used columns in Fluxx and what they do.
Using Advanced Filters
Please see the screenshot below for highlighted, important items from the Advanced Filters screen and beneath the screenshot for descriptions of said items.
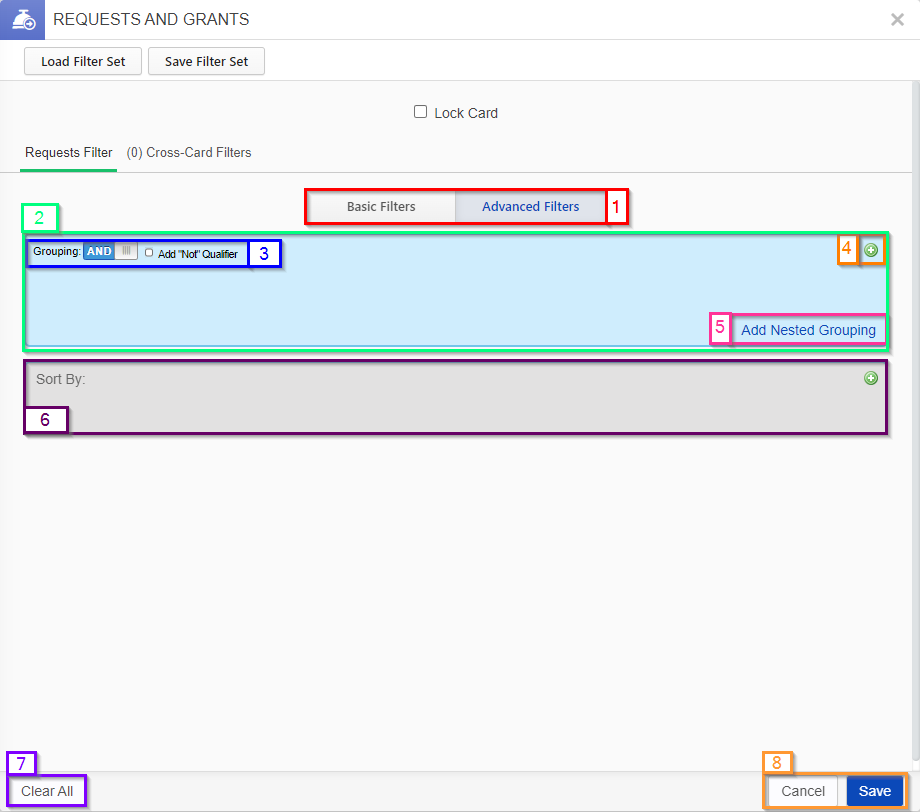
- Box # 1:
- Box # 2: highlights the blue criteria box. All criteria added to the Advanced Filters will appear here in this blue box.
- Box # 3: Shows the "Grouping" toggle for the criteria. By default, all criteria have AND logic between them; by clicking on that "AND" toggle, you can switch the Grouping type to OR logic in between the criteria. This can be useful if you are looking for records that have EITHER meet Criterion A OR meet Criterion B. Additionally, by clicking the checkbox to the left of the text "Add "Not" Qualifier" you can add NOT logic into the search.
- Box # 4: Shows the Green Plus ("+") Button where you can add new criteria to the Advanced Filters box. Clicking on that Green Plus Button will pull up a new screen allowing you to select ANY of the fields available for that specific record type. In this example, clicking the Plus button will result in you being able to select from every field available for the Application and Grants record type.
- Box # 5: Shows the Add Nested Grouping button. When you click on this button, you will added a new subgrouping within the blue box; every subgrouping can have its own Grouping (see Box # 3). This way, you can have really tricky logic for your criteria (e.g. either the record meets Criterion A or it meets Criterion B AND it also has to meet Criterion C and Criterion D).
- Box # 6: Shows the Sort By box. Similar to the the green plus button shown in Box # 4, there is a Green Plus Button here that allows you to add any field for this record type as the sort field; from there, you'll be able to choose whether that field should be used to sort the records in an Ascending fashion or a Descending fashion.
- Box # 7: Shows the Clear All button where you can clear ALL currently selected criteria from this filter.
- Box # 8: Shows the Cancel and Save buttons. Hitting Cancel will cancel whatever filters you added here and bring you back to the card as it was before you clicked the "Filter" button in the first place. Hitting Save will save your filter criteria and then proceed to filter the card to display only the records that meet your criteria.
Cross Card Filters with Advanced Filters
Let's say that you're filtering for records of the Applications and Grants record type, but you want to find these records based off of information held on another record type. Let's say, for this example, that you want to find Grants where the Organization that requested the grant is based out of Milwaukee. This is all achievable within Advanced Filters.
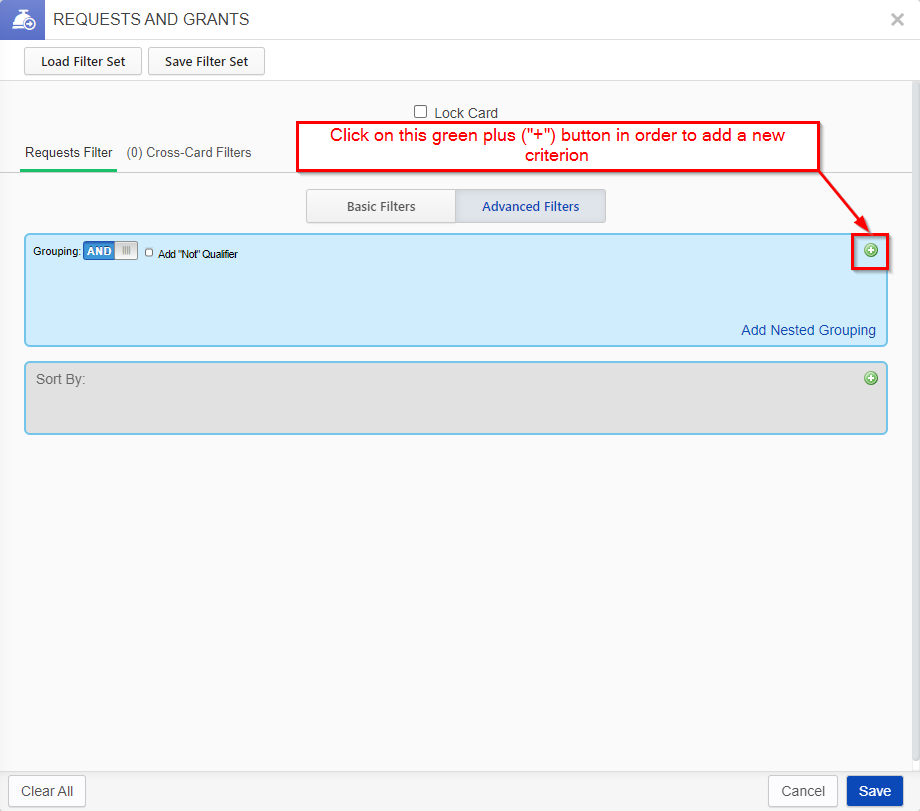
To start, head over to Advanced Filters and click on the Green Plus Button in order to add a new criterion to the filters. Please see also the screenshot below.
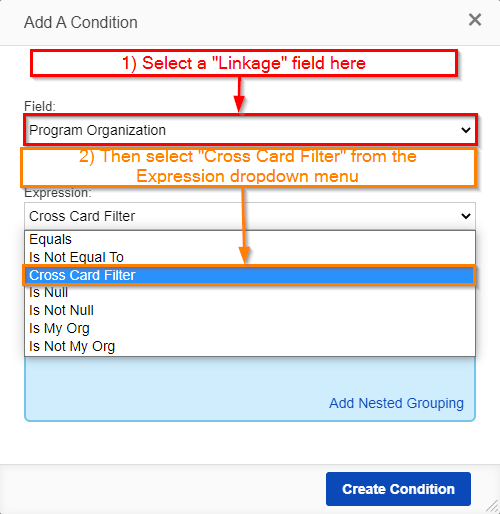
From the "Add a Condition" screen that pops up, you should select a field that serves as a linkage to another record type. For this example, I'll be using Program Organization, which is the field that links the Application/Grant Record back to the Organization that is requesting said grant. Once you've selected a Field that serves as a "Linkage" to another record type, open up the "Expression" dropdown menu and select "Cross Card Filter" from among the options. Please also see the screenshot below for visual instructions on how to do this.
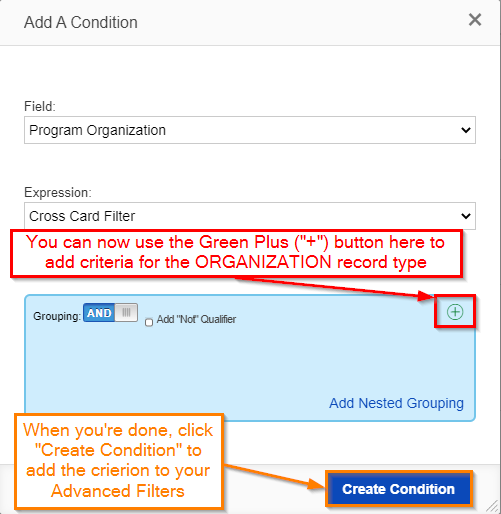
Once you've selected "Cross Card Filter," a blue box similar to the one seen for Advanced Filters will appear allowing you to add criteria, change groupings, add "Not" qualifiers, etc. Now, you can add the criterion "City," use the Expression of "Equals" and enter in the text "Milwaukee." Once you click "Create Condition" and then "Save" from the Advanced Filters screen, the system will filter down the Application/Grant records to only those whose requesting Organization is based out of the city of Milwaukee.
Universal Search
This search is an advanced search that does NOT limit itself to only one record type.
Universal Search – Allows you to search every record in the system at once for key words/IDs, names, etc. Very powerful for certain queries, but don't rely upon it for more complexes searches/to find records based off a certain criteria (i.e. something that can't be done easily in Universal Search is finding all grants whose grant amount is greater than $100,000).
Screenshot below for how to open the Universal Search bar:

Once Universal Search is open, you can type terms or numbers into the search bar to search all records that might meet that criteria. For example: I know I have a test application with request # 5014. I type that number into the Universal Search, and I find the Request and any Requirements, Payments, Contacts, etc. that have that ID or that are connected to that request ID.
Note: Not all records that are returned are necessarily related to the Request I'm trying to look for. As you can see from my screenshot, below, the Requirement that is returned is NOT related to the Llama Rescue Inc. testing grant application, but was returned by the Universal Search because it's ID (requirement ID) is also 5014.

Ad-Hoc Reports
Ad-Hoc Reports are reports that we create that can be run on the fly, at any time, by any employee within the Fluxx system. Unlike filters or the Universal Search, these reports will NOT just show you records in the system; instead, Ad-Hoc Reports generate Excel or CSV files for which you can configure the Filters, the Columns, and the Groupings of the records returned. These reports are flexible and allow for us to add data from different record types all onto one report.
Before You Begin...
Fluxx has a great article regarding all things Ad-Hoc Reports related. Please see that article here: https://fluxxdev.atlassian.net/servicedesk/customer/portal/1/article/1795951277?src=-372247987
When using Ad-Hoc Reports, you'll need to know what the column names for important fields are. Please see the Excel sheet linked below to find important and frequently used columns in Fluxx and what they do.
Managing Ad-Hoc Reports
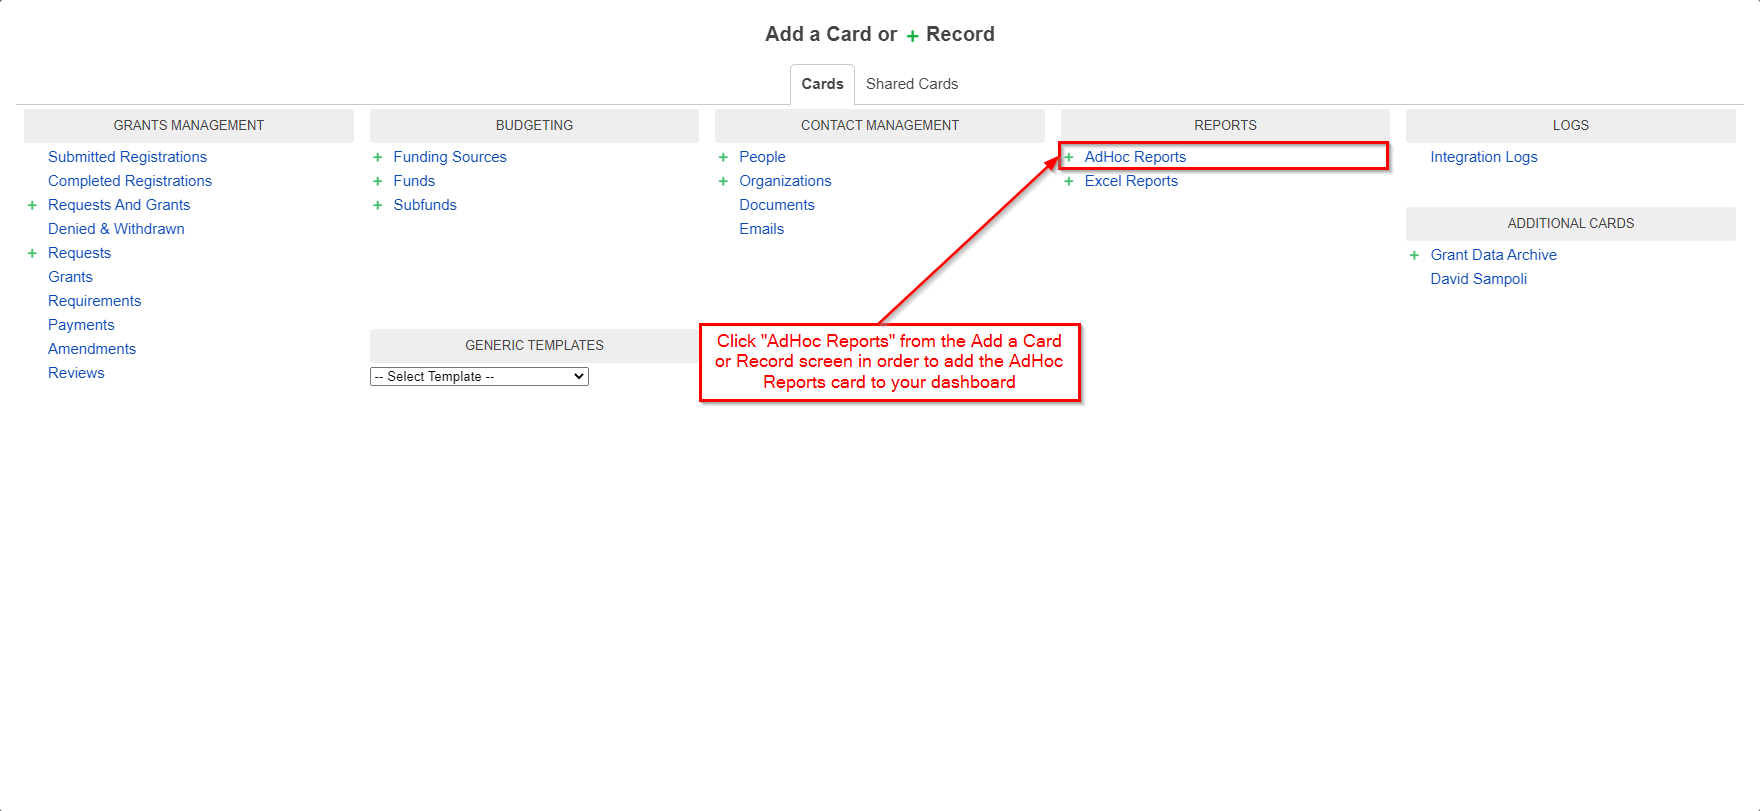
To begin creating an Ad-Hoc Report (or to begin editing one), first start by going to the Add a Card or Record screen. Please see the screenshot below for more information on this.
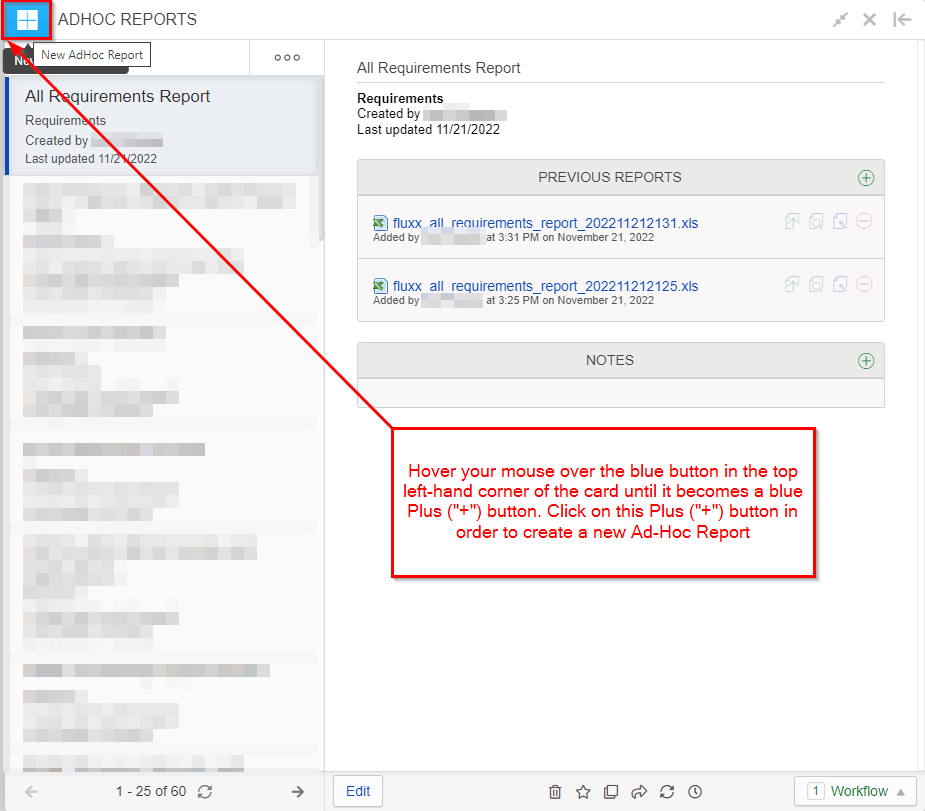
In order to create a new Ad-Hoc Report, hover your mouse button over the top left-hand corner of the card until the blue image becomes a blue Plus ("+") button. Click on this Plus button in order to create a new Ad-Hoc Report. Please see also the screenshot below for visual instructions.
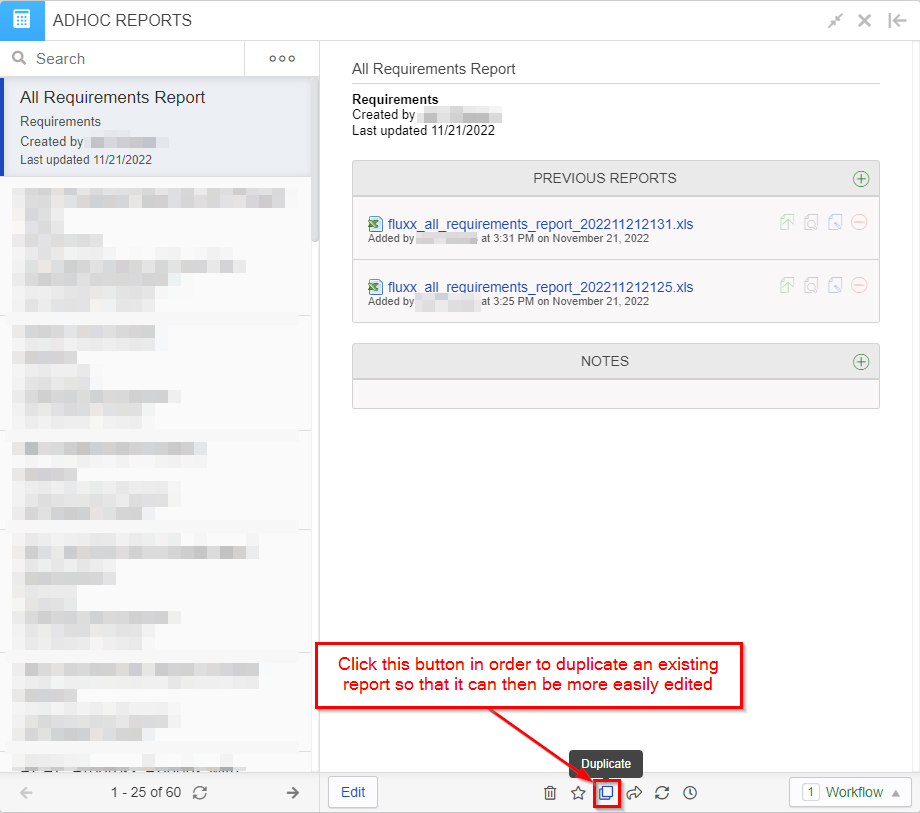
In order to duplicate an existing report for easier editing/changes, click on the report you want to duplicate from the report list and then find and click on the icon highlighted in the screenshot below in order to duplicate said report.
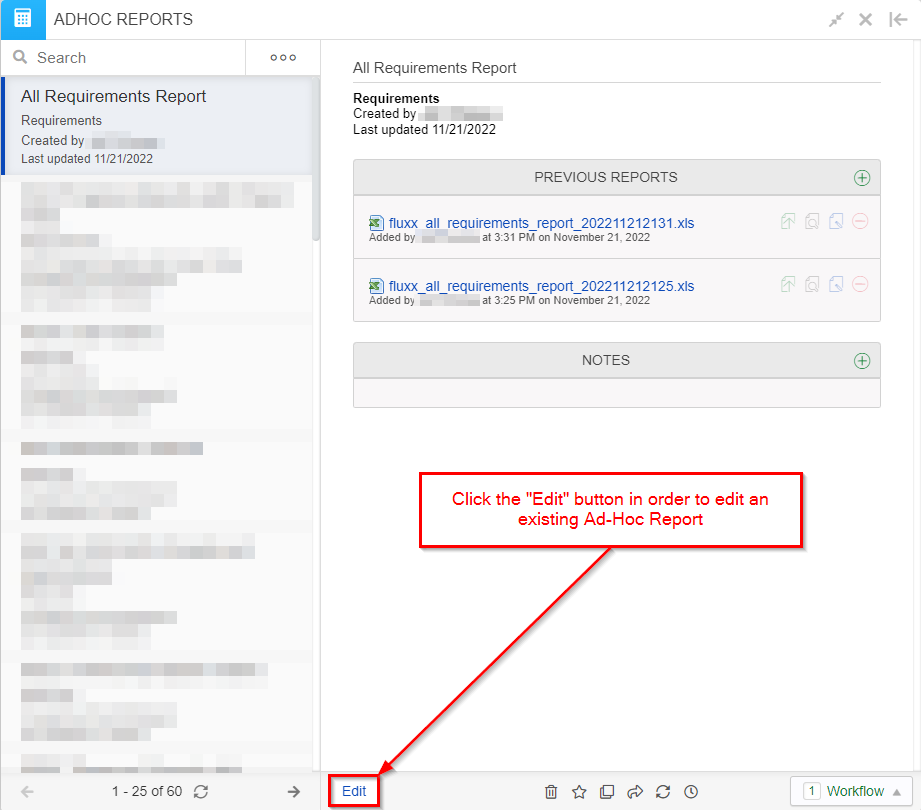
If you need to edit an existing report, you can click on the "Edit" button in the bottom left-hand corner of the card. Please also see the screenshot below.
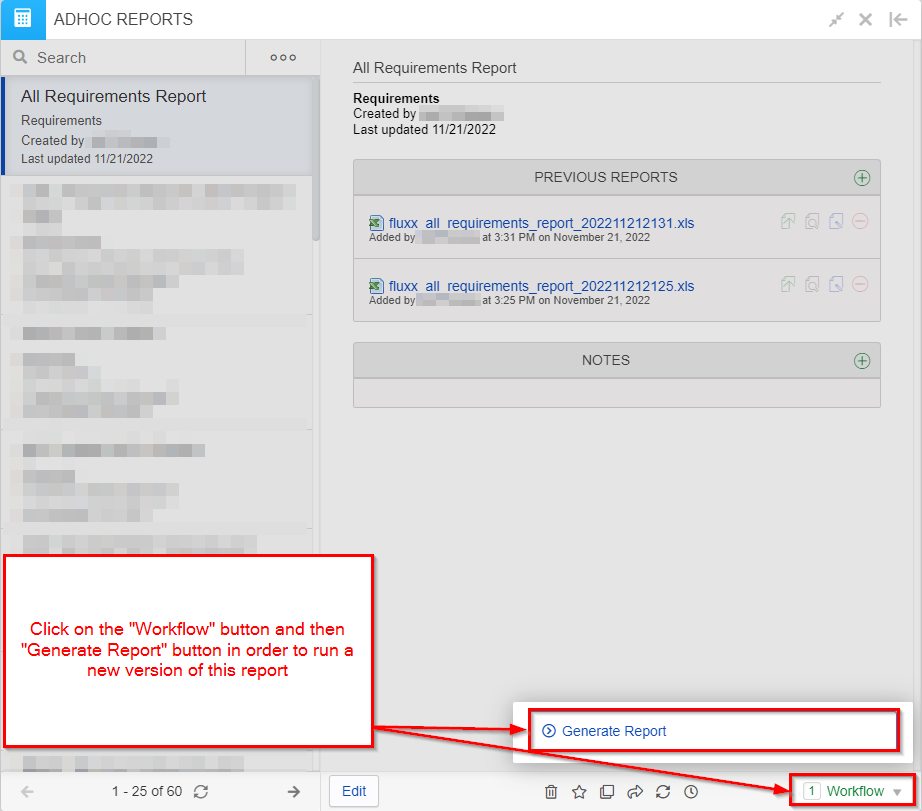
Finally, in order to run an Ad-Hoc Report, you should click on the "Workflow" button in the bottom right-hand corner of the card and then then "Generate Report" button from the menu that pops up.
Creating or Editing an Ad-Hoc Report
Hitting the blue Plus ("+") button OR the edit button on the Ad-Hoc Report card will bring you to another screen that looks like the one in the screenshot below. Please see the screenshot below for highlighted, important items from the Edit Ad-Hoc Reports screen and beneath the screenshot for descriptions of said items.
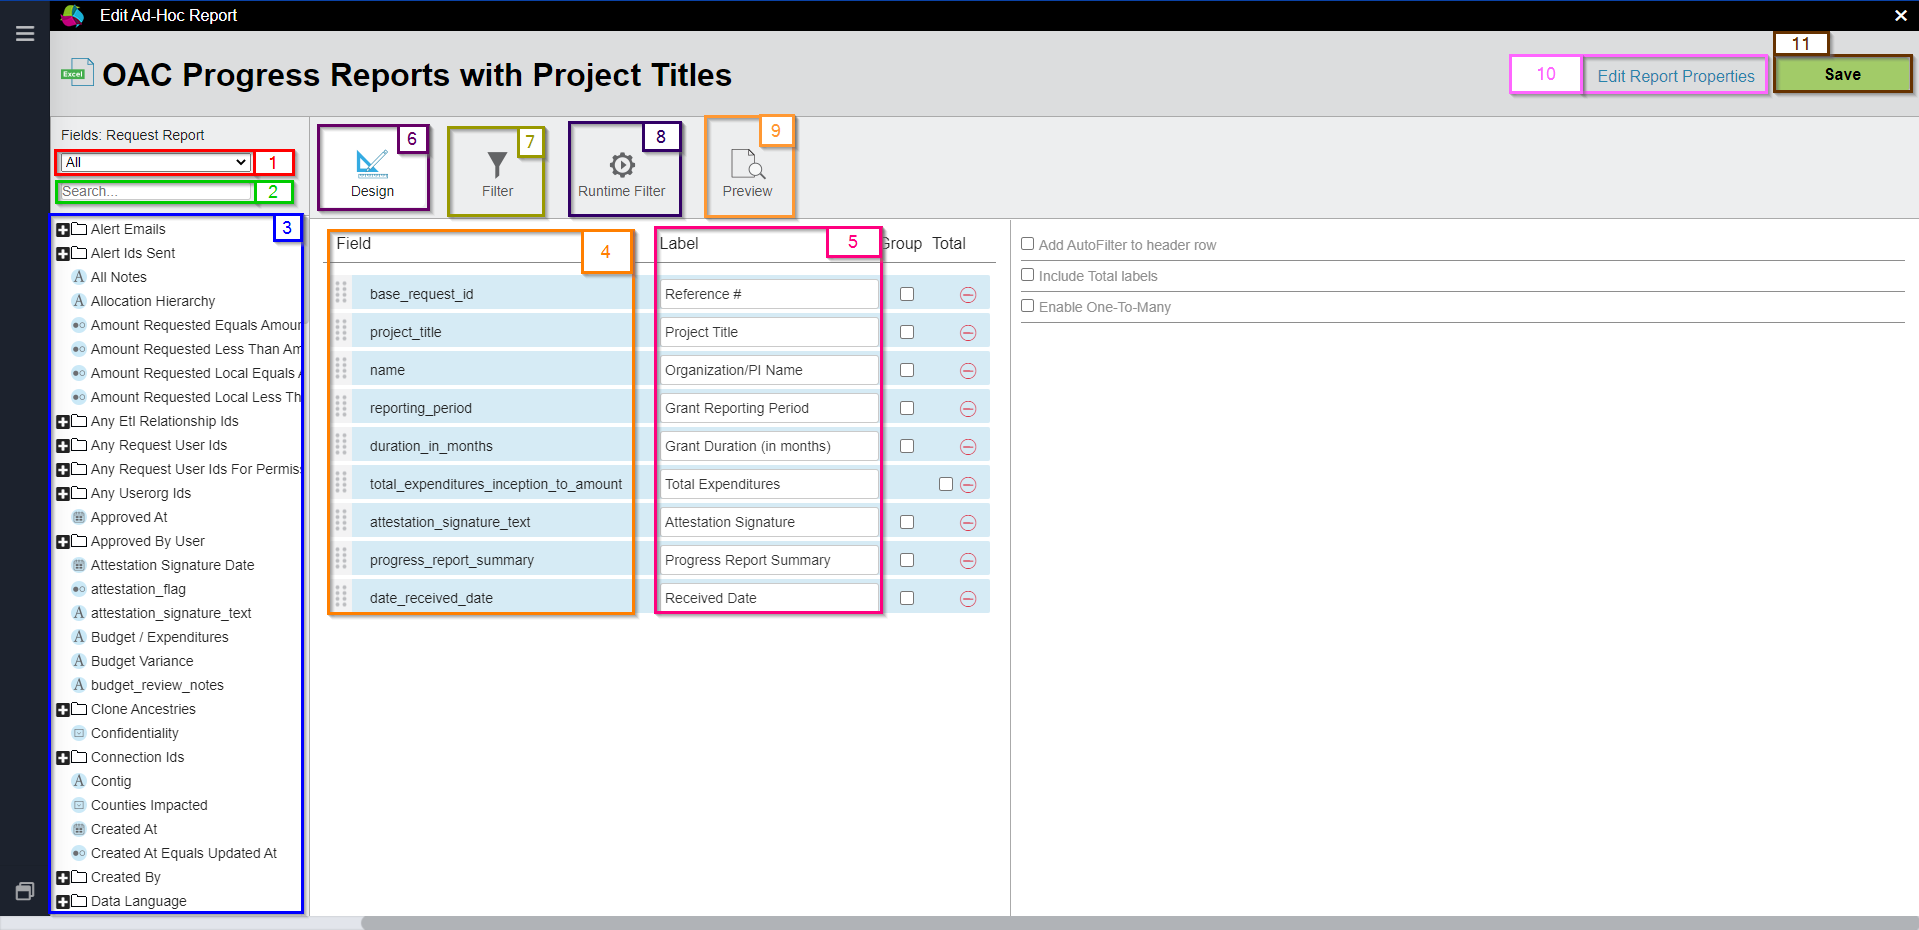
- Box # 1: Shows which columns are currently displayed. By default this will sometimes be only Recommended columns; I recommend always switching this dropdown menu to display "All" columns (as shown in the screenshot above).
- Box # 2: Shows where you can search for specific columns using a search term. Please be sure to use the Excel sheet linked from this article to find the names for commonly used columns; some column names are quite odd and unexpected.
- Box # 3: Shows the list of possible columns to choose from for this report. Drag from this portion of the screen to the Field section (Boxes # 4 and 5 from the screenshot above) in order to add a specific column to the Ad-Hoc Report.
- Box # 4: Shows the internal column name of the columns already selected from this report.
- Box # 5: Shows the Label that is configurable for every column that you add to your report. This way, you can make the report more legible for end-users. For example, we usually change the label of the column "Base Request" or "base_request_id" to be "Reference Number" since that is the name that WPP is used to.
- Box # 6: Shows the Design tab as currently selected. This where you design the columns of the report in question.
- Box # 7: Shows the Filter tab. This allows you to have standing filters on this report so that it doesn't return EVERY record for this record type. Ad-Hoc Reports can use both Basic and Advanced Filters as you would be able to do for a normal card. Those won't be covered again here as they are covered earlier in this guide.
- Box # 8: Allows you to add Run-Time Filters. These are different from normal filters. Normal filters (both of the Basic and Advanced variety) will ALWAYS be applied to this report whenever it is run. Run-Time Filters, on the other hand, will prompt the user for values to search for for the specific Run-Time Criterion you have entered. For example, a common Run-Time Filter to use is Status. Every time someone goes to run an Ad-Hoc Report that has a Status Run-Time Filter, a screen will pop up asking the user trying to run the report to enter in the statuses for which they would like to return the records with said statuses.
- Box # 9: When clicked, will show you a Preview of how the report will look when it is run. Useful for checking that you are using a column that is actually populated or for checking if your filters will actually return any data.
- Box # 10: Shows the Edit Report Properties button; when you click this button, you will be given the option to change the Report's name, description, and type (.xlsx or .csv).
- Box # 11: Shows the Save button. Clicking this button will save what you have done to the report and bring you back to the Ad-Hoc Report card, from where you can run your newly created report.