The queue menu in the Admin Panel allows you to monitor two specific Queues from within the Admin Panel. The first queue is the Jobs Queue, which shows the status of (or delete) background jobs in the system – such as Card Exports and Bulk Updates.
The second queue is the Email Queue, which allows you to monitor, delete, or send emails that are sent to the Queue (i.e. those emails that are NOT automatically sent – see the Email Settings section for more information on this).
Before you go on...
Both of these queues can be monitored outside of the Admin Panel by non-admin users who have the required permissions. For more information on the permissions needed here, see the Permissions+ section of the User Settings Menu of the Admin Panel page.
For more information on Monitoring the Jobs Queue from outside of the Admin Panel, see this Fluxx article: https://fluxxdev.atlassian.net/servicedesk/customer/portal/1/article/3073048724?src=-1850192719
For more information on Monitoring the Email Queue from outside of the Admin Panel, see this Fluxx article: https://fluxxdev.atlassian.net/servicedesk/customer/portal/1/article/2095546388?src=1015302360
Jobs Queue
As stated previously, the Jobs Queue tab allows you to monitor the status of (or delete) background jobs in the system. Please see the screenshot below for highlighted items from the Jobs Queue tab and beneath the screen for explanations of said items.

- Box # 1: Shows the Queues Menu of the Admin Panel as currently selected.
- Box # 2: Shows the Jobs Queue tab as currently selected.
- Box # 3: Shows the Filters that you can use to narrow down this menu to just the Jobs that you are interested in. There are three Filter options:
- Job Type: Filters based on the type of background job. These come in four flavors:

- Download_report_job: Represents background jobs resulting from a user downloading an Ad-Hoc report.
- Bulk_update_attribute_job: Represents background jobs resulting from a user running a bulk-update on a card.
- Migration_job: Represents a background job from a data migration. Some of these data migrations represent the big cut-over migrations performed before WPP went live in order to pull in data from our old Grants Management System into Fluxx. However, Migration jobs set up via the Admin Panel will also appear under these Job Type.
- Card_excel_export_job: Represents background jobs resulting from a user clicking "Export" on a card.
- State: Filters based off of the status of the background job:

- Any: As the name implies, this will display background jobs from any status (same functionality as if the blank status is selected).
- New: The job has not yet been started. This is a fairly rare status (the system is usually pretty fast about beginning background jobs, so they're rarely seen as 'New').
- Error: The job did NOT finish due to an error. Job needs to be restarted if the outcome is still desired (e.g. you'll need to export the card again, say, if you didn't get the Excel export).
- Canceled: The job did NOT finish due to it being stopped by a user.
- Processing: The job is being processed. Unless stopped by a user or the job runs across an error, this is the final status before the job is complete.
- Complete: The job has finished successfully.
- Created by: Shows a dropdown list of system Employees (the only type of user that can start a background job). This allows you to filter down to who actually kicked off the background job.
- Job Type: Filters based on the type of background job. These come in four flavors:
- Box # 4: Shows the top checkbox. Checking this checkbox will select every background job on this page (maximum of 25 jobs per page, so maximum of 25 jobs selected).
- Box # 5: Shows the table headers for the table of jobs found beneath this line.
- Box # 6: Shows the individual checkboxes for the individual background jobs on this page. Each checkbox is in line with one background job and so allows you to select that specific job if you would like to run actions on just that job.
- Box # 7: Shows the downloadable reports for all export jobs (both for download_report_job and for card_excel_export_job). Basically, if the system did not automatically download this report for you when the background job finished (which is rare, but sometimes does occur), you can always have an admin user grab the Excel file for you from here. Also allows you to have a "history" of previously run exports.
- Box # 8: Shows pagination details. In the middle of the box, you can see the record number you're on (e.g. 1-25 of 622). Each page contains 25 records, so you know that you're on page 1 when you see 1 - 25, page 2 when you see 26-50, etc. On the far left of the box, you can see a (greyed out) button prev, which would allow you to go back to the previous page if this screenshot weren't taken on page 1. On the far right of the box, you can see the next button that would allow you to navigate to the next page (in this example, page 2).
- Box # 9: Shows Run Action options. In the dropdown menu actions, you have a dropdown list of actions to run. You can select the action you want to run from the list, and then click the Run Action button in order to run the action on the records selected (i.e. the ones whose checkboxes are checked). From the Jobs Queue, there is only one possible action to run: Delete Job. This allows you to cancel the job if you do not want it to run to completion.
Email Queue
As previously stated, the Email Queue allows you to monitor, send, or delete emails that are NOT sent automatically. The Email Queue tab is very similar in setup to the Jobs Queue. See the screenshot below for highlighted items from Email Queue tab and beneath the screenshot for descriptions of said items.
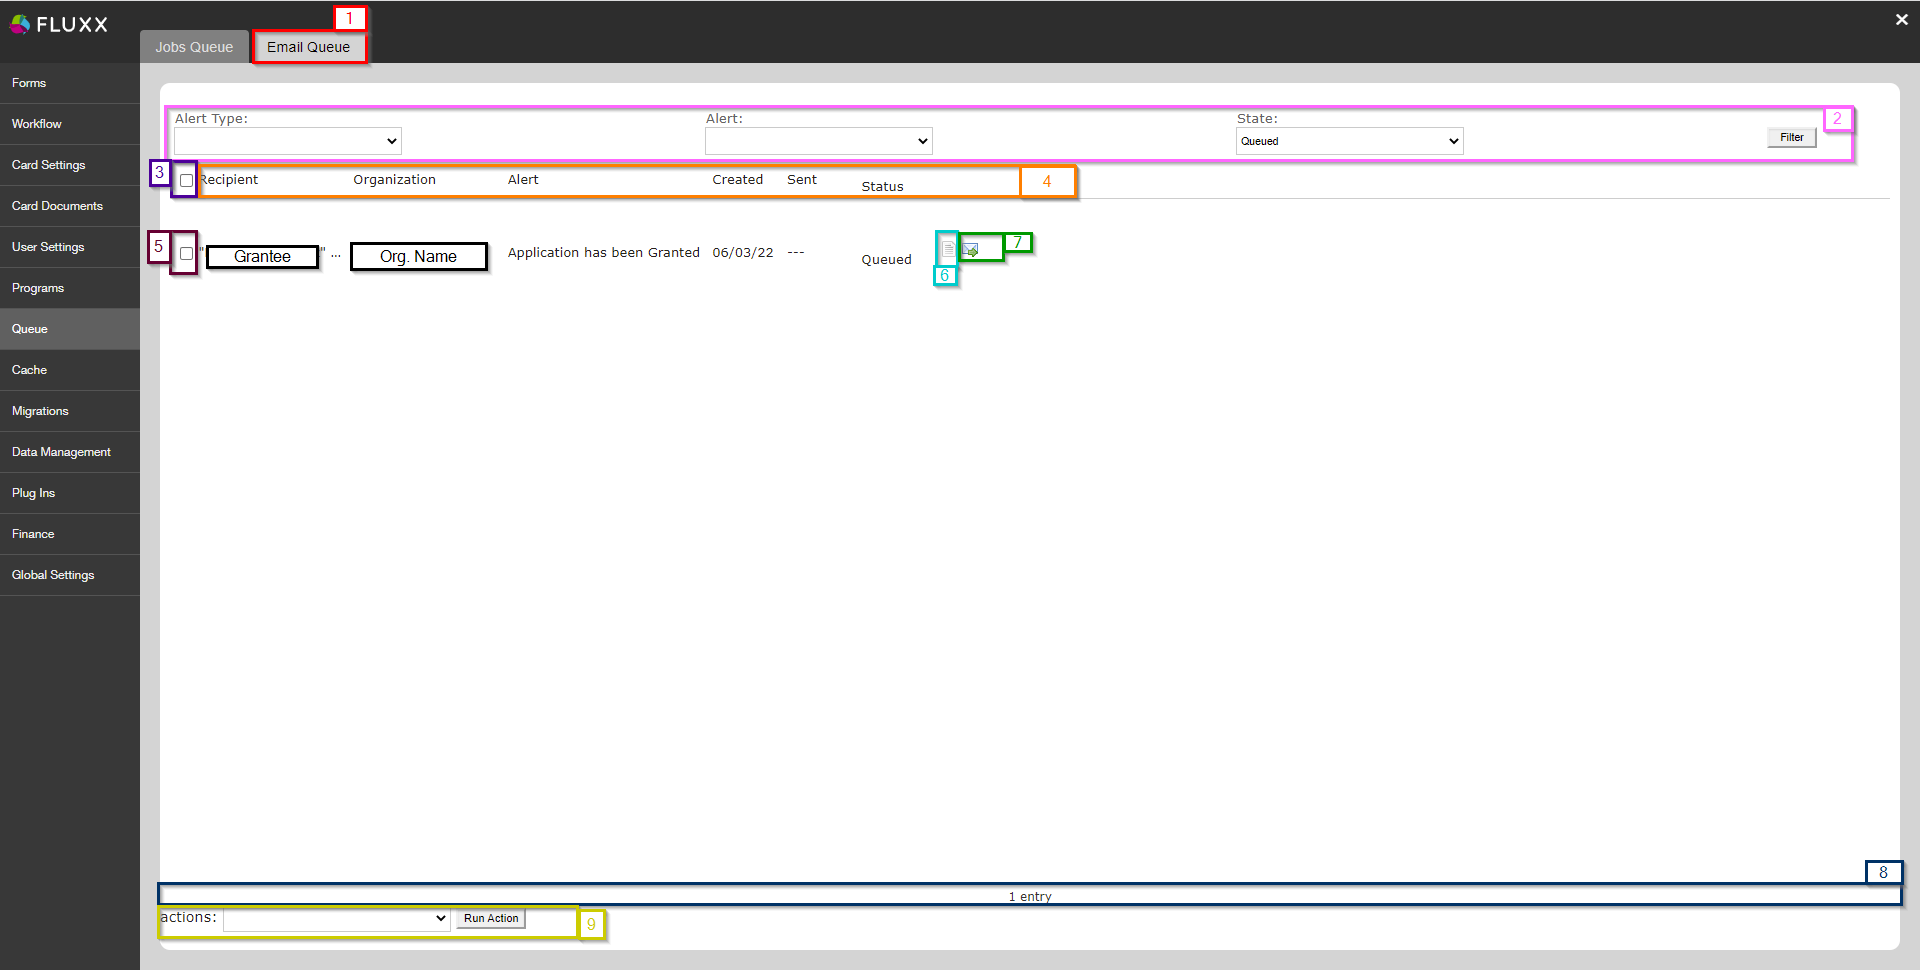
- Box # 1: Shows the Email Queue as currently selected.
- Box # 2: Shows the Filters that you can use to narrow down this menu to just the Emails that you are interested in. There are three Filter options:
- Alert Type: Allows you to filter based off of the base record type from which the email was sent:

- Grant Request: The main record type for everything in Fluxx, these alerts are sent from Application and Grant records. These alerts are primarily for status updates (e.g. "Application Declined" or "Application Granted") and for notifying grantees when their awarded grants are 90 or 30 days away from the Grant End Date.
- Loi: LOI in Fluxx means Registration to WPP. These are emails sent for registration records. We have 1 alert configured here: an alert that emails WPP staff when a new user registration is submitted.
- Request Amendment: These are alerts for No Cost Extensions and Budget Revisions. These consist of status alerts for WPP staff (e.g. Amendment Submitted by Grantee) and of alerts for grantees (e.g. "New Amendment to Submit" and "Amendment Successfully Submitted").
- Request Report: Request Reports in Fluxx mean Requirements to the WPP. We have quite a few email alerts for requirements; some remind grantees to submit their requirements (e.g. 30 days before Requirement Due, 1 day before 1, and 7 days overdue), some alert grantees when they successfully submitted the Requirement, and the rest alert WPP staff to various status changes that requirement their attention (e.g. emailing the Finance Team when the Requirement moves to the status "Finance Review").
- Request Reviews: These are alerts for Reviews. We only have 2: 1 for "New Review in Reviewer Portal" and 1 for "Review Successfully Submitted."
- Alert: Allows you to filter to the specific email message to find emails that are related to a specific alert. This list contains the Internal Name of the email message in the dropdown menu; select the internal name of the alert you want to only see email messages of this type.
- State: Allows you to filter email messages based off of their current status.

- Any: As the name implies, this will display email messages from any status (same functionality as if the blank status is selected).
- Queued: The default status for email alerts that are NOT set to automatically send, anything that goes to the Email Queue that hasn't been approved by a user will have this status. By default, the Email Queue will filter down to messages that are Queued so that you can quickly see which emails need to be approved or deleted by a user.
- Approved: Emails that have been approved to be sent by a user, but that haven't actually been sent yet.
- Sent: Email message was approved by a user and was successfully sent.
- Error: The email message attempted to send, but ran across an error and was not able to be sent successfully.
- Filter Button: Click on this button to apply your filters to the screen. If NOT clicked, setting filters won't actually change which messages appear.
- Alert Type: Allows you to filter based off of the base record type from which the email was sent:
- Box # 3: Shows the top checkbox. Checking this checkbox will select every email message on this page (maximum of 25 email alerts per page, so maximum of 25 emails selected).
- Box # 4: Shows the table headers for the table of emails found beneath this line.
- Box # 5: Shows the individual checkboxes for the individual email alerts on this page. Each checkbox is in line with one email and so allows you to select that specific email message if you would like to run actions on just that 1 email alert.
- Box # 6: Shows the Preview Email Message button. Clicking on this box will display a Preview of the email message as it will be sent out to the user listed. This is very useful for checking to ensure that you formatted the email message correctly before actually sending it out; if it's NOT formatted correctly, you can always delete the email message and then re-queue a new email after correcting the email template.
- Box # 7: Shows the Send to Outlook button. This allows you to place this email alert (including its To line, its CC line, and its BCC line) into a new email message from your integrated Outlook account; in also deletes the email alert in Fluxx (as it's not being sent from within Fluxx).
- Box # 8: Shows pagination details. In the middle of the box, you can see the record number you're on (e.g. 1 entry, but if there were more it would show 1- 25 of X where X is the total number of email alerts that match your applied filters). Each page contains a maximum of 25 records, so you know that you're on page 1 when you see 1 - 25, page 2 when you see 26-50, etc. On the far left of the box, you would normally see a (not visible in this screenshot since there is only 1 page) button prev, which would allow you to go back to the previous page if this screenshot. On the far right of the box, you would be able to see the next button that would allow you to navigate to the next page.
- Box # 9: Shows Run Action options. In the dropdown menu actions, you have a dropdown list of actions to run. You can select the action you want to run from the list, and then click the Run Action button in order to run the action on the records selected (i.e. the ones whose checkboxes are checked). From the Email Queue, there are two options:

- Approve and Send: Approves the email and kicks off the process of sending the email alert.
- Delete: Deletes the email message, preventing it from ever being sent.