...
Example of what a Select Field looks like when configured as an Hierarchical Field when going to select options:

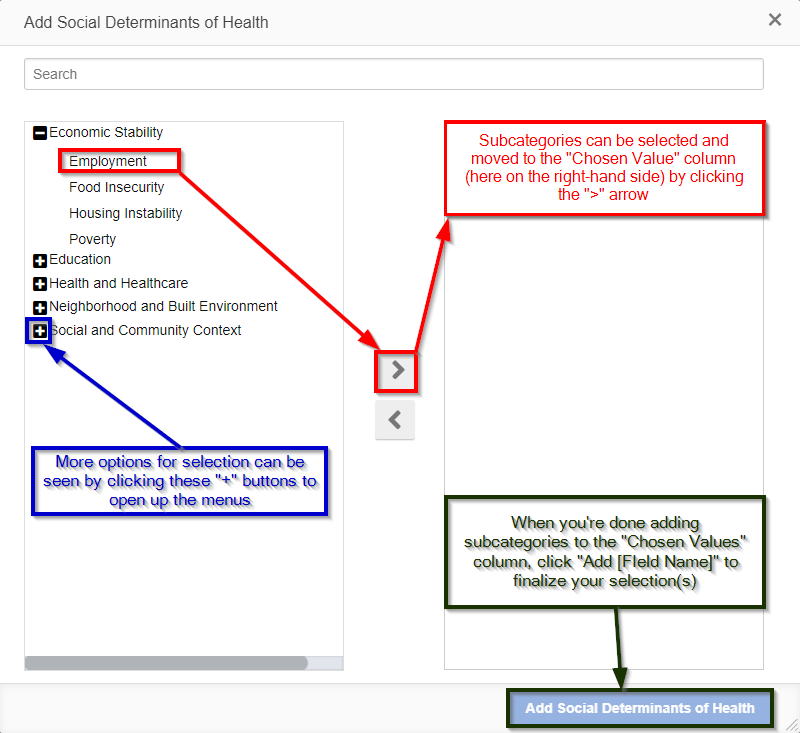
Example of what a Select Field looks like when configured as an Hierarchical Field when two options have already been selected:
...
- Decimal: Essentially the "default" option, Decimal format means that the field will accept decimal answers (distinguishing this field type from a Number – or Integer – field). No other formatting is applied to the field.
- Example value: 3.01012 (notice that the decimal spot is maintained and can go out to as many decimal places as needed).
- Percent: Formats the value such that there is a trailing percentage sign ("%") appended to the end of every value. Values will be rounded up to the nearest Integer percentage (e.g. entering in 50.679% will have the system round the value up to 51%).
- Example value: 51% (notice the trailing % sign at the end of the value).
- Currency: Formats the value such that there is a leading dollar sign ("$") appended to the front of every value. Values can store a maximum of 2 decimal places (since currency values rarely exceed 2 decimal places).
- Example value: $50.67 (notice the leading dollar sign; additionally, a value like 50.679 cannot be entered – it would have to be rounded up to 50.68).
...
- Box # 1: Shows the field currently selected; in this case, the field selected is, of course, an Amount field.
- Box # 2: Shows the configurable label for the field on this specific form. As with all fields (and components), you can change the label of an Amount Field on each and every form on which it lives. This is useful if different text is needed for different groups of Grantees (i.e. PERC vs. OAC Grantees).
- Box # 3: Shows the "Required" checkbox. When this checkbox is selected, the field will be considered Required for the form. This means that the Grantee will be unable to submit the form without filling out this field. Additionally, the field label will be Bolded on the form.
- Box # 4: Shows the Max value and Min value configuration options for the number field. If the Max value and Min value are filled out (with numbers), a user will be unable to advance (e.g. Submit) a Form when the value entered in this field exceeds the Max value or is below (less than) the Min value.
- Box # 5: Shows two checkboxes which serve as functionality toggles. Please see the descriptions below to better understand what each checkbox controls.
- Currency expander: When this checkbox This option is only available for Amount Fields with a Decimal Format Type of Currency (the checkbox will be hidden if the Decimal Format Type is NOT Currency). When this checkbox IS checked, users will be able to enter common abbreviated forms for high denominations, e.g. entering "$5k" will have the system convert that to "$5,000.00" or entering in "$5m" will have the system convert that to "$5,000,000.00"
- Example of what the help text for an amount field with the currency expander functionality turned on:

- Numeric range: Selecting Selecting this check box will make several new options appear (see screenshot below) for the field. Explanations of the new options can be found below the screenshot. In short, selecting this checkbox ensures that users users cannot manually enter in values, but instead are required to select a value from one of the options presented (turns Number Field into something more akin to a Select field).
- This Numeric Range works the same as the Numeric Range for Number Fields. Please see the Number Field Configuration Options section for more information on how to configure a Numeric Range.
- Currency expander: When this checkbox This option is only available for Amount Fields with a Decimal Format Type of Currency (the checkbox will be hidden if the Decimal Format Type is NOT Currency). When this checkbox IS checked, users will be able to enter common abbreviated forms for high denominations, e.g. entering "$5k" will have the system convert that to "$5,000.00" or entering in "$5m" will have the system convert that to "$5,000,000.00"
- Box # 6: Shows where you can Delete this field from the form. Note: Deleting a field will also delete any configuration options you have saved for it; if you were to add the same field back to the Form afterwards, it would be added with all configurations moved back to the default.
- Box # 7: Shows the Save button. As with all fields, if you make any changes whatsoever you'll need to hit the Save button for your changes to be effectuated. If you do not, any unsaved changes will be discarded.
...