Overview
The Global Settings Menu of the Admin contains a plethora of settings within the system. The Global Settings menu is essentially a miscellaneous settings menu; if the setting can't be found in another menu, it's likely to be found with Global Settings.
Overall, the Global Settings menu has 6 settings groups, each containing several settings.
- General Settings: The largest and most extensive settings group of the 6, General Settings is really the "core" group of this overall Admin Panel menu. If a settings can't be found somewhere else, it's like in the General Settings group.
- Foundation Details: A short group of settings related to the organization maintaining this Grants Management database, i.e. the WPP, and about the website itself.
- Print Settings: Short list of settings related to printing documents and storing PDF files.
- Card Settings: A longer settings group, the settings held within allow you to change the name of Cards within the system. For example, Fluxx by default calls Registrations "LOIs," but the WPP changed that name to "Registrations" for easier comprehension for staff within this settings group.
- Recommendation Settings: Contains some settings related to Recommendation Request email templates. Not used by the WPP.
- Site Logo: As the name of the group implies, here within can be found 2 upload sections for the granting organization's (i.e. WPP's) logo: 1 for a "Large Icon" and 1 for a "Small Icon."
General Settings
General Settings: The largest and most extensive settings group of the 6, General Settings is really the "core" group of this overall Admin Panel menu. If a settings can't be found somewhere else, it's like in the General Settings group.
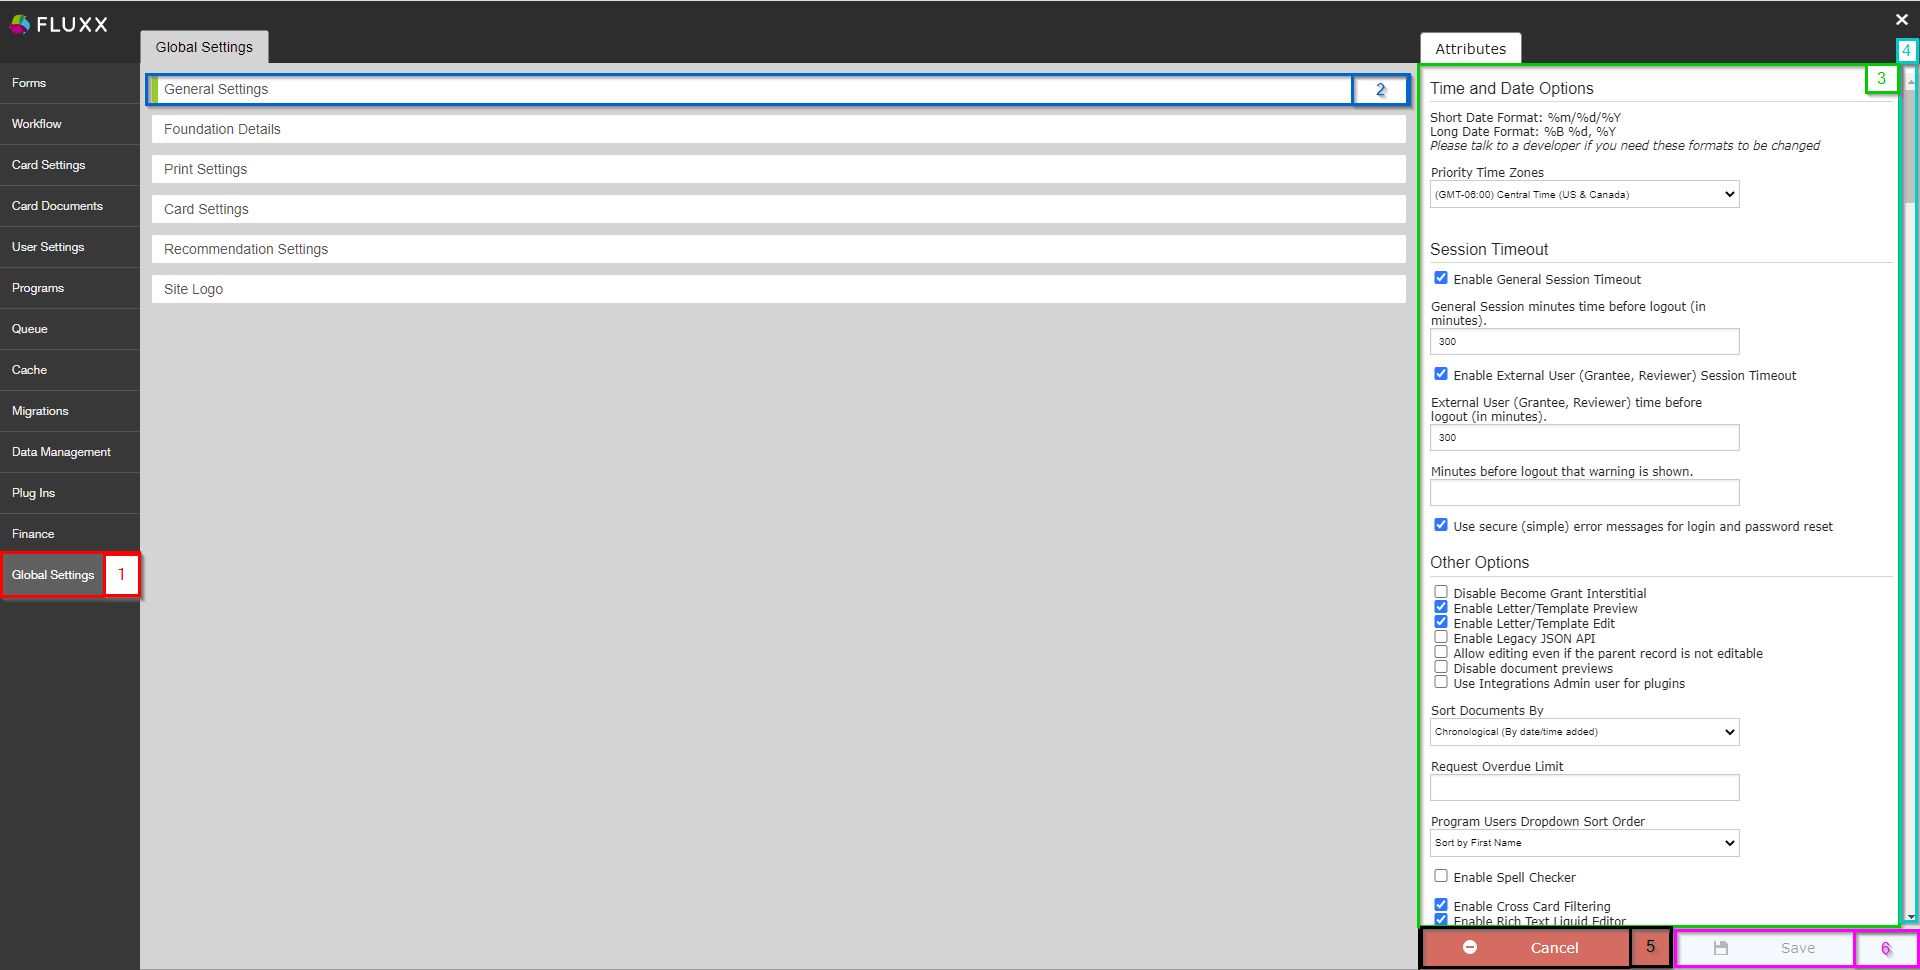
- Box # 1: Shows the Global Settings menu as currently selected.
- Box # 2: Shows the General Settings settings group as currently selected. You can tell which settings group is currently selected by the slim green line seen on the left-hand side of the settings group.
- Box # 3: Shows the area where all of the settings within this group are found.
- Box # 4: Shows the Scroll Bar; the scroll bar is very important for this menu as there are many settings in this settings group, and scrolling is absolutely necessary in order to be able to see all settings.
- Box # 5: Shows the Cancel button. If clicked, the system will discard any unsaved changes to this Settings Group (i.e. no changes will be made).
- Box # 6: Shows the Save button. If you want to keep any of the changes that you've made to this Settings Group, you must click the Save button to effectuate those changes. Otherwise, any unsaved changes will be discarded.
Changing Settings in the General Settings Group
In general, it's recommended to leave these settings as they are because they control so much of the background settings of the system (like the start and end of the WPP's fiscal year, suppresses the Initiatives and Subinitiatives program levels, and ensures that the ID system follows WPP standards). If you do want to change a setting in the General Settings group, it's recommended to first test the change in the Pre-Production environment. Testing should be thorough to ensure that there are no unintended consequences to the change.
Below are a few key settings that are important to leave as they are unless you have a very good reason to change them.
Suppression of Initiatives and Sub Initiatives
Initiatives and Sub Initiatives are the Program Levels below the Subprogram level. If the WPP had, for example, programs underneath each subfund, we could enable this feature. However, at the time of writing WPP subfunds are unique to an application, so there is no need for the Initiative or Sub Initiative levels. See the screenshot below to find where these settings are actually set as well as other important, highlighted items.
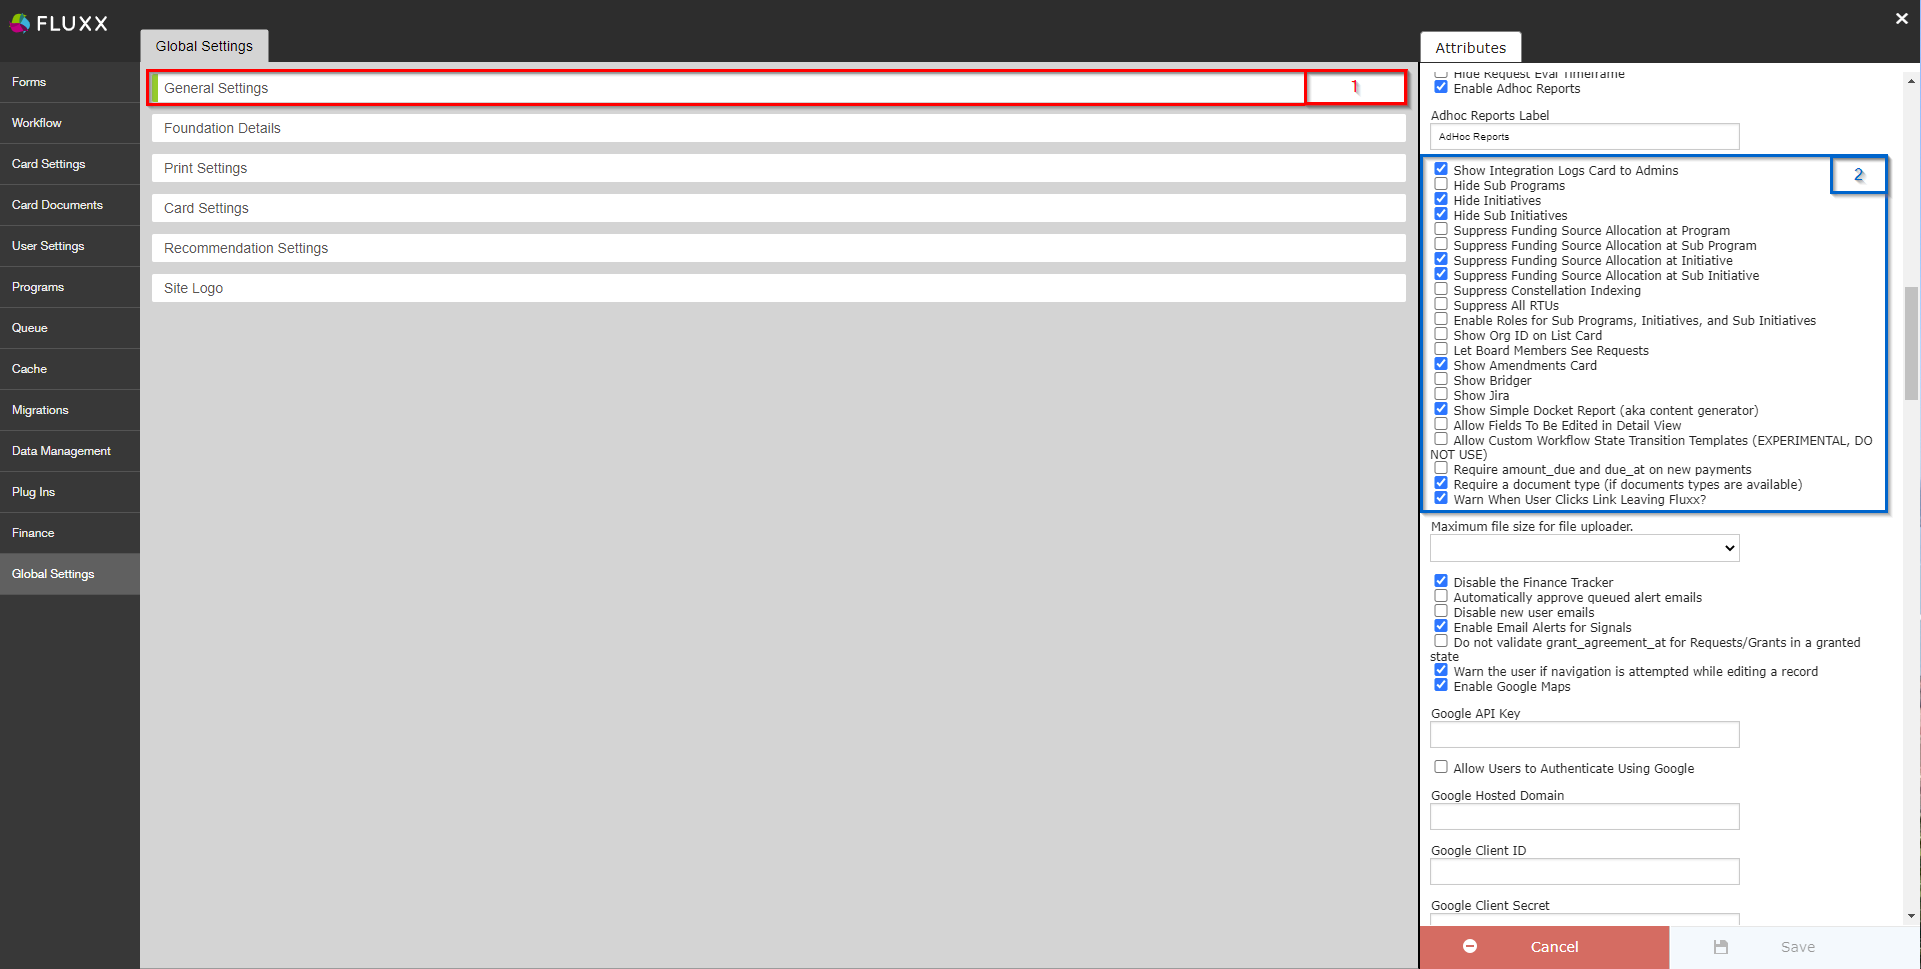
- Box # 1: Shows the General Settings group as currently selected. As always, you can tell which settings group is currently selected by the slim green line seen on the left-hand side of the settings group.
- Box # 2: Shows where the settings are, all in the form of checkboxes. This guide won't discuss everyone of these settings, but will highlight the important ones for this section.
- Fourth settings down in the list – Hide Initiatives: As the name suggests, this will hide the Initiatives Card from selection on a standard dashboard. Since the WPP does not use them, we hide the Initiatives card from selection.
- Fifth settings down in the list – Hide Sub Initiatives: This is the same setting as above, except for Sub Initiatives rather than Initiatives. Again, since the WPP does not use them, we hide the Sub Initiatives card from selection.
- Eighth setting down in the list – Suppress Funding Source Allocation at Initiative: This prevents Funding Sources from being allocated to the Initiative level. Since the WPP does not use them, we prevent Funding Sources from being allocated to the Initiative level.
- Ninth Setting down in the list – Suppress Funding Source Allocation at Sub Initiative: This is the same setting as above, except for Sub Initiatives rather than Initiatives. Again, since the WPP does not use them, we prevent Funding Sources from being allocated to the Sub Initiative level.
WPP's ID System
Background: Prior to using Fluxx, the WPP used a grants management software called "Blackbaud;" prior to this, the WPP used its own grants management database developed in-house by SMPH IT's development team. WPP's ID system started in the Legacy, in-house database developed by SMPH's IT Development team. These IDs started with "1" (the first awarded grant has an ID number of "3") and ended with "3401."
When the WPP transitioned to Blackbaud, the ID system was maintained with one caveat. To make it clear where an application/grant was created relative when the cut-over to the new system happened, all new IDs in Blackbaud began with ID number "4000." All IDs from applications/grants started in Blackbaud will therefore be between "4000" and "5000."
When the WPP transitioned from Blackbaud to Fluxx, the ID system was again maintained with a caveat. To make it clear where an application/grant was created relative to when the cut-over to Fluxx happened, all new IDs in Fluxx begin with ID number "5000," although now at the end of the IDs there is appended a dash ("-") followed by the UW Fiscal Year in which the application was created (e.g. "2022").
See the screenshot below for how we set these settings to ensure that the ID format matches WPP's former ID format and for other highlighted items; see beneath the screenshot for explanations of said items.
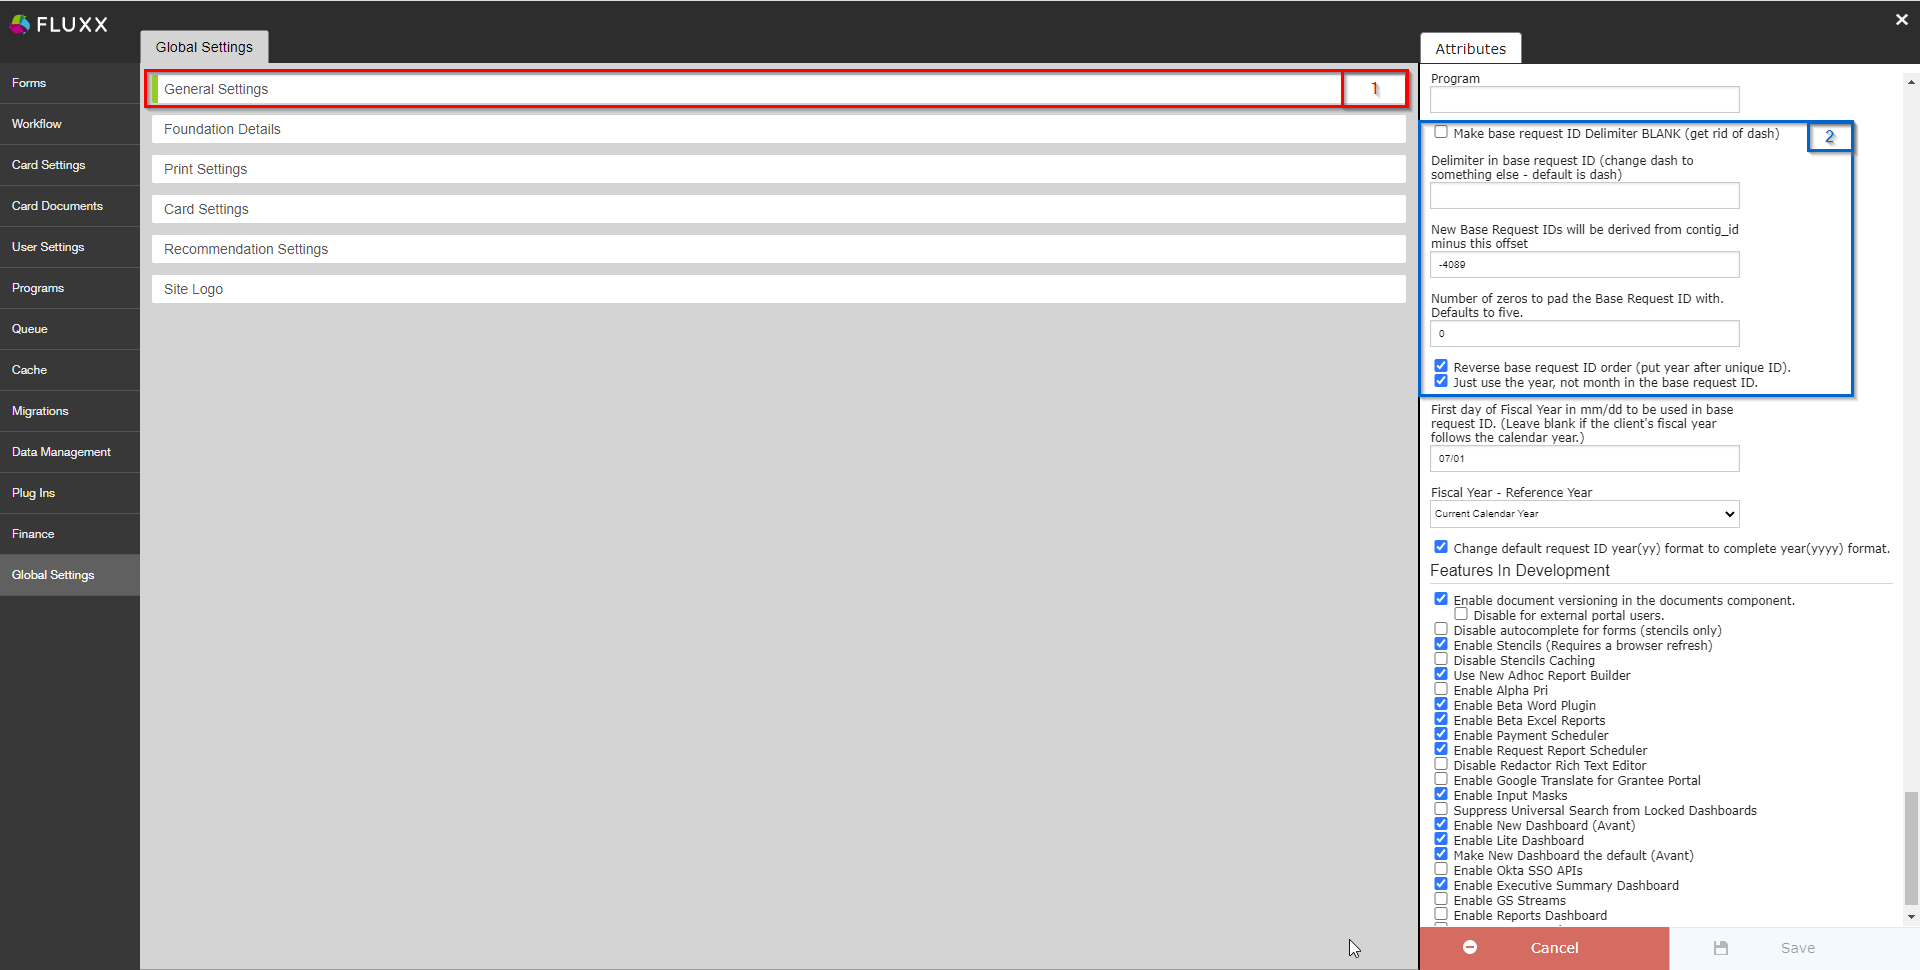
- Box # 1: Shows the General Settings group as currently selected. As always, you can tell which settings group is currently selected by the slim green line seen on the left-hand side of the settings group.
- Box # 2: Shows where the ID settings live:
- Make Base Request ID Delimiter BLANK: If checked, the delimiter between the base portion of the ID (i.e. the 5000 counting up piece) and the fiscal year portion (i.e. the "2022" portion) will NOT be separated by the dash ("-") that normally separates them. This would be confusing for WPP staff, so we do NOT check this box.
- Delimiter in Base Request ID (change dash to something else - default is dash): As the name implies, this box allows you to change the dash ("-") delimiter between the base portion of the ID and the fiscal year portion. You could change this to anything; for example, it could be changed to a pipe ("|") delimiter or even an asterisk ("*") delimiter; however, the dash ("-") aesthetically looks pretty good, and WPP staff are now pretty used to the current format.
- New Base Request IDs will be derived from contig_id minus this offset (set to -4089): This is the main setting that ensures that new base requests started in Fluxx started with # 5001-2022. As the name implies, the way the first portion of the base request ID is calculated is by taking the contig_id (internal ID) of the request and subtracting the value found here from that contig_id in order to get the base request ID base number. As you can probably figure out from the math here, the contig_id of the first application created in Fluxx is equal to 912, so 912 - negative 4089 (so 912 + 4089) = 5001.
- Number of zeros to pad the Base Request ID with. Default to five: As the name implies, this setting will by default pad 5 zeros (0s) to the front of the Base Request ID number. Since the WPP does NOT want this, we changed the number of zeros to pad the Base Request ID with to 0 (i.e. pad the ID with no zeros).
- Reverse Base Request ID order (put year after unique ID): If NOT checked, then the ID will appear in this order (Fiscal Year the Application was Created in) + (Whatever Delimiter is chosen in b, dash ("-") otherwise if b is blank, or nothing at all if a is checked) + (Unique ID determined by part c padded with the number of zeros from part d). Since the WPP likes to see the ID number in a format similar to what we had in the previous systems, we leave this box selected so that the order is instead (Unique ID from c padded with zeros from d) + (Delimiter from b, dash ("-") if b is blank, or nothing at all if a is checked) + (Fiscal Year in which the application was created).
- Just use the year, not month in the base request ID: If NOT checked, then the "Fiscal Year" portion of the ID will also include the month in which the application was created. This makes the ID too long from WPP's perspective, so we leave this setting checked to ensure that we only use the Fiscal Year and not the month as well.
Start and End of WPP's Fiscal Year
The beginning (and end) of WPP's Fiscal Year is also set within the General Settings group. Please see the screenshot below for highlighted items and beneath the screenshot for descriptions of said items.
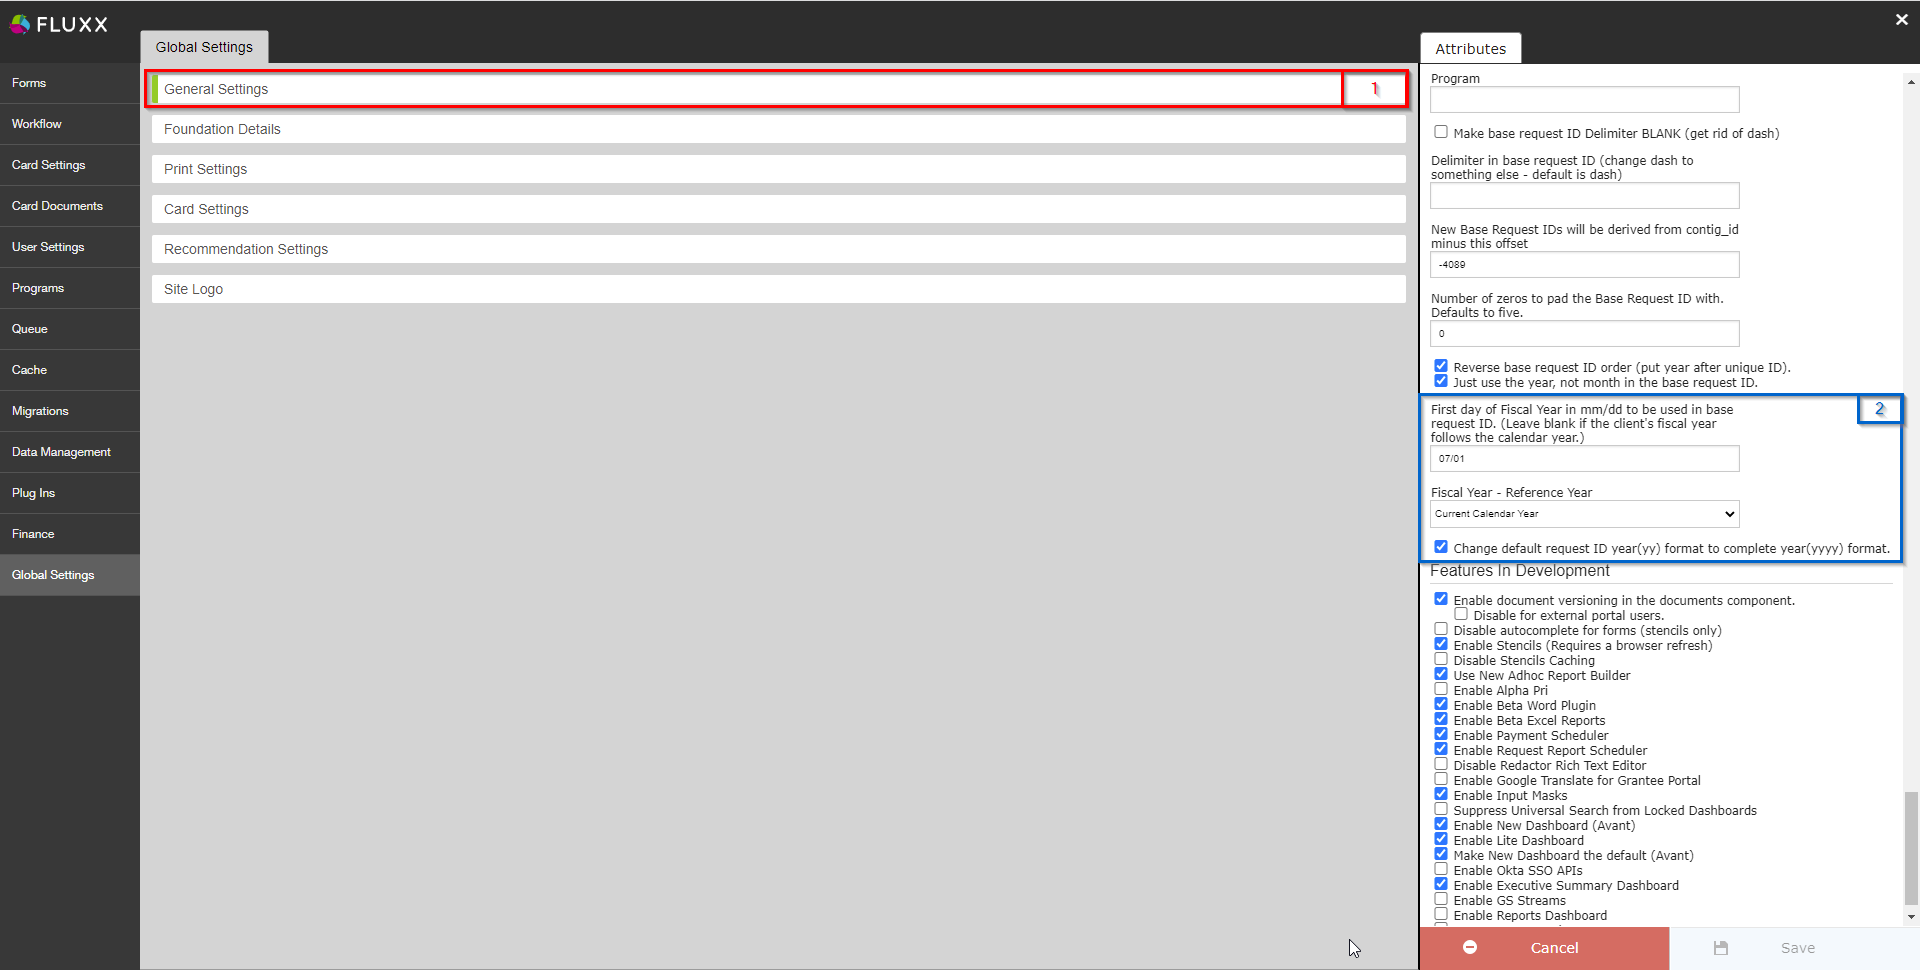
- Box # 1: Shows the General Settings group as currently selected. As always, you can tell which settings group is currently selected by the slim green line seen on the left-hand side of the settings group.
- Box # 2: Shows where the Fiscal Year settings live with the General Settings group.
- First day of Fiscal Year in mm/dd to be used in base request ID. (Leave blank if the client's fiscal year follows the calendar year.): As the name implies, this where you can specify the First Day of the WPP's fiscal year in mm/dd format. This will be used in the ID Format such that the second half of the ID (the portion after the "-" dash) will change to the new fiscal year once that date is passed within the calendar year. As the name of the setting implies, if this value is left blank, the start of the Fiscal Year will follow the calendar year (i.e. will begin on January 1st of each year).
- For example, WPP has the First Day of the Fiscal Year set to 07/01 (July 1st), so in the year 2022, here's how this would work: If I create an application on June 30th of the year, my base request ID would be something like # 5XXX-2022. However, if I were to create the application one day later (July 1st, 2022), the ID would be something like # 5XXX-2023. It's important to leave this value alone as July 1st is the beginning of the Fiscal Year for the whole of the UW (not just the WPP).
- Fiscal Year - Reference Year: This determines what Fiscal Year will get selected based off of what the current calendar year is. Please see the explanations below:
- Current Calendar Year: The current setting that the WPP uses, this will ensure that the Fiscal Year will perform as laid out in Box # 2's a. i. area above. Essentially, this will mean that at the start of the calendar year, the Fiscal Year and the Calendar year are "aligned" (i.e. they're both, say, 2022). When the date specified in a. above is reached in the calendar year, the Fiscal Year will increment by one and so will show as 2023 if the calendar year is 2022.
- Next Calendar Year: This means that at the start of the calendar year, the Fiscal Year will be one year after the current calendar year. So, if the calendar year is 2022, on January 1st of 2022 the Fiscal Year would be 2023. When the date specified in a. above is reached in the calendar year, the Fiscal Year will increment by one and so will then show 2024 if the date is July 1st, 2022.
- Previous Calendar Year: This means that at the start of the calendar year, the Fiscal Year will be one year before the current calendar year. So, if the calendar year is 2022, on January 1st of 2022 the Fiscal Year would be 2021. When the date specified in a. above is reached in the calendar year, the Fiscal Year will increment by one and so will then show 2022 if the date is July 1st, 2022.
- Change default request ID year (yy) format to complete year (yyyy) format: If NOT checked, the ID system will only show the last two digits of the Fiscal Year in the ID format rather than the full, four digit year. The WPP leaves this checked so that we see the full Fiscal Year in the ID.
- Example: If this setting is left checked, a new application started in the 2023 Fiscal year would show an ID that looks like: 5XXX-2023. If the setting is unchecked, instead, the same application's ID would appear like: 5XXX-23.
- First day of Fiscal Year in mm/dd to be used in base request ID. (Leave blank if the client's fiscal year follows the calendar year.): As the name implies, this where you can specify the First Day of the WPP's fiscal year in mm/dd format. This will be used in the ID Format such that the second half of the ID (the portion after the "-" dash) will change to the new fiscal year once that date is passed within the calendar year. As the name of the setting implies, if this value is left blank, the start of the Fiscal Year will follow the calendar year (i.e. will begin on January 1st of each year).
Foundation Details
Before you go on...
Fluxx has a great article that goes through all of these settings in detail. Before you read the next section, please be sure to refer to this Fluxx article: https://fluxxdev.atlassian.net/servicedesk/customer/portal/1/article/1796212024?src=359774592
Foundation Details Setting Group
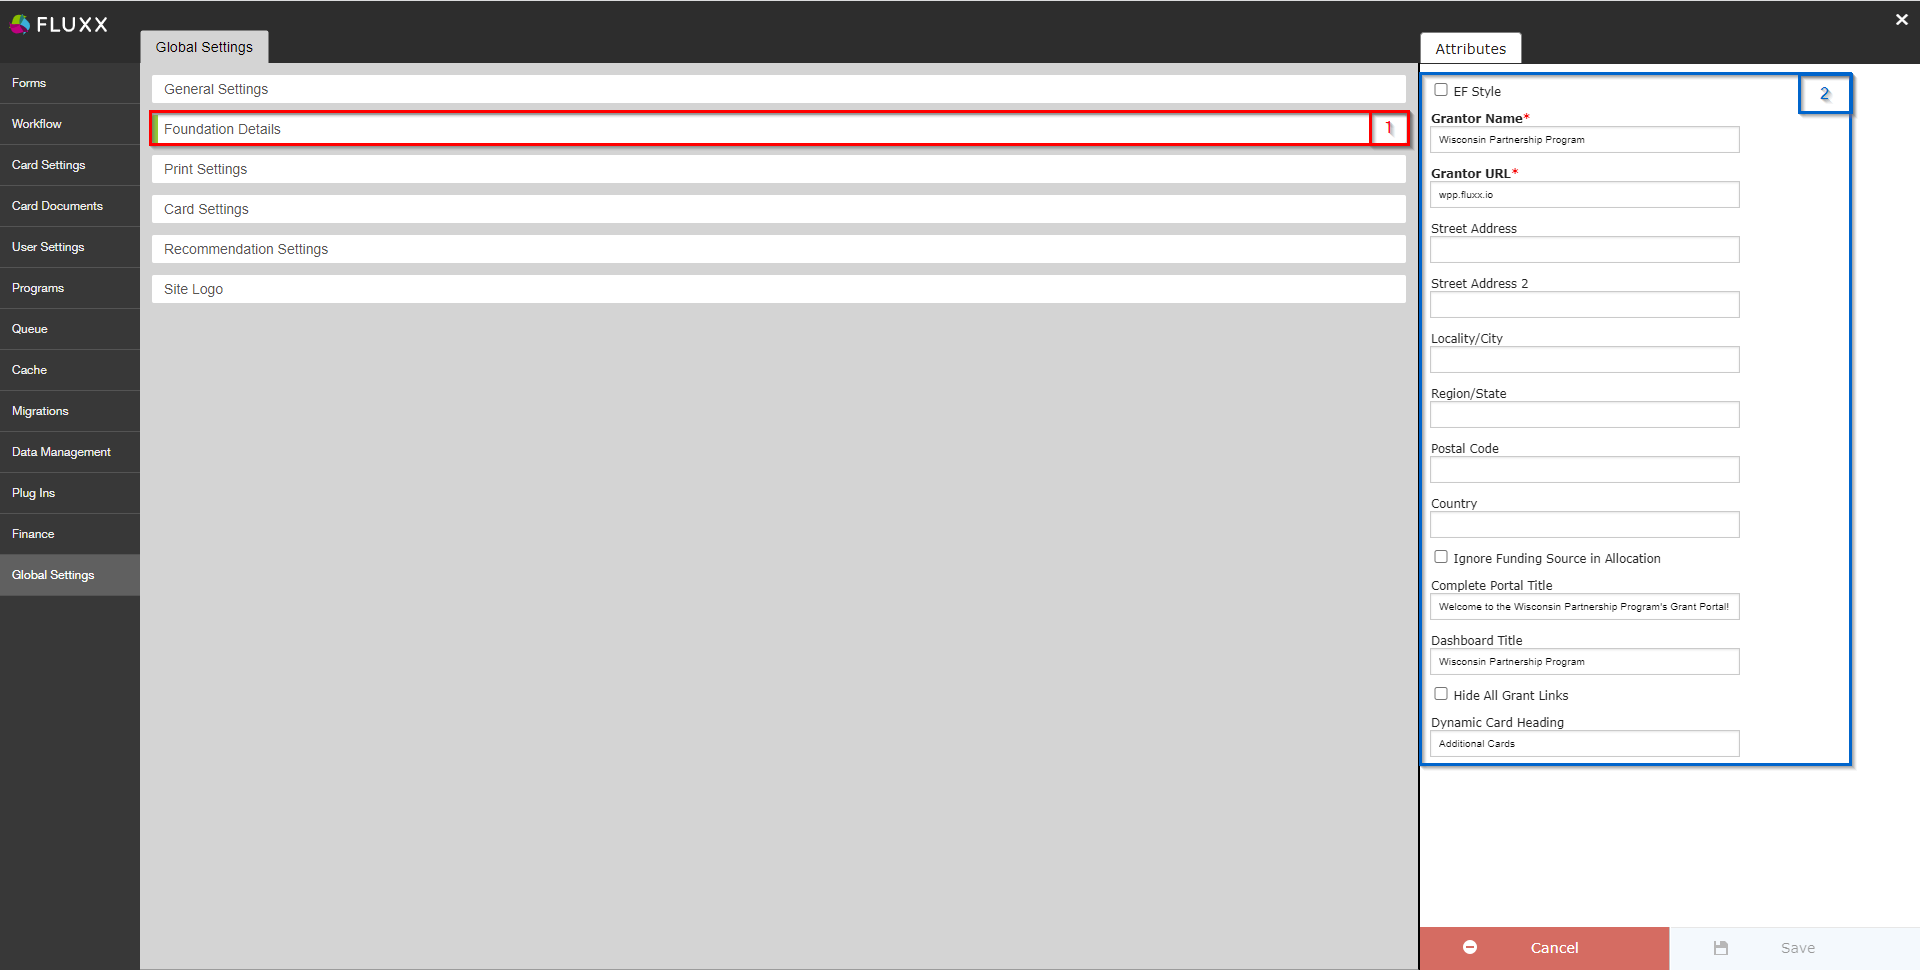
As stated previously, the Foundation Details setting group allows you to change/add information to our organization's information (i.e. the WPP). See the screenshot below for highlighted items and beneath the screenshot for descriptions of said items:
- Box # 1: Shows the Foundation Details setting group as currently selected. As always, you can tell which settings group is currently selected by the slim green line seen on the left-hand side of the settings group.
- Box # 2: Shows the actual configurable settings within the Foundation Details group. Please do NOT change any of these fields unless you know that you explicitly must do so as it can cause a number of issues.
- The most important field NOT to change is the Grantor URL field, which corresponds to our Fluxx instance URL. Since we've linked out to this URL from a number of places, changing this URL will break a lot of links.
Print Settings
The WPP does not really use the Print Settings group; if you need information on this settings group, please see this Fluxx article here: https://fluxxdev.atlassian.net/servicedesk/customer/portal/1/article/1795951117?src=396219717
Card Settings
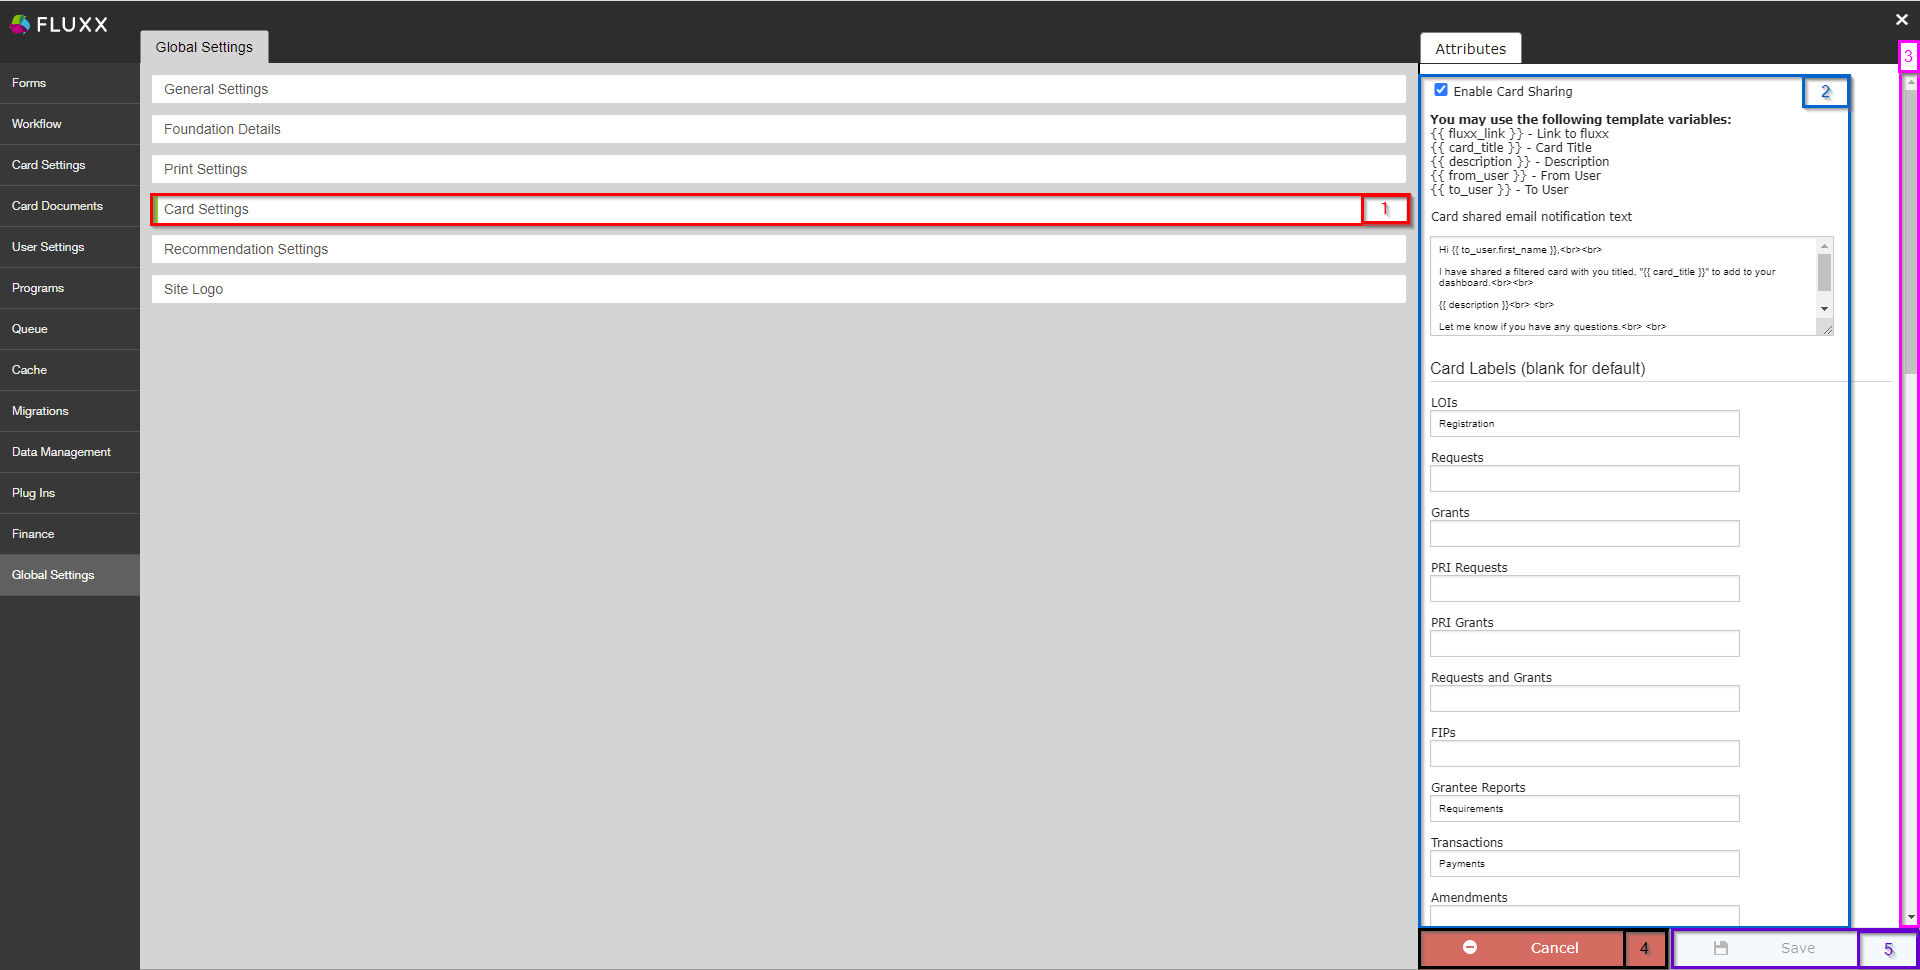
As previously mentioned, hte Card Settings group allows you to change the name of Cards within the system as well as edit a few other settings. Please see the screenshot below for highlighted items and beneath the screenshot for descriptions of said items:
- Box # 1: Shows the Card Settings group as currently selected. As always, you can tell which settings group is currently selected by the slim green line seen on the left-hand side of the settings group.
- Box # 2: Shows the actual configurable settings for the Card Settings group. Some key settings are:
- Enable Card Sharing: If NOT checked, then users will be unable to share cards with other users within the system. If this box IS checked, then employees can share specific cards with other employees.
- Card Labels (blank for default): As the name implies, typing a name in here will change the Card name to match whatever is entered. If NO text is entered, the Card name will be left as the Fluxx default.
- Example: By default, Fluxx calls user registrations "LOIs." The WPP thought that this terminology was quite confusing, so we typed in "Registration" in this section so that the Card is renamed "Registration" rather than "LOI."
- Box # 3: Shows the scroll bar allowing you to scroll down on this page. Since there are more settings than can be seen just from this page, you'll need to use the scroll bar to look through all settings.
- Box # 4: Shows the Cancel button. If clicked, the system will discard any unsaved changes to this Settings Group (i.e. no changes will be made).
- Box # 5: Shows the Save button. If you want to keep any of the changes that you've made to this Settings Group, you must click the Save button to effectuate those changes. Otherwise, any unsaved changes will be discarded.
Recommendation Settings
This settings group is not used by the WPP.
Site Logo
As previously mentioned, within the Site Logo settings group can be found 2 upload sections for the granting organization's (i.e. WPP's) logo: 1 for a "Large Icon" and 1 for a "Small Icon." This ensures that the WPP has unique logos for the site that show the WPP's name and the UW-Madison's symbol.
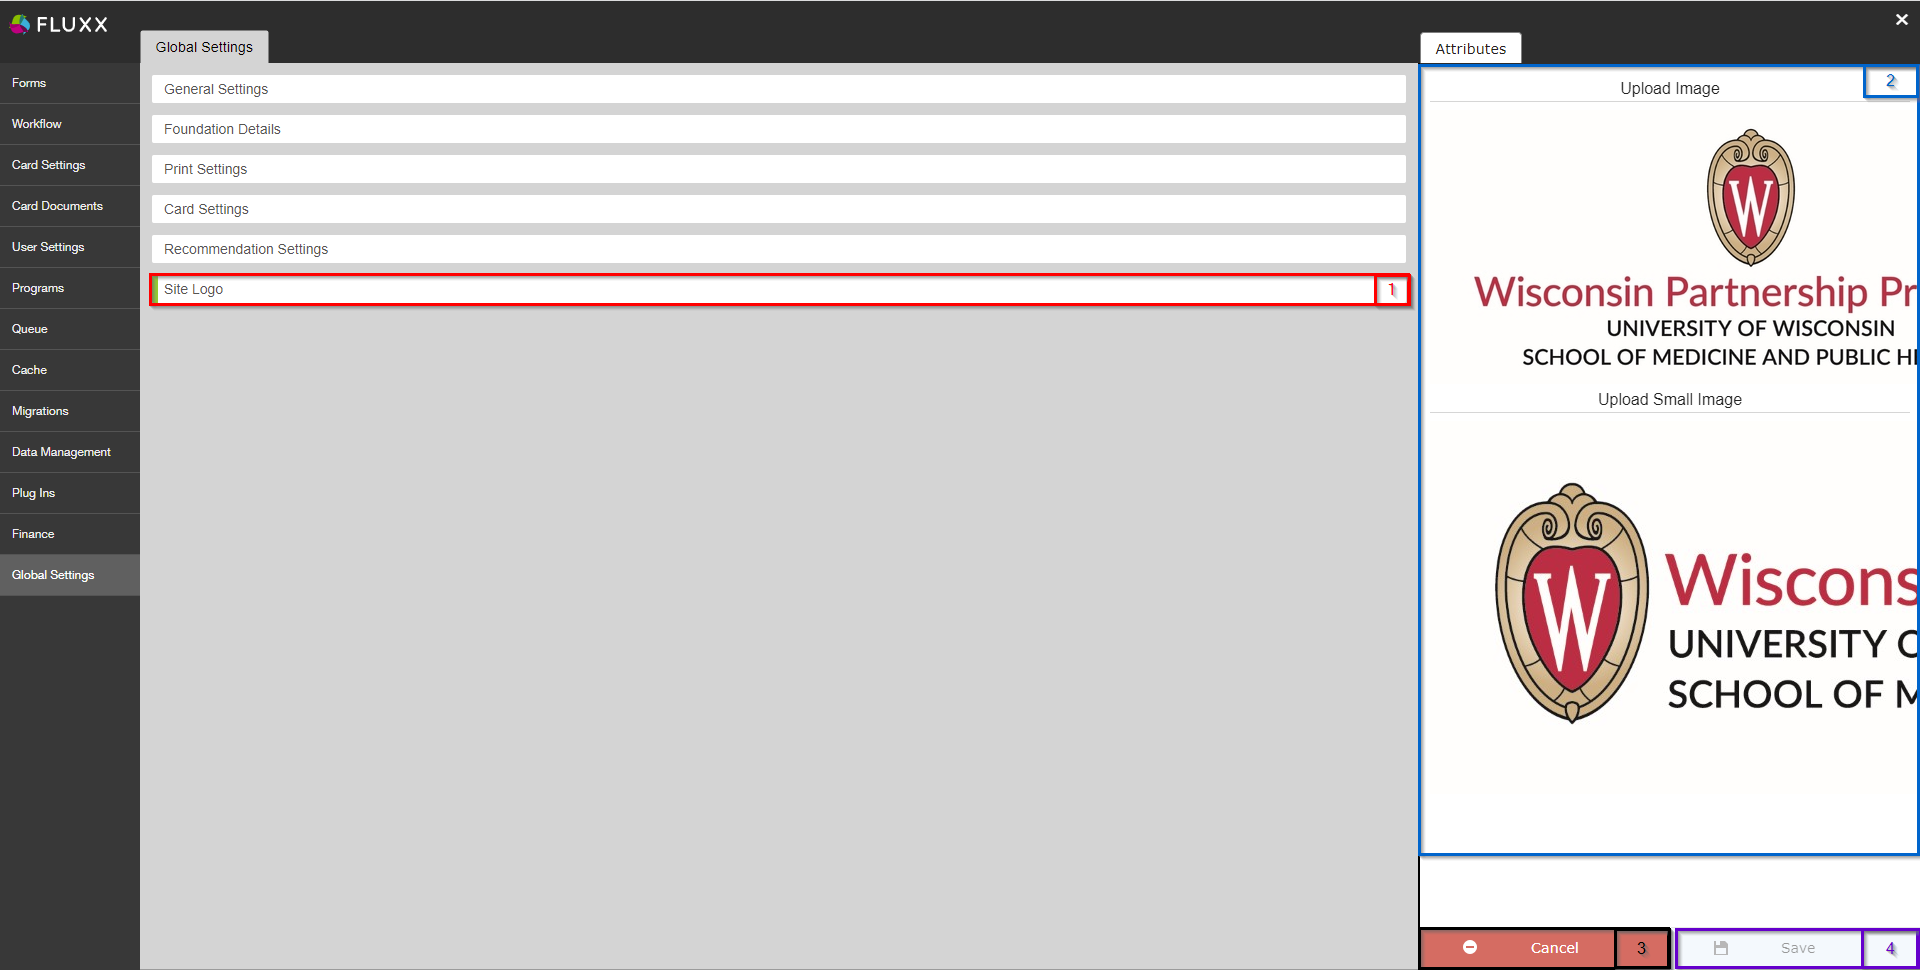
See the screenshot for highlighted items from this settings group and beneath the screenshot for descriptions of said items.
- Box # 1: Shows the Site Logo settings group as currently selected. As always, you can tell which settings group is currently selected by the slim green line seen on the left-hand side of the settings group.
- Box # 2: Shows the upload sections where you can actually upload the Image and the Small Image logos for the WPP. Click on the "Upload" buttons in order to select a file to upload.
- Box # 3: Shows the Cancel button. If clicked, the system will discard any unsaved changes to this Settings Group (i.e. no changes will be made).
- Box # 4: Shows the Save button. If you want to keep any of the changes that you've made to this Settings Group, you must click the Save button to effectuate those changes. Otherwise, any unsaved changes will be discarded.

