Card Settings Menu
In Fluxx, the Card Settings menu of the Admin panel contains a number of configuration settings that can control the Cards in the system for that given record type, the export format of a given record type, the list of fields listed as 'Recommended' from the Ad-Hoc Reports builder, the format/configuration of Fields found within that record type, and any code "Methods" used for that record type (see this Fluxx article for more information on Methods).
The Card Settings Submenu from the Admin Panel screen, with the "Grant Request" record type selected within the Card Settings Menu.

Within the Card Settings Menu for each Record Type, you can find five separate tabs that allow you to edit/configure various different aspects/settings within that record type. See the screenshot below for the highlighted items and beneath it for explanations of said items.
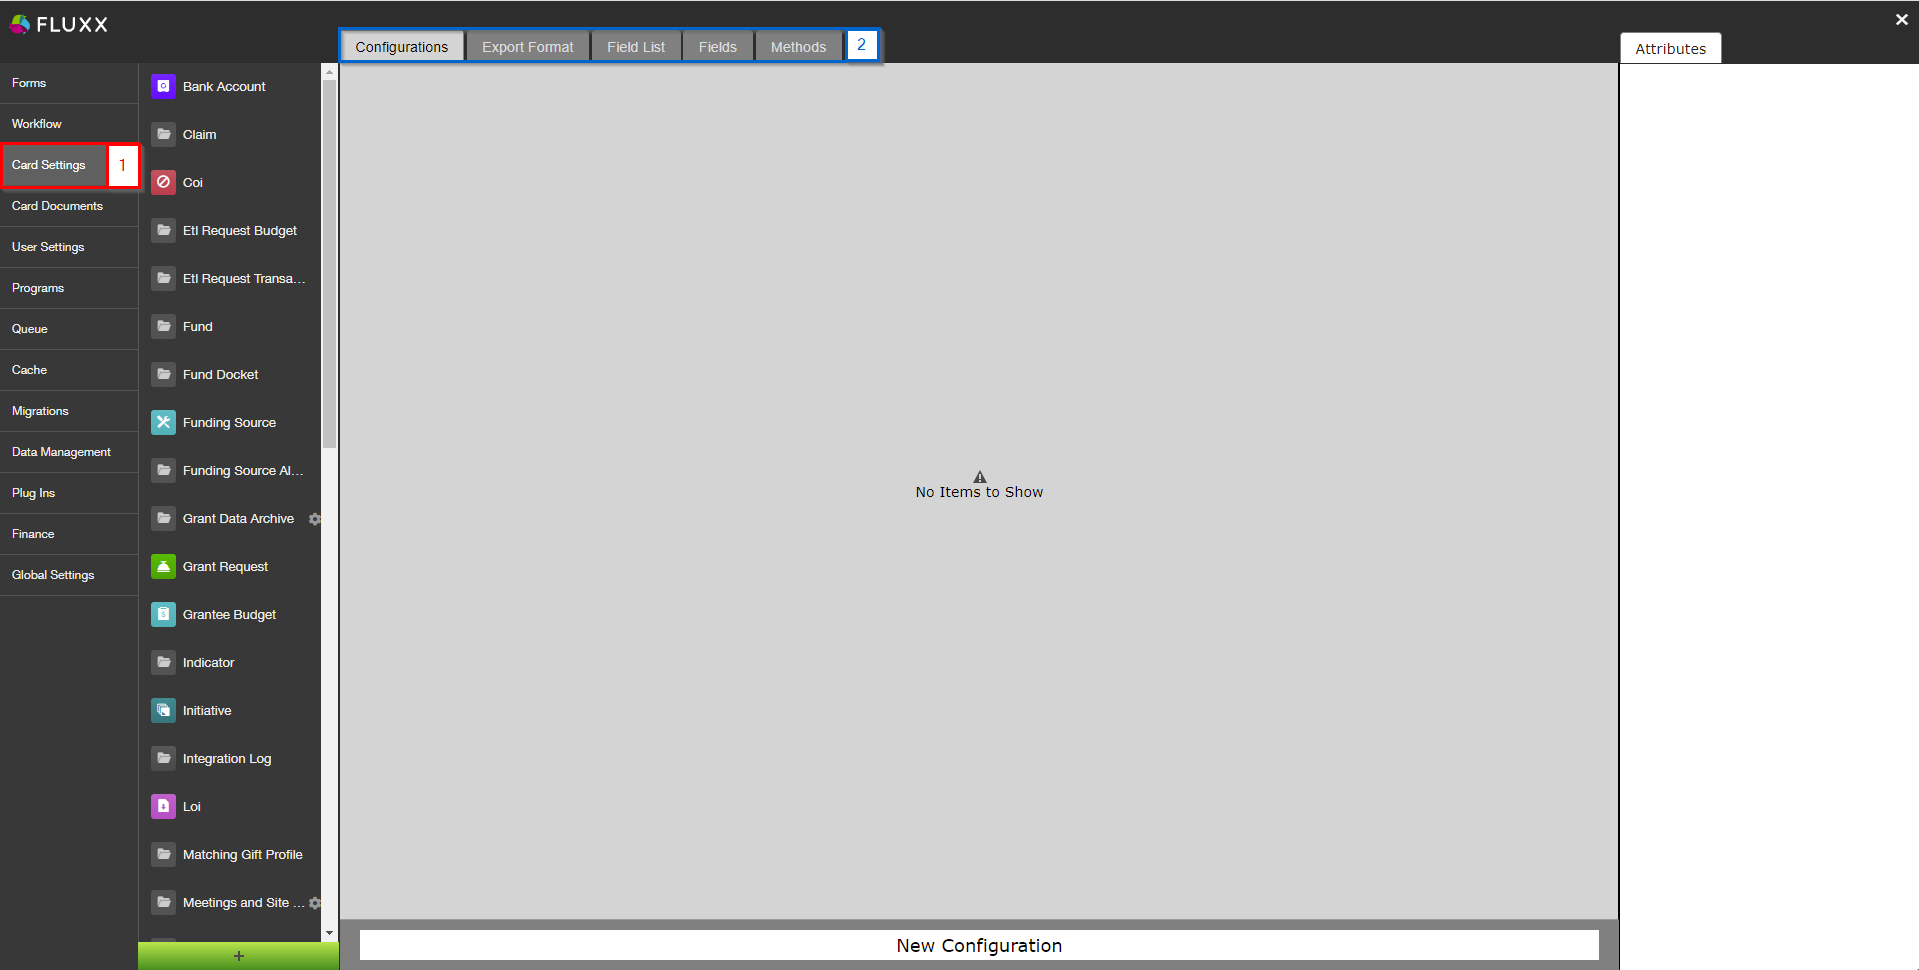
- Box # 1: Shows the Card Settings Menu selected from the main Admin Panel menu.
- Box # 2: Shows the five tabs where different settings can be found for a given Record Type (independent of which Record Type you have selected). See the sections below for explanations of each of those tabs (in order).
Configurations
Before You Begin...
Fluxx has a great article discussing Card Configurations which will help you to better understand everything discussed, below. The article also walks through creating a new Card Configuration and the implications of doing so.
See Fluxx's article, here: https://fluxxdev.atlassian.net/servicedesk/customer/portal/1/article/3177349182?src=492022410
Configurations in the Admin Panel
As stated in the Cards section of the Fluxx Grantmaking – General Overview page, a Card is the visual display of a single record type or of a subset of records within a single record type. The Card Configurations menu allows you to change/edit/create new cards within a given Record Type to be used and seen in the system.
For example, within the Grant Requests record type, the WPP has two Card Configurations set up: "Denied and Withdrawn" and "Grants." These cards represent subsets of the overall card, "Requests and Grants," which stores all grant applications (even those that are not accepted or withdrawn by the applicant) and awarded grants. The Card "Denied and Withdrawn," as the name implies, contains the subset of Grant Applications that were explicitly declined by the WPP and those applications that were intentionally withdrawn from consideration by their applicant. The Card "Grants" also stores a subset of Requests and Grants, but in this case stores all applications that ever became fully awarded Grants.
Export Format
The next tab over is the Export Format tab, which is used in determining what fields get exported (and in what order) when the Card Action "Excel Export" is used from the card "Actions" menu (see also the screenshot below).
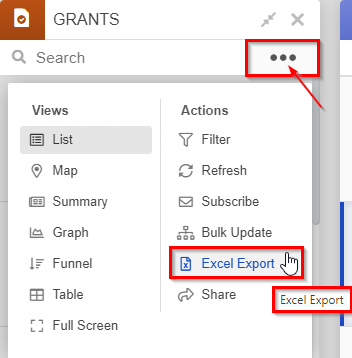
Screenshot showing how one uses the "Excel Export" option from a card. First, click the "Three Dots" menu found in the top right-hand corner of the card, then under Actions select "Excel Export."
The Export Format page can be used to configure the format that the data gets exported to Excel with. Please see the screenshot below to see important items highlighted on the Export Format page and beneath the screenshot for explanations of these highlighted items.
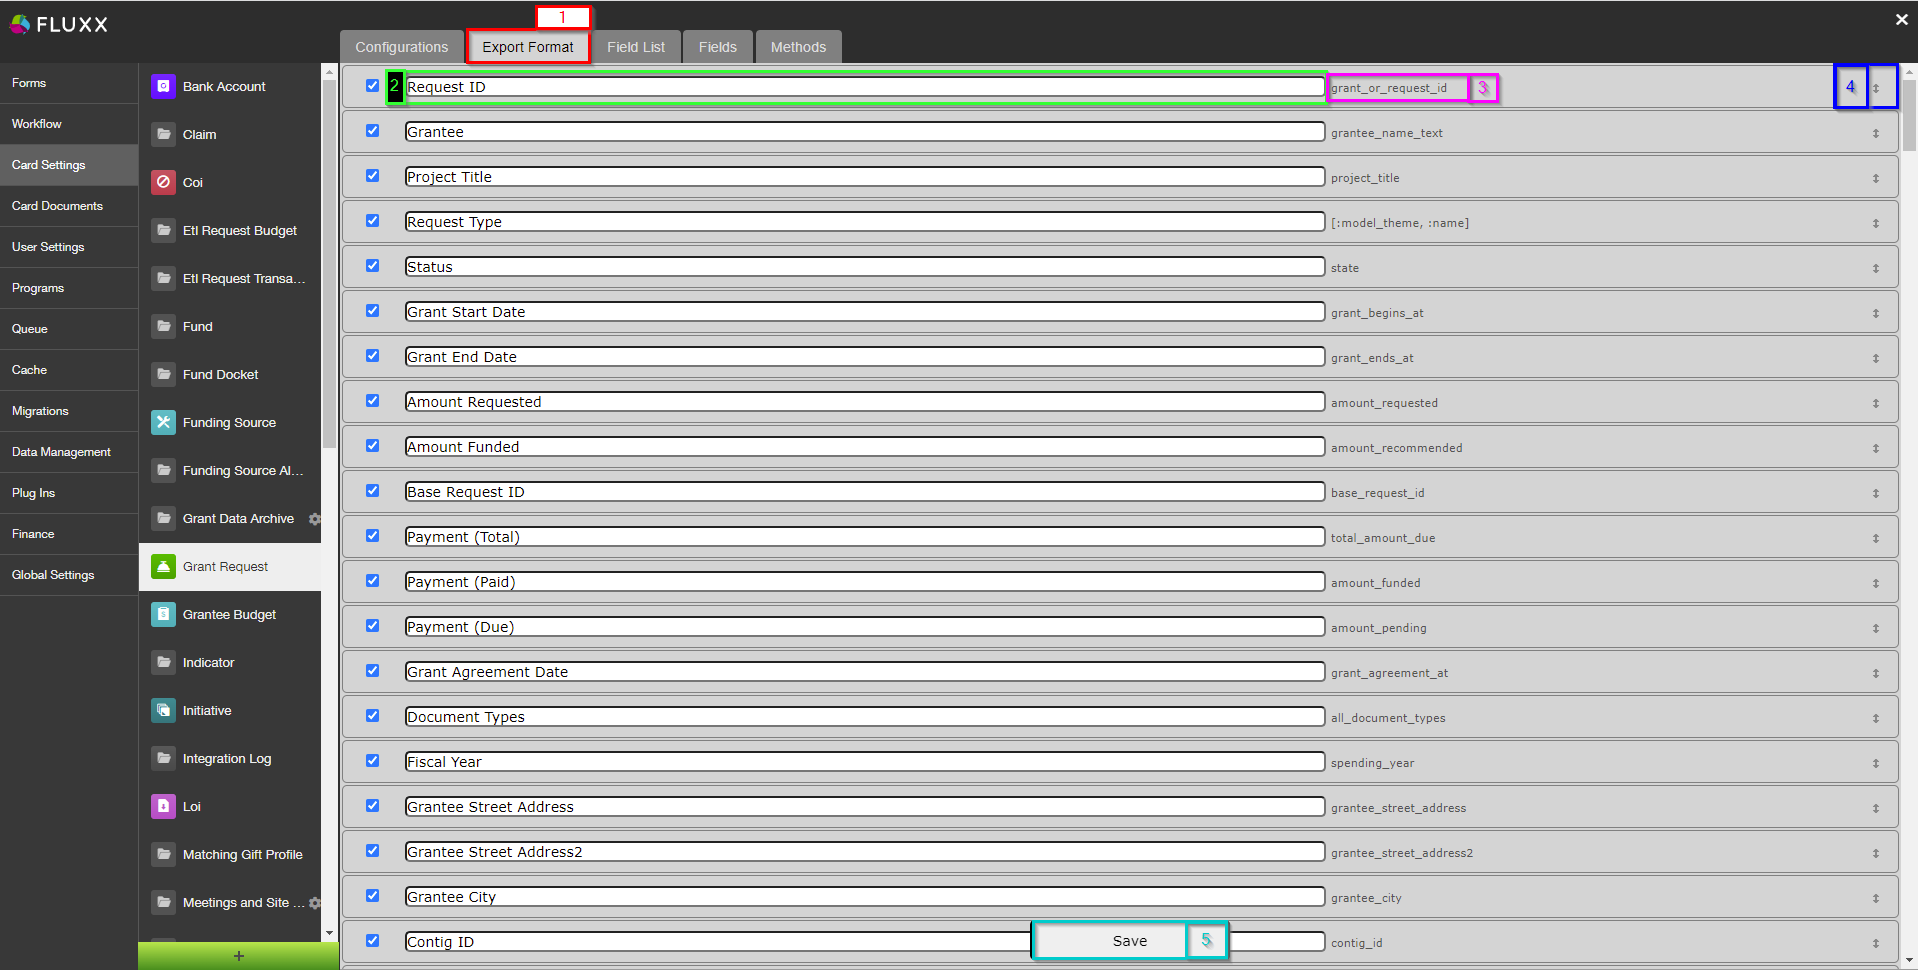
- Box # 1: Shows the "Export Format" tab when it is selected.
- Box # 2: Shows the configurable label for each of the columns that will display in the Export. You can change any of these labels so that they are more understandable for staff. Please note, however, that changing a label here will change the label for that column on all future Excel exports from this Record Type unless this label is subsequently changed again.
- Box # 3: Shows the Internal Field Name of the column in question. This can be useful (especially after a column label has been changed) for seeing what the field actually is. Can be matched with the Internal Field Name from the Fields tab to confirm the exactly field that you are looking at.
- Box # 4: Shows an arrow that is both an up and down arrow (↑ and ↓). By clicking and dragging on this arrow, you can move columns up or down in the Export format to change/determine the order that the columns should be exported in.
- Note: The order in which the columns appear is as follows: The top column will be displayed farthest to the right in the Export table, and the bottom column will be farthest to the left in the Export table. You can, therefore, move columns up/down on this page to effectively move columns to the right/left (respectively) in the eventual exported table.
- Box # 5: Shows the Save button. If you've changed a label or moved a column around in the export format, you must hit the save button in order for your changes to be effectuated. Otherwise, your changes will be discarded.
Field List
The next tab over is called "Field List." From this screen, you can tell the system which columns per record type should be considered "Recommended" for the purposes of Ad-Hoc reports. See the screenshot below to see highlighted important items from this screen and beneath the screenshot for descriptions of said items.
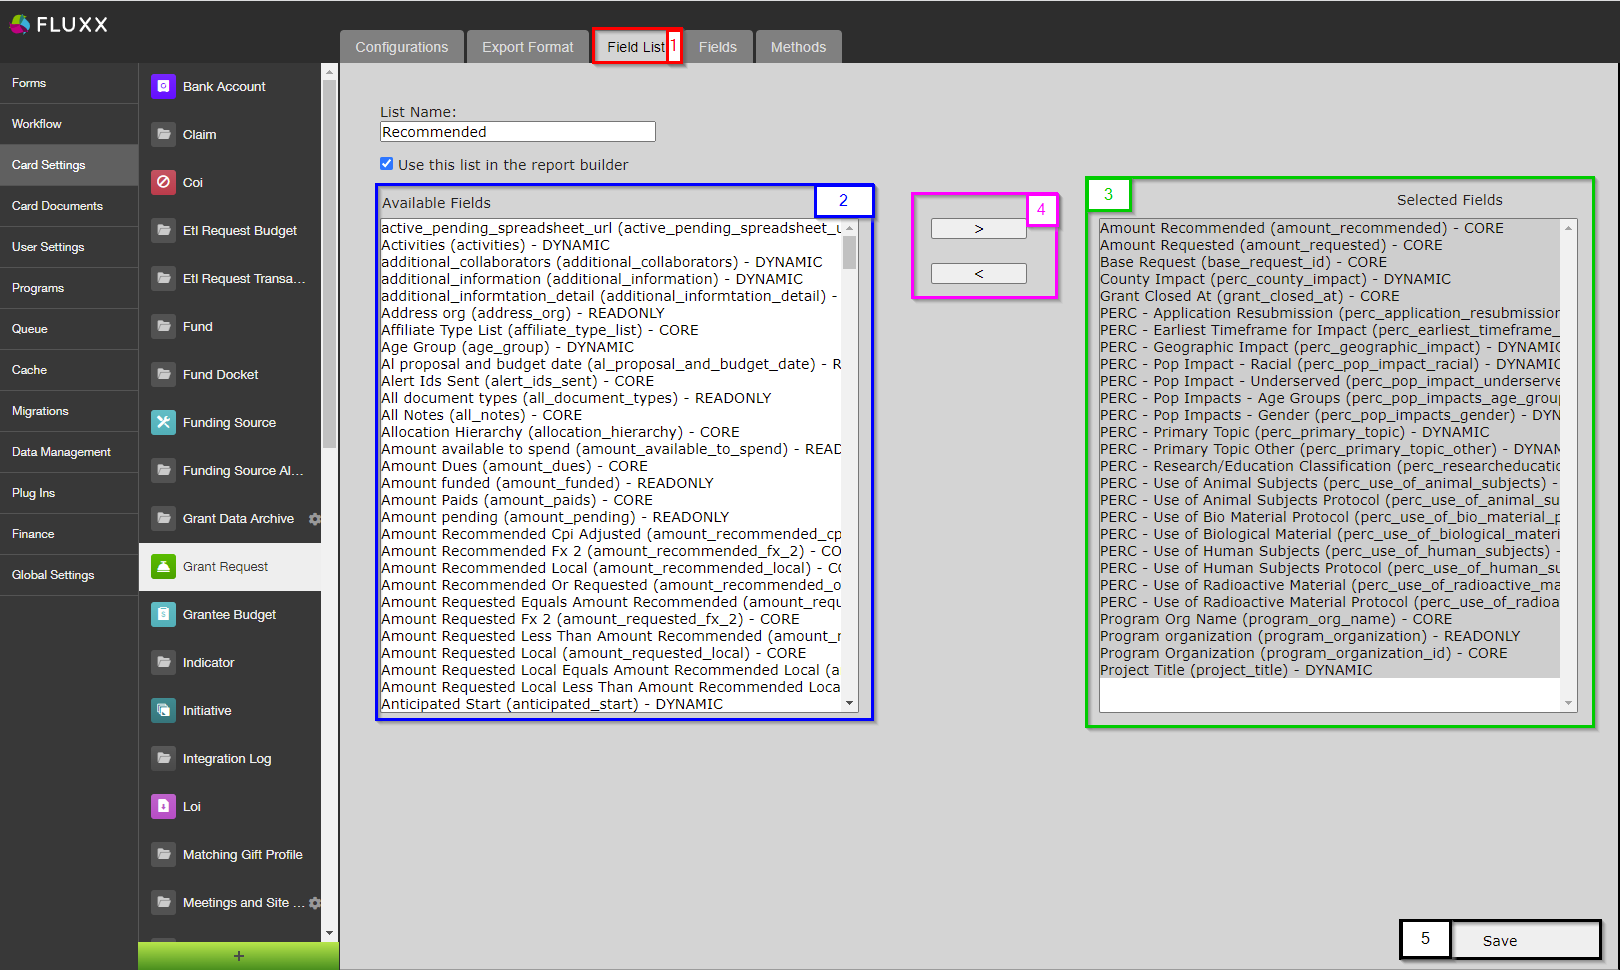
- Box # 1: Shows the Field List tab selected.
- Box # 2: Shows the list of all available fields for this specific Record Type.
- Box # 3: Shows the list of fields that have been selected to be considered "Recommended."
- Box # 4: Shows the arrows that allow you to move a field between the list of all available fields (again, on the left) and the list of selected "Recommended" fields (on the right). Click on a field from either list to highlight it and use the ">" arrow to move a field from the "Available Fields" to the "Selected Fields" (Recommended Fields) list and the "<" arrow to move a "Selected" (recommended) field back to the list of Available Fields (making the field no longer a "Recommended" one).
- Box # 5: Shows where you can Save your selections. You'll want to make sure to hit Save if you've made any changes whatsoever; if you fail to do so and click over to another tab, all unsaved changes will be discarded.