This page contains information relevant to the old Progress Report workflow and the transition period. For new state information refer to the Fluxx Progress Report Review page.
Summer 2023 Update
This workflow is in the process of being updated to remove external reviewers ("Progress Report Reviewers").
7/11:
- New forms have been added and old ones have been retired. Identify old versions by "(legacy)" appended to the old form name.
- Old forms now have fields to track comments for each stage of review (Finance, NSQ, Program Officer, and Admin), which have been populated with dummy values depending on status.
- Workflow for old versions is still the same with minor tweaks: 1) NSQ sends directly to Program Officer review, 2) Bundle is only triggered if sent for Admin Team Review, 3) Progress Report Review statuses are retired.
What to do:
> Create new progress reports using the new forms (this will be automatic as the retired forms can no longer be selected)
> When performing Finance, NSQ, or Program Officer review, enter your comments in the fields. This is not required yet, but is good practice for when it will be.
> Wait for training on new workflow (mid-August)
Background
The WPP's two committees (OAC and PERC) require that the annual Progress Reports submitted by grantees be reviewed by at least two committee members. This requirement is relatively new for OAC (since September 2022) but has been a requirement for PERC for a long time.
Prior to the WPP's implementation of Fluxx, these Progress Report were reviewed by PERC members outside of the grants management system that the WPP was using at the time (Blackbaud) and reviewed instead using Box (to house all of the documents + information about the progress reports) and Google Forms (for collecting the comments and recommendations of the committee members).
When the WPP went-live with Fluxx (September 1st, 2021), one of the first requests to the systems analyst was to create a new workflow whereby these reviews would be completed 100% within the grants management database.
This build and workflow went through several iterations and many rounds of testing within the Pre-Production environment between October of 2021 (when work officially began) and September 2022 (when the full workflow was built and implemented within the Production environment). On September 23rd, 2022 the first Progress Reports were sent for review by PERC members in the Production environment.
Workflow from Employee Perspective
The workflow for Progress Report reviews at first follows the workflow of (most) other requirements until it reaches the status of Program Staff Review.
First part of workflow (In Blue are the statuses that the record will pass through; in Green are the buttons used to move the record to the next status):
Status of New → Submitted by Grantee → Status of Finance Review → Finance Review Completed by Finance Team → Status of NSQ Review → NSQ Review Complete by Head of Finance Team → Status of Bundle Stage → Bundle Complete by WPP Administrative Assistant → Status of Program Officer Review.
Changes at and after Program Officer Review
Prior to the implementation of the Progress Report Review workflow, Program Officer review was the second to last status. At this stage of the workflow, the Program Officers would review the Progress Report and essentially had two options: request more information from the Grantee or directly approve the progress report.
With the changes, this status has become more of a "preparatory" status prior to the Progress Report Reviewers getting a chance to review/make their comments on the Progress Reports.
Program staff (and those assisting them) under the new workflow will use this status to select the Progress Report Reviewers who need to review the progress report. Once they have done so, they will use the workflow button to move the progress report to the status of Progress Report Review.
Only in the status of "Progress Report Review" will progress report reviewers be able to see/add comments to a progress report.
Selecting Progress Report Reviewers who will review
The first step to begin the Progress Report Review process is to assign the users who will need to review the progress report in question. To do so, navigate down to the "Internal" section found at the bottom of the Progress Report. Within the Internal section, open up the submenu called "Progress Report Reviewers." Within this submenu, you will find four separate fields for "Progress Report Reviewer # X" where X is which number reviewer (out of 4) the reviewer is.
As stated at the beginning of this article, at least 2 progress report reviewers should be assigned per progress report. Grants that are dual-funded (i.e. are receiving funds from both the OAC AND PERC committees) should be reviewed by four progress report reviewers.

Clicking on one of the four "Progress Report Reviewer # X" fields will display in a dropdown menu ALL of the possible Progress Report Reviewers in the system.
A few important things to keep in mind when assigning Progress Report Reviewers:
- Progress Report Reviewer # 1 and Progress Report Reviewer # 2 are both required fields to move to the next status. You will NEED to select two reviewers for those fields in order to be able to send the Progress Report to the Progress Report Reviewer Portal.
- From a system perspective, there is little difference between making a user Progress Report Reviewer # 1 vs Progress Report Reviewer # 2. The user will see the same questions and same instructions regardless of which number Progress Report Reviewer they are.
- However, each numbered reviewer can only see their own section. I.e. Progress Report Reviewer # 2 cannot see Reviewer # 1's (or # 3's or # 4's) responses/signature and instead will ONLY see the questions/signature fields designated for them.
- Progress Report Reviewers # 3 and # 4 are NOT required fields, meaning that you do NOT need to select reviewers in these fields in order to move the Progress Report to the next status.
- However, if the grant is jointly funded by OAC and PERC, these two fields should be filled out as jointly funded proposals should have their progress reports reviewed by two OAC members and two PERC members.
Making the Progress Report Accessible for the Progress Report Reviewers
Now that you've selected who will be the reviewers, the Progress Report should be made accessible for them to see/edit.
Navigate to the bottom right-hand corner of the Progress Report to find the "Workflow" button. Click on the button and, from the window that emerges from that button, click on the second button that says "Send to Progress Report Review." This will make the Progress Report accessible in the Progress Report Reviewer portal.

Next Steps
While in the status "Progress Report Review" every one of the progress report reviewers will all be able to review and edit (add comments) to the Progress Report. The issue here is that, if two Progress Report Reviewers go to "Edit" the Progress Report at the same time, they will come across a record lock and will be unable to add their comments on the record (however, they will still be able to view and review the Progress Report).
When a reviewer has completed their Review, they do not have the ability to move the status by themselves (as that could prevent other Progress Report Reviewers from being able to complete their review). Instead, they are instructed to email the WPP (wpp@hslc.wisc.edu) to let us know that their review is complete. Once all reviewers have completed their review, WPP Staff can move the Progress Report's status from "Progress Report Review" to "Progress Report Review Received."
From the status of Progress Report Review Received, Program Officers will be able to finally Approve the progress report should no additional information be needed.
Workflow from Progress Report Reviewer Perspective
(Pre-step 1 – Employee Task): Since the Progress Report Reviews are in their own separate portal (similar to how Grantees’ work and Reviewers’ work is done in separate portals), the user will need to have the “Progress Report Reviewer” Profile assigned to their user and the “Progress Report Reviewer” role assigned to them as well.
- Users start, as always, from the main portal log-in page. They’ll enter in their username (usually their email address) and password as they normally would to sign in.
- Since the user has the Progress Report Reviewer Profile attached to their user (see pre-step 1), when they sign in they’ll be prompted to select which Profile to sign into. They will need to select “Progress Report Reviewer”:
- From there, they’ll be brought to the main “Information” page of the Progress Report Reviewer portal. As with the “Reviewer” portal, they’ll use the left-hand navigation pane to access the tab “Reports to Review” where they can find all of the Progress Reports assigned to them for review. In order for reports to be visible in this portal, they need to have the status of “Progress Report Review” (otherwise they are hidden so that we can prevent folks from viewing the reports too early).
- Once they click on “Reports to Review,” they’ll be brought to the Progress Report(s) that they are assigned to. In order to begin adding their review comments/make their recommendations, the reviewers will first need to click the “Edit” button (as is standard across Fluxx for all records):
- Once they hit edit, they can still navigate the first part of the progress report (the part that the Grantee edited) but cannot change anything in this section (to preserve the data integrity of what the grantee entered/wrote). They’ll need to scroll down to the “Progress Report Review” section which is where they an leave their recommendation/comments. Each reviewer can only see their own recommendation/comments (NOT those of other reviewers). All 4 reviewers (we can have up to 4 reviewers per progress report) will see the “Progress Report Documents” (the Document Bundle that WPP's administrative assistant uploads) as well as the “Instructions” section and the “How to Submit this Progress Report Review” section.


Once we get an email from them, we have a workflow button only available to employees that we can use to push it to the next status of “Progress Report Review Received” (and from there to the status of “Accepted.”) Progress report reviewers will be able to see their own comments/recommendations after we do this by navigating to the other tab in the Progress Report Reviewer Portal called “Submitted Reports.”
Build for Progress Report Review
The build for this Portal and Review workflow is somewhat extensive. Since this workflow had to be designed from scratch (there's no equivalent workflow available by default in Fluxx), almost all of the pieces were built out manually by the systems analyst.
Note: To populate requests for testing purposes, you need to add a requirement to a grant*:
1) From a Grants card (green service bell icon or red/brown completed document icon), find the grant to generate a request for.
2) Navigate to Internal > Award Information > Requirements option and click the green plus.
3) Choose Single Report and enter details.
*There might also be a batch process for this, but the one-off option is sufficient for testing.
Progress Report Review Portal Itself: Build
The first part of the build is creating the Progress Report Reviewer Portal itself as well as the Profile needed to access said portal.
Creating the Portal Itself
The actual portal's done is done via dashboard template, as are the Reviewer and Grantee Portals.
The dashboard template used here is called: "External: Progress Report Reviewer Portal."

The "External: Progress Report Reviewer Portal" Dashboard Template that is used by the system as the build for the Progress Report Reviewer Portal
The dashboard itself is composed of three Cards. The first card is simply a Generic Template – exactly the same "data type" as the first Card found for the Grantee and Reviewer Portals. It's formed as text which can be changed/updated at any time without breaking the Portal.
The second and third cards are both Requirement cards but with different filters. These cards may appear blank on the dashboard view, but that does NOT mean that they will be blank for the Progress Report Reviewers. See the section below for more information on this.
The Reports to Review Card
The Reports to Review Card is set up using the filters found in the screenshot, below. While the filter may look a bit complicated, the idea behind it is actually quite simple. The card will first filter to ONLY reports that have the correct status of "Progress Report Review" (the status that all Progress Reports should be in to be able to be reviewed by the reviewers). The second "OR" logic section is where the "complicated part" comes into play. The section in Yellow (i.e. the section using "OR" logic in between the arguments) is ensuring that ONLY the specified reviewer will be able to see and review the Progress Report in question. Since we have 4 separate fields for the Progress Report Reviewers, we need to list each of the four fields separately. The criteria then state, essentially, "If I am Reviewer # 1 OR Reviewer # 2 OR Reviewer # 3 OR Reviewer # 4 then display this report to me." This section should not be touched unless you absolutely know what you are doing/need to add a fifth (or generally an additional) progress report reviewer.

Filters of the "Reports to Review" Card
This logic, while necessary to have the Portal display the right Progress Reports ONLY to the specified reviewers set up to review them, has some interesting side-effects. When viewing the dashboard "External: Progress Report Reviewer Portal," the card will most likely appear as completely empty to most staff. This, however, does NOT mean that there are no Progress Reports for review. Instead, since the logic ONLY displays progress reports in this card when your specified user is listed as Progress Report Reviewer # 1 - 4, the card will most likely be blank because most WPP staff will not be listed as a Progress Report Reviewer on any Progress Report.
If you need to make sure that a Progress Report Reviewer can correctly see the Progress Report(s) that is assigned to them, impersonate that user and sign into their "Progress Report Reviewer" profile. Only THEN will you be able to check the "Reports to Review" section and determine if they can correctly view the Progress Report(s) assigned to them.
The Submitted Reports Card
The "Submitted Reports" card is set up very similarly to the Reports to Review card. The only difference in the filters is that, instead of looking at the status of "Progress Report Review," the "Submitted Reports" cards looks at the two subsequent statuses: Progress Report Received (the status the Progress Report goes to after it is submitted by a staff member) and Approved (the final status that all Requirements go to once WPP has approved the report). In this card, Progress Report Reviewers are able to see the previous reports that they have submitted so that they can look back at past comments/suggestions made.

Filters of the "Submitted Reports" Card
User Settings Changes for the Build
This build adds a new Profile and a new Role for users to be able to access the portal, view Progress Reports, and have the permissions necessary to edit the Progress Reports so that they can add their comments/recommendation.
Creating the Profile and Using the Dashboard Template as the Portal
The next piece is to create the Progress Report Reviewer profile which Progress Report reviewers will use to access the actual Portal. Please see the screenshot below and highlighted items there within in order to understand the build for the Progress Report Reviewer Profile. To understand this page and these settings better, please be sure to first review the page User Settings Menu of the Admin Panel.

- Box # 1: Shows the User Settings menu of the Admin Panel as currently selected.
- Box # 2: Shows the Progress Report Reviewer Profile as currently selected. You can tell which Profile is currently selected NOT ONLY based off of the name (match name of Profile with "Description" from box # 3), BUT ALSO from the slim green line that appears to the LEFT of the Profile name.
- Box # 3: Shows the Name of the Profile that is currently selected. This can be changed without breaking any configuration, but please note that this will change the name of the Profile that users will sign into when they go to review progress reports, so it should be named appropriately so as to not be overly confusing.
- Box # 4: Shows the Profile Categories associated with this profile. This profile has NO categories associated with it.
- Box # 5: Shows the Dashboard theme dropdown menu. For this profile, we are using the settings Branded Theme Poral (New).
- Box # 6: Shows where we actually select the Dashboard Template that we want to use as the Portal's build. Here we select the Dashboard Template that we explicitly built for this purpose – the template External: Progress Report Reviewer Portal.
- Box # 7: Shows additional settings for the profile. Both boxes are checked – preventing Progress Report Reviewers from adding or removing dashboards and preventing them from accessing Workflow Notes.
- Box # 8: Shows where you can Delete this User Profile. This is highly dangerous! Deleting any User Profiles that are in use (as this one is!) will result in users immediately losing the Portal Access and permissions that they need to complete their work.
- Box # 9: Shows where you can Save your changes to this profile. If you've made any changes, you must hit the save button in order for your changes to be effectuated. Otherwise, your changes will be discarded.
Setting Up Rights for the Profile
Now that we've set up the Profile (and connected that Profile with the Portal), we need to give Rights to the users who enter in using the Profile. Otherwise, the users will NOT be able to perform actions such as editing the Progress Report (thus preventing them from leaving comments/their recommendation).
See the screenshot below for highlighted, important items from this screen. See beneath the screenshot for descriptions of said items.
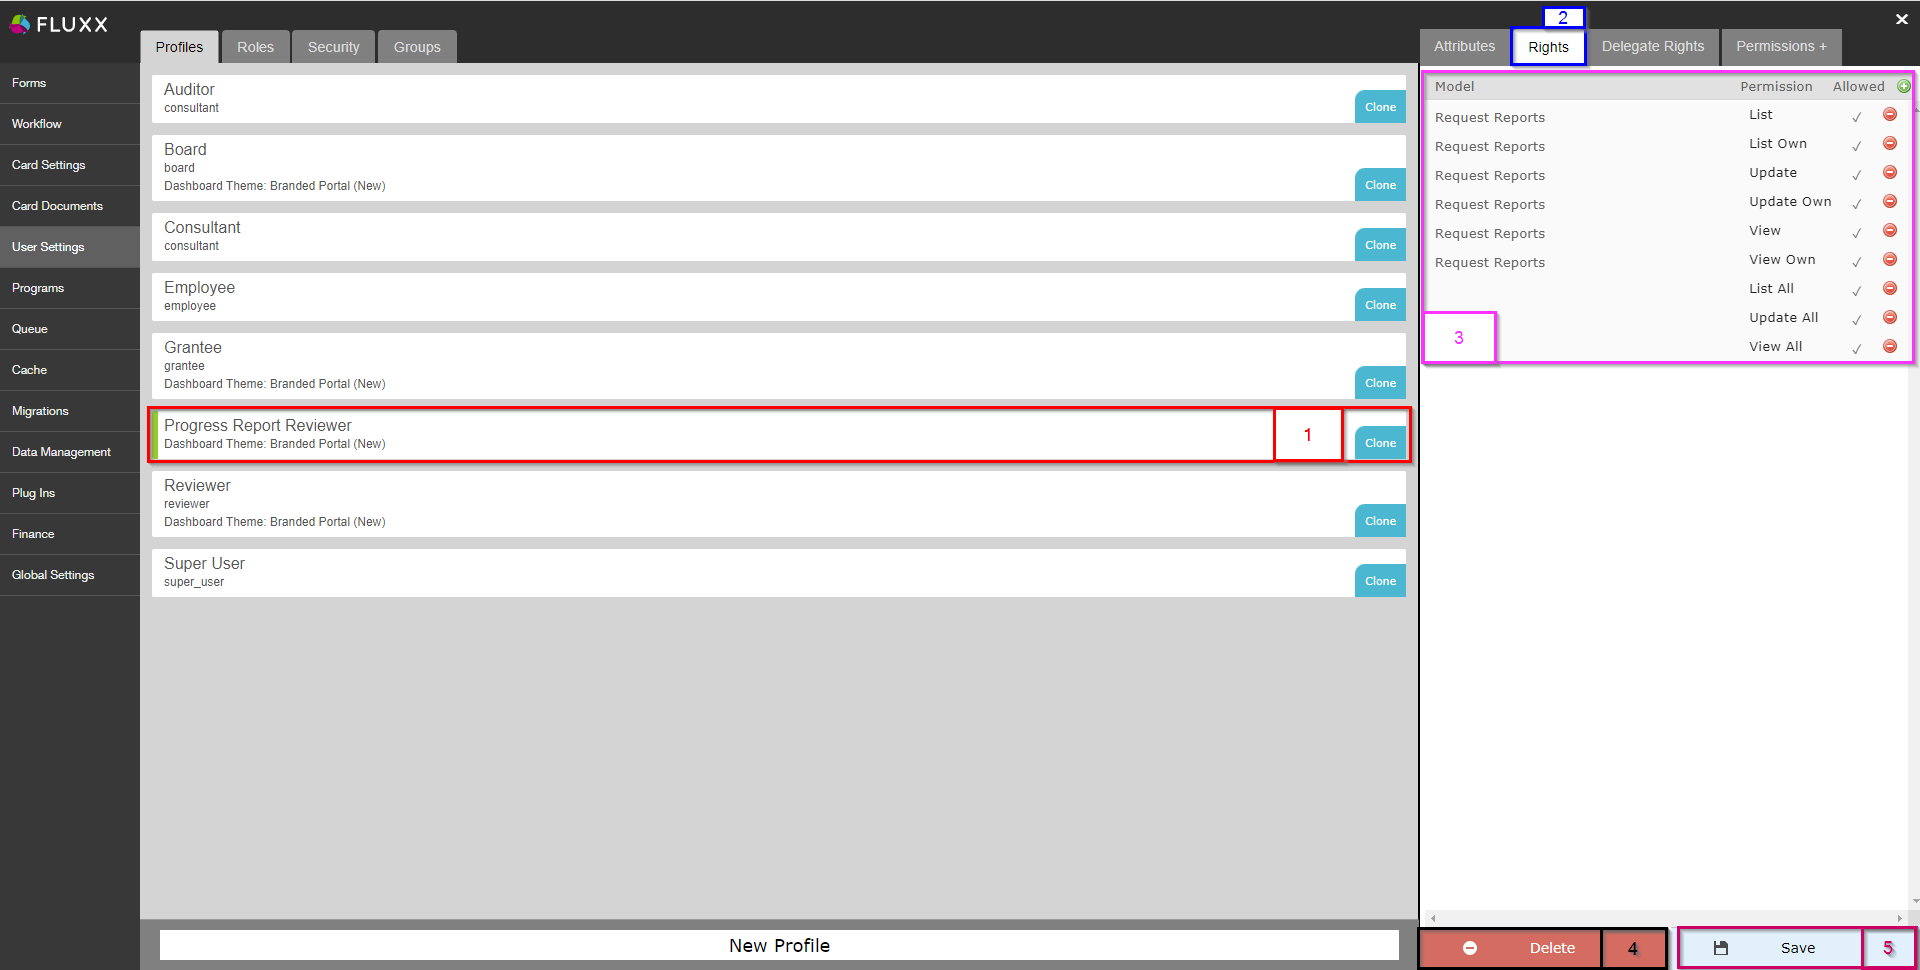
- Box # 1: Shows the Progress Report Reviewer Profile as currently selected. You can tell which Profile is currently selected from the slim green line that appears to the LEFT of the Profile name.
- Box # 2: Shows the Rights tab as currently selected for this Profile.
- Box # 3: Shows the rights currently configured for this Profile. Please change these permissions ONLY if you know what you're doing and have tested the change EXTENSIVELY in Pre-Production.
- Box # 4: Shows the Delete button where you can delete the Profile you currently have selected. This is highly dangerous! Deleting any User Profiles that are in use (as this one is!) will result in users immediately losing the Portal Access and permissions that they need to complete their work.
- Box # 5: Shows where you can Save your changes to this profile. If you've made any changes, you must hit the save button in order for your changes to be effectuated. Otherwise, your changes will be discarded.
Creating the Progress Report Reviewer Role
The next piece of the build is to create the User Role "Progress Report Reviewer" which will be used to give these reviewers permissions to edit the Progress Reports when they are in their queue. Please see the screenshot below for important, highlighted items from this screen and beneath the screenshot for descriptions of said items.

- Box # 1: Shows the User Settings menu of the Admin Panel as currently selected.
- Box # 2: Shows the Roles Tab as currently selected.
- Box # 3: Shows the Progress Report Reviewer User Role as currently selected. You can tell which Role is currently selected from the slim green line that appears to the LEFT of the Profile name and by matching the Role name with the name shown in Box # 5.
- Box # 4: Shows the Roleable Type dropdown selection box. For the Progress Report Reviewer Role (and all Roles used by the WPP) we use the Roleable Type of Program.
- Box # 5: Shows the configurable name of the Progress Report Reviewer Role type. This can be changed at any time without breaking anything in the system. However, please avoid doing so, as we've trained employees on the current names of the Roles we've configured.
- Box # 6: Shows the Delete button where you can delete the Role you currently have selected. This is highly dangerous! Please only delete roles that were created in error and are not attached to any user accounts; deleting any Roles that are in use will result in users immediately losing the permissions that they need to complete their work (i.e. being unable to edit the Progress Report that they need to review).
- Box # 7: Shows the Save button where you can save any changes made to the Role. If you've made any changes, you must hit the save button in order for your changes to be effectuated. Otherwise, your changes will be discarded.