If you need support and the systems analyst is out of office, here are some suspected FAQs and quick responses to those FAQs.
Fluxx Links
- Fluxx Employee Reference Guide (Reference Guide written for WPP staff by systems analyst)
- Fluxx Grantee Reference Guide (Reference Guide written for WPP grantees by system analyst)
- Fluxx and Liquid Code Reference Guide (Reference Guide provided to WPP by the GrantBook i.e. implementation team during Fluxx go-live)
- Fluxx SMPH Past JIRA tickets (tickets that WPP staff have opened for Fluxx issues)
- Fluxx JIRA ticketing system (where you can ask questions to Fluxx staff directly)
Some Frequently Asked Questions (FAQs) and suspected FAQs:
I'm not able to log into the system!
Could be two flavors to this:
- Flavor # 1: I'm not getting the "Reset Password" email from Fluxx needed to ensure that I can change my password. How can I change my password without the email?
- Comments on Causes and Frequency: This issue is for one of two reasons. The first is simple: The user's email address in the system is wrong. Correct it in Fluxx, and this problem can be resolved. The other is weirder: they simply don't get the email despite their email address being correct. This is a rare one, but can definitely happen. The reason that this occurs is not yet clear (it looks like Fluxx just doesn't queue the email), but the fix is straightforward.
- Fix to Issue: Pull up the user's People record within Fluxx (you might have to open the People Card on your dashboard if you have not already). Hit "Edit" on the users record. Set a generic password for the user (something like Wisc123 or Fluxx123 work great) and email the user back with this generic password. Tell them to log into Fluxx with their email address and that generic password, and then tell them to change their password as soon as they can.
- Flavor # 2: I'm getting a weird error message that says "We're sorry, but something went wrong" when I try to reset my password.
- Comments on Causes and Frequency: This is more common from my experience than Flavor # 1 of this issue, but still does not happen to all users. Unknown cause (possibly a connection timeout or something like that).
- Fix to Issue: This one doesn't need a "Fix" per se. While the user is confused because they got an error message, the system actually does save the password they entered. So, the user just needs to go back to the WPP Fluxx main page (wpp.fluxx.io), enter in their email address for their user name, and enter in the password they just created into the password box. That will allow them to sign in as normal.
- Screenshot of error message from Issue # 1, Flavor # 2:

I'm not able to see some of the Requirements I thought I would see.
- One issue, but there's usually an order of things to check. First thing to check is: Are the requirements correctly loaded for this grantee?
- To check this, head over to the dashboard called "3. Requirements Dashboard"
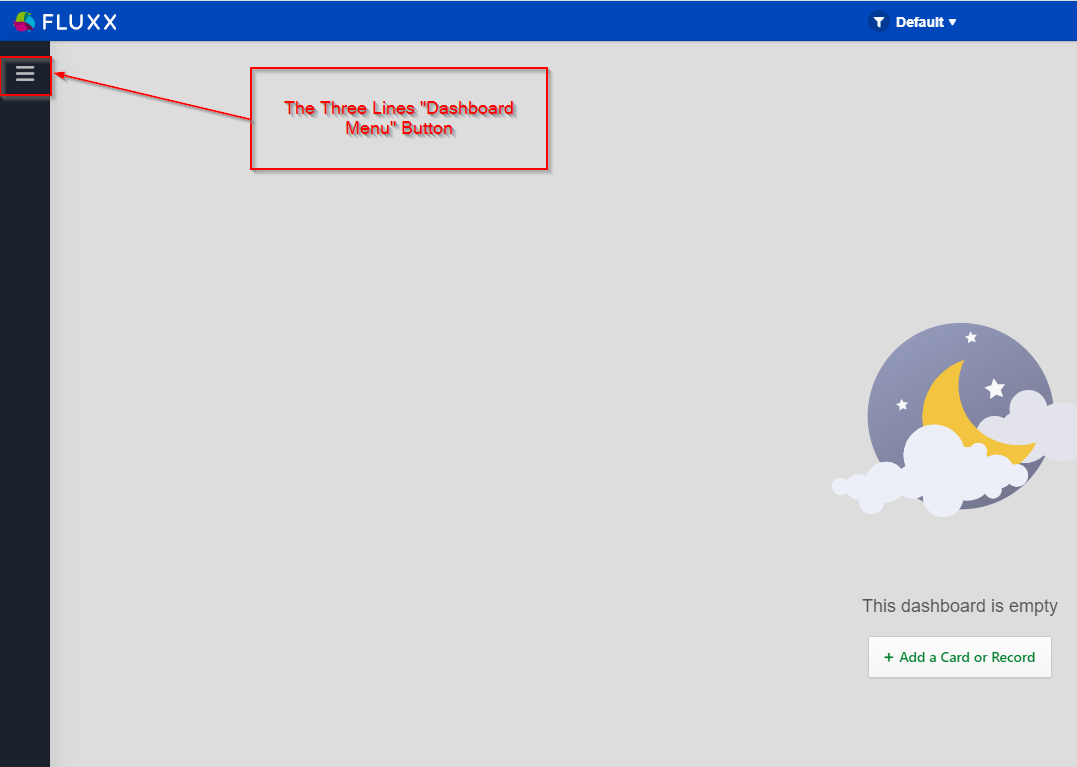
- To get there, first head over to the Three Lines "Dashboard Menu" button (see screenshot, below, for location of the button).
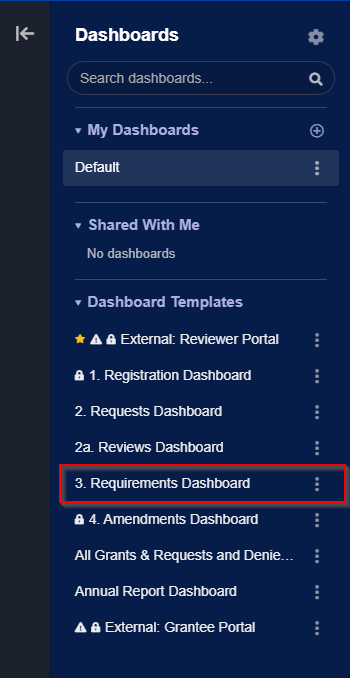
- That will pull up the Dashboard menu, shown below. From this dashboard menu, select the Dashboard Template "3. Requirements Dashboard"
 |
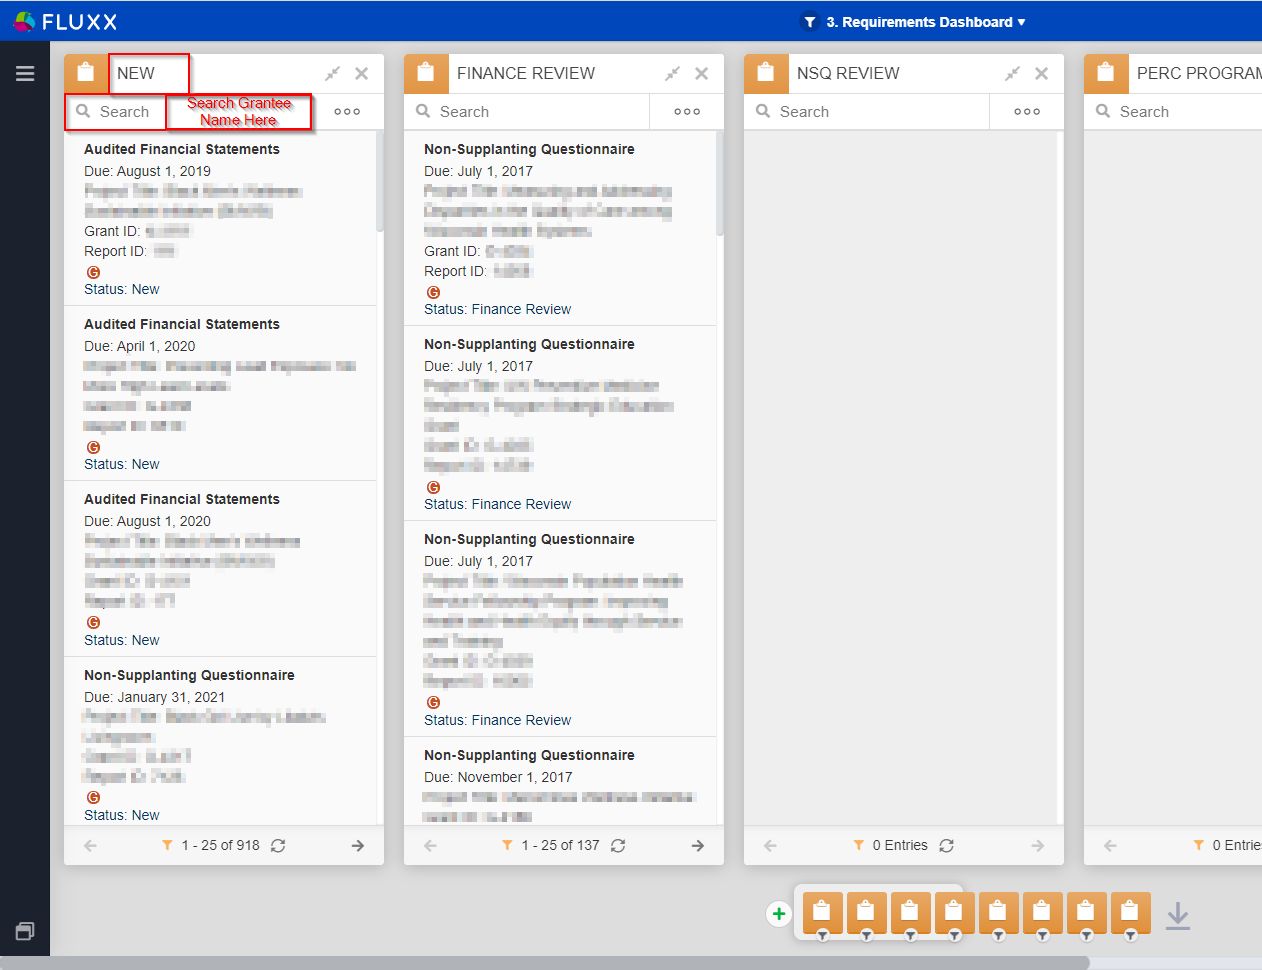
|- That will pull up the dashboard shown in the screenshot below. In the Card found to the far left called "New," you'll find all of the Requirements that are outstanding with grantees. In the search bar in that Card, you can search the grantee's name to see if their report is correctly published to them. If you can see the requirement on the backend, then the likely lies within the Grantee Portal. If, however, you are unable to see the requirement from this dashboard, you may want to contact Jon Thomas to have him check to make sure that the requirement needs to be there/was built correctly.
- If you did NOT find the Requirement within the "New" card, keep checking the various other cards on the Requirements dashboard going from left to right. Move next to "Finance Review" and so on.
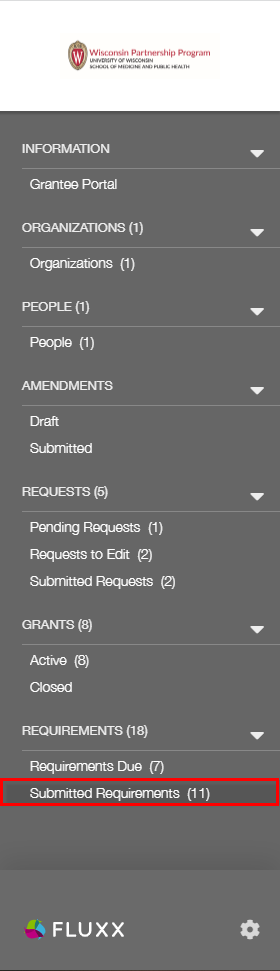
- If you DO find the Requirement in one of the other cards (i.e. NOT the new card), instruct the Grantee to check out the "Submitted Requirements" tab in the Grantee Portal. Any requirement that is is a status OTHER THAN "New" will be found in the "Submitted Requirements" tab:
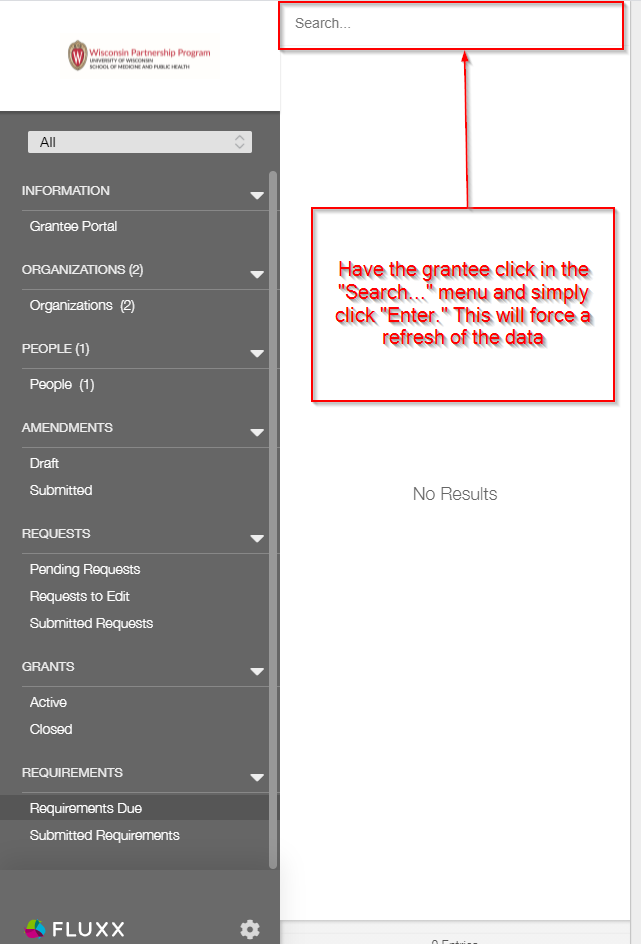
- Assuming that you found the Requirement from this Card, you'll want to have the grantee try to refresh their requirement card to see if that pulls in their report. Within the Grantee Portal, have them go to the "Requirement Due" tab, click on the "Search..." bar, and hit the "Enter" button to force a refresh (see also the screenshot, below). This should pull in any requirements that were not previously showing.
- If the grantee is still unable to see their requirements after the refresh, try Impersonating the user and checking out their "Requirements Due" section for yourself. If you can see their requirement while logged in as them, take a screenshot and send to the grantee (sometimes, they don't know they need to scroll down to see all of the requirements available to them).
- If the user does NOT have a requirement that they should have, you can contact Jon Thomas/Mai Nou Her and one of them will be able to create the Requirement for the grantee.
Help! I can't edit/add information to a Requirement that I need to submit!
- This should be an easy one. Usually if the grantee can't edit/fill out information in the Requirement they are looking at, it's because they haven't clicked the "Edit" button at the top right-hand corner of the screen. If they are NOT able to see the edit button, this is usually (99% of the time) because they don't have the correct User Role assigned on their user record. If they're trying to fill something out in the Grantee portal, they should have the Grantee Role attached to their user.

I Want to Access Our Application In Progress But I Don't See It In My Portal
When we have an application cycle open, we can get some questions from grantees about not being able to see their in-progress applications in the portal. Here are the two most common issues and solutions:
Either: I started my application but now I can't see it! Or: I can see my application but I can't add any information to it!
This is usually a result of grantee confusion, but there can sometimes be legitimate issues that we can fix in order for them to see/edit their application.
Here are the things to check that everything is set up normally:
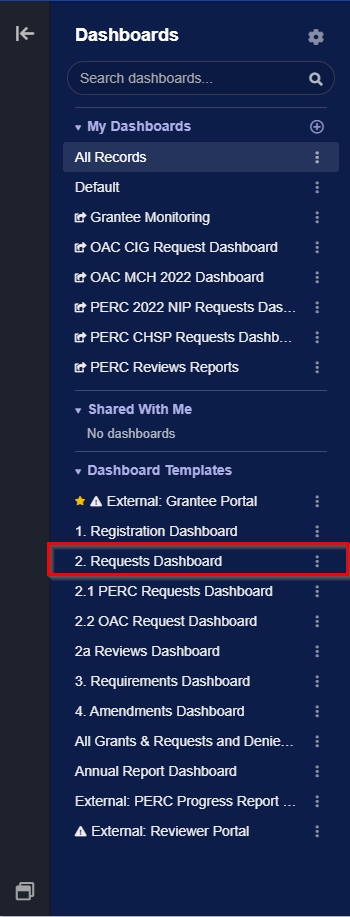
- Step # 1 – Can YOU see their application (from the employee portal)? You can go to the Dashboard manager and check out the Shared Dashboard "2. Requests Dashboard" which shows all current application records.
- Dashboard manager showing where you can find the "2. Requests Dashboard":
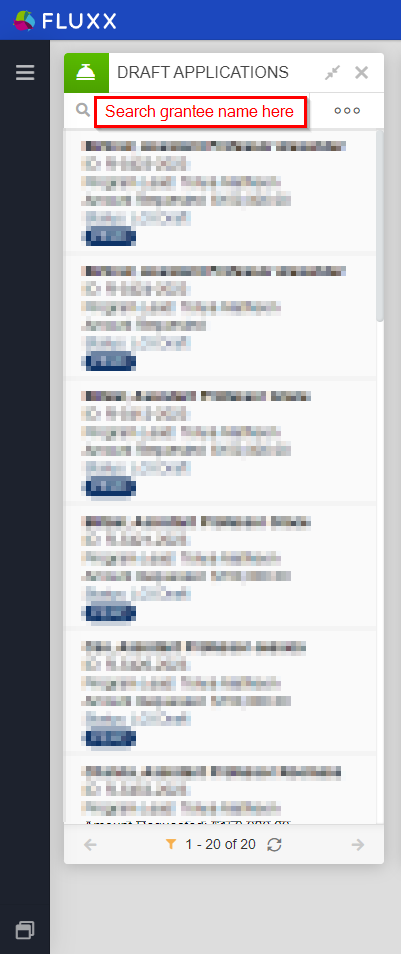
- From "2. Requests Dashboard," look at the card farthest to the left called "Draft Applications" (draft applications are ALL applications that have been initially begun by grantees but have NOT yet been submitted for the first time). In the search bar at the top of the card, type in or paste the Grantee's name to see if you can find their application in drafts. If you CAN find the application, proceed to step # 2.
- If you are UNABLE to find their application within the Draft Applications card, start checking the cards to the right of Draft Applications one-by-one. Next in order is Eligibility Review (where applications go immediately AFTER they have been submitted), so type in or paste the Grantee's name in that search bar next to see if you can find their application; repeat this step for each subsequent card to the right on the dashboard to see if you can find their application.
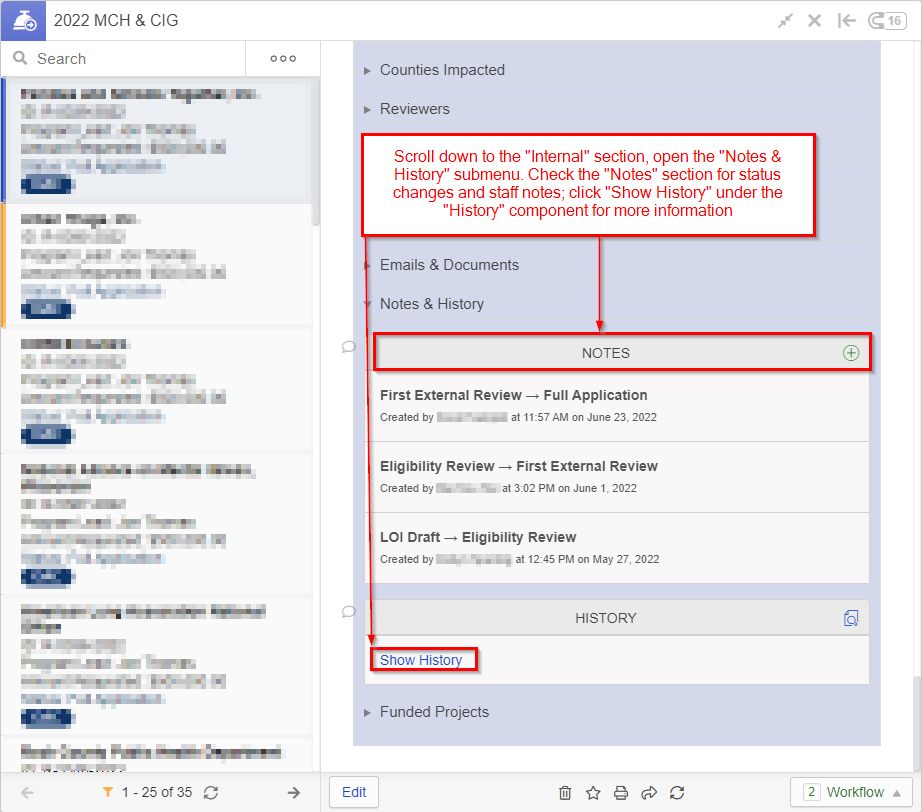
- If you DO find the application in one of these other cards, go ahead and check the Audit Trail (AKA History in Fluxx). You can do so by scroll down on the application until you reach the Internal section. Within the Internal section, there's a submenu called Notes & History; open it. The first place to check is the "Notes" component. This will give you high-level information about the application, such as status changes (including who performed the status change) and any staff notes. Likely, you can "tell the story" of what happened to this application just by using the notes section. However, if you need more details there is also the full History. Below the Notes component, find the History component and click on the blue link that says "Show History" (see also the screenshot below). This will allow you to see exactly who changed what and when in case you had any lingering questions.
- If you still CANNOT find the application, you can always check if there's any linked Request records to the Grantee's User record by pulling up their User record in a User card.
- If you are unable to find the application via any of these means, it's possible this user canceled their application after creating it but before saving it (basically, deleting the application – the positive thing is that this however can only happen on initial or round 1 applications as anything in round 2 will already have been saved), in which case there isn't anything to do other than:
- Have them start a new application (recommended)
- Create a new application for them (if they are unable to for some reason) and assign the organization and primary contact of that application to their organization and user respectively.
- Step # 2 – Check that the application is set up correctly and visible by the Grantee: Once you've confirmed that the application exists, now we need to make sure that it's set up for the Grantee to be able to see it. Pieces to check:
- Is their organization/user attached to the Grant? It would have been difficult to find the grant if this the user/their organization isn't linked to the grant, but still always important to check.
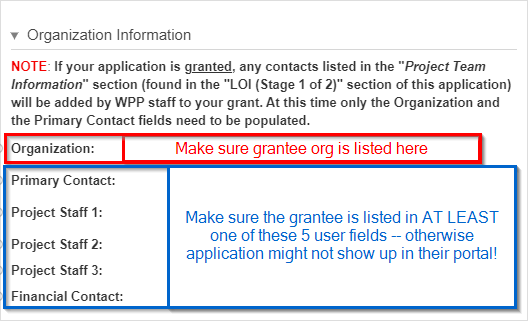
- Check the "Organization Information" section of the application (always near the top). Next to "Organization:" there should be listed the primary organization applying for this grant. Under that, there are 5 user fields; the Grantee's name should be filled out in at least one of those 5 user fields. This will ensure that they have access to the application from their user portal.
- If the user needs to be added to the application, but the Grantee's name does NOT appear in one of the dropdown menu when selecting one of those users, then the organization is NOT linked to the user (and vice versa). Go ahead and create the relationship between the user and the organization record. Once you've done so, the user will be selectable from those dropdown menus. Select the user in one of those 5 user fields and save the record.
- Is their organization/user attached to the Grant? It would have been difficult to find the grant if this the user/their organization isn't linked to the grant, but still always important to check.
- Step # 3 – After verifying that the application is set up correctly, see the portal through the Grantee's eyes: After completing steps # 1 and 2, we can be sure that the application is set up correctly so that the Grantee should be able to see it within their portal. Now, we should attempt to log in as the grantee to see things as they would in their portal.
- In order to do so, go to a User card. Search for the Grantee in the card's search bar and click on the grantee's name when you find them. On their record, scroll down until you see the internal "Login Information" section. From within there, there is a link called "switch to this user" which will allow you to sign in as if you were the grantee. Click on "switch to this user" and check out their portal. See also the screenshot below for more details.

- From within their portal, use the left-hand dark grey Navigation Bar and find the collapsible "Requests (#)" menu (where # represents the number of applications found linked to the grantee's user). Under that menu, there are two tabs to check: Pending Requests (for applications that have NOT ever been submitted and are in draft status) and Requests to Edit (for applications who are in Round 2/Full Application status). You can more easily tell where to find the application by seeing if either Pending Requests or Requests to Edit have a "(#)" next to the title; if so, the # represents the number of applications that can be found in that tab. For the example shown in the screenshot below, you'd click on Pending Requests to find the Grantee's application since that tab has "(1)" at the end of its name. If you can find it here in their portal, take a screenshot to send to the Grantee to explain where they need to look in order to find their application.
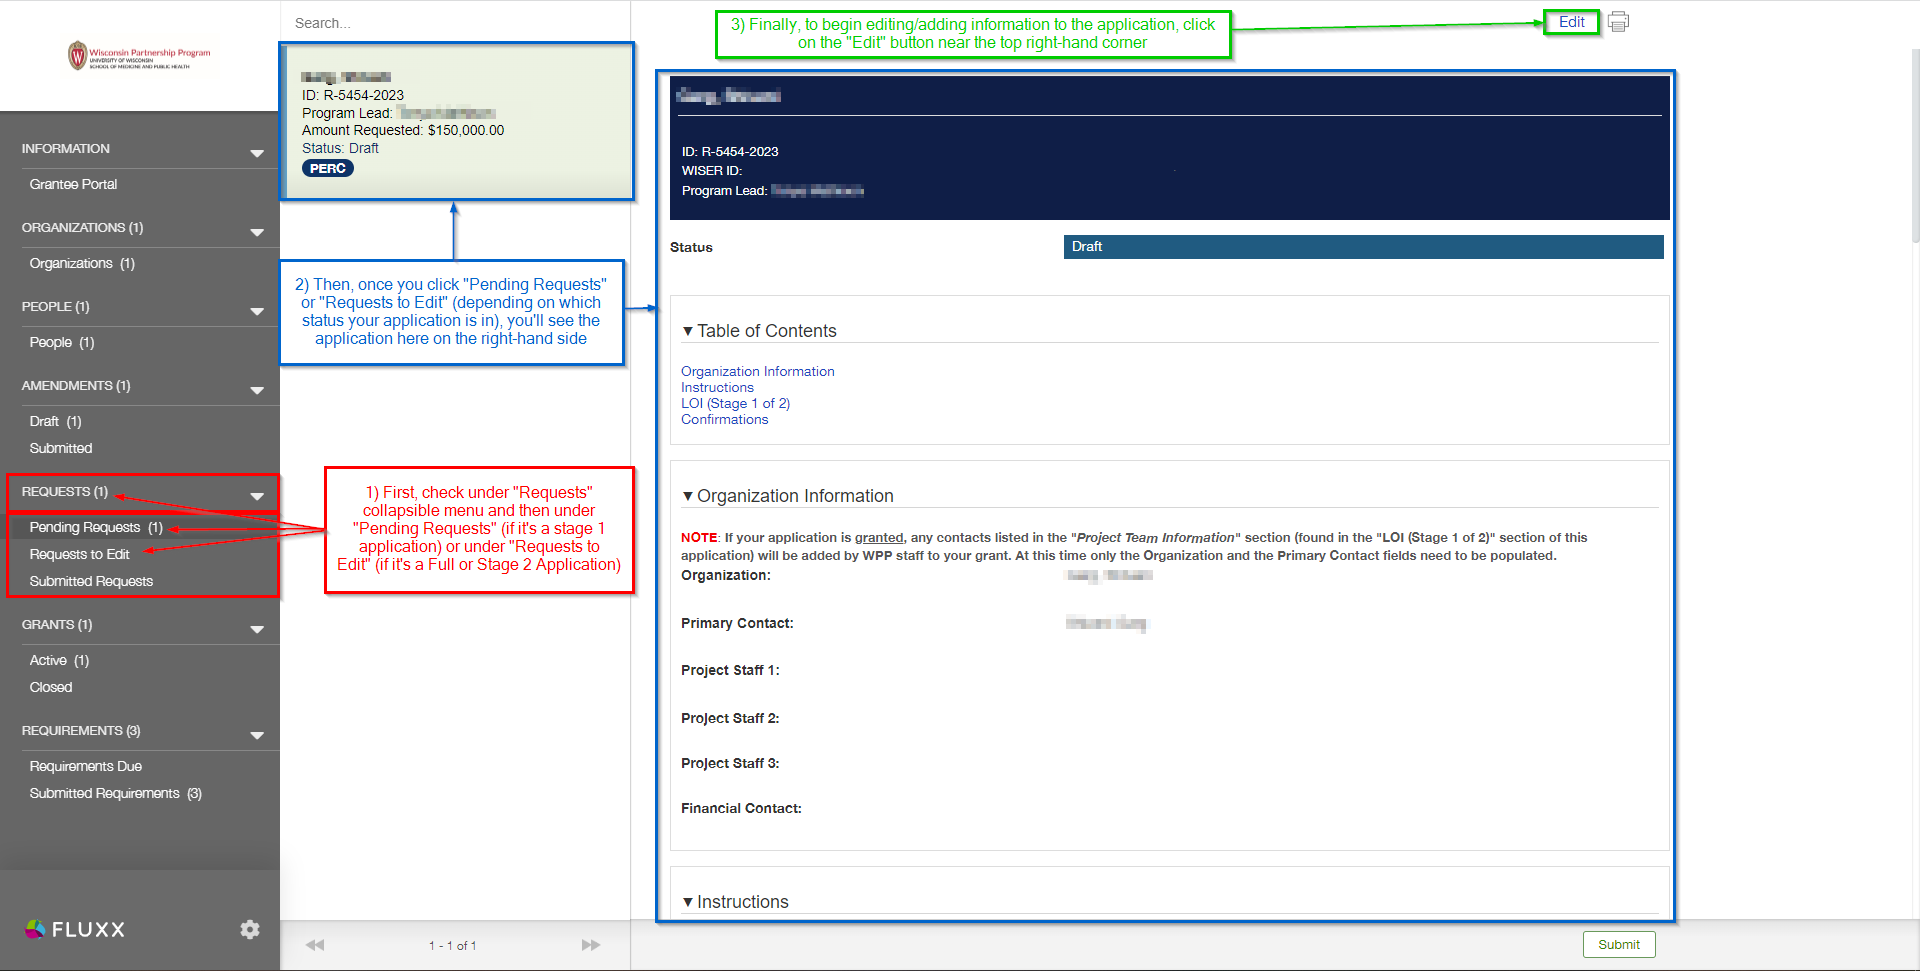
- Step # 4 – what if they don't know how to edit the application? As in the screenshot above, they'll need to click the "Edit" button in order to start editing/adding information the application.
- What if the user can't see the edit button? If they cannot see the edit button, the answer is almost assuredly that they do NOT have the required Grantee Role in order to be able to edit this application. Add the Grantee Role to their user record and the edit button will appear for them as it shows in the screenshot above this.
My Review is "Stuck" and I'm Unable to Update/Edit It
This is an odd error that's only occurred 2 times since Fluxx's go-live. Essentially, the Reviewer can NOT select whether or not they have a Conflict of Interest and so cannot complete this review. Here's the information you'll need to fix this:
- The Reviewer's Name
- Which grant the review is for
First, impersonate the user in question and check out the Review in their portal; if you are able to select a Conflict of Interest designation, then the reviewer might just be confused. However, if you are ALSO unable to select a Conflict of Interest designation, follow the steps below.
Resolving the Issue
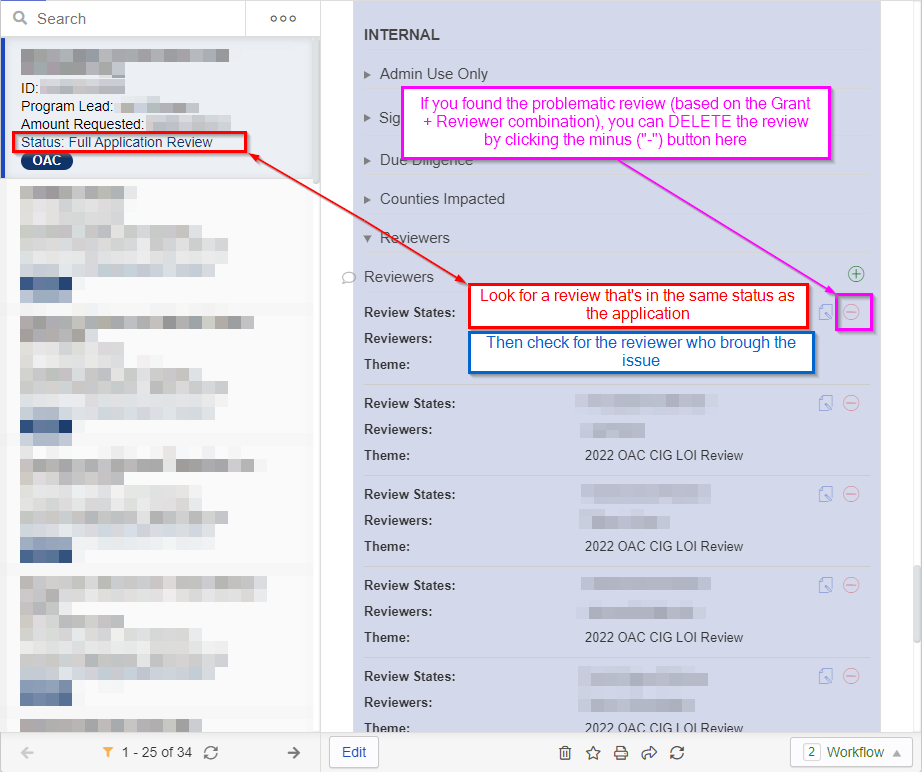
Once you have this information, go to the application record in question. Scroll down to the Internal section and open up the "Reviewers" submenu. Once you find the Reviewer set in question (look for the same Reviewer and the status that the application is currently in), you should take a screenshot/take note of:
- The Review State(s)
- The Reviewer (this should be easy to remember since they are the requestor)
- The Theme (also called the Review Form).
You should then delete the review set. See the screenshot below.
Once you've done so, you'll want to recreate that reviewer set (that's why you took a screenshot/made note of the key information above).
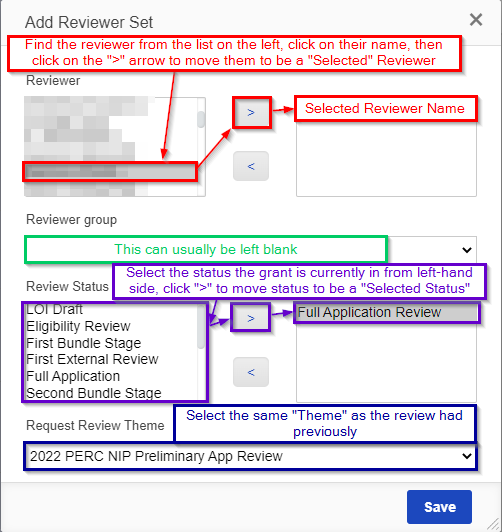
Click on the Green Plus ("+") button next to the Reviewers title to create a new Reviewer set:

Once you click on the Green Plus ("+") button, a window will pop up called "Add Review Set." Basically, select the same Reviewer, the same status, and the same Review "Theme" as were selected previously. This will restore the Review and allow the user to go in and edit it as normal. See also the screenshot below for a visual representation of how to create the Review Set.